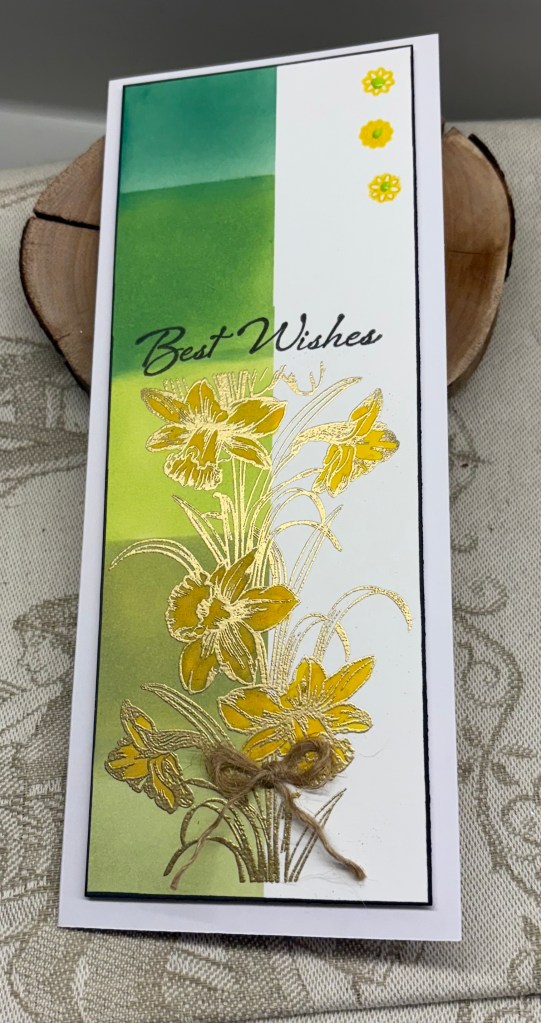
Art deco look


Standing up and open

Our current challenge here at Double Trouble, is to use 3 layers, 2 pattern papers and a sentiment, but you can also use the sketch at TSOT # 677, and make a fan card which is what I chose to do. They look difficult, but are actually easier than one thinks. Due to backlinking I cannot enter my card into the TSOT challenge, but it is an example of combining the two challenges for anyone interested.

I followed a tutorial found HERE as this person had changed sizes to an A2 style which is my preferred size to use. Also one of my stamp buddies has done a card like this and she recommended the same tutorial.

My card uses a mat gold card base, PP from CTMYH, small piece of PP from a paper pad, a sentiment from Spellbinders, a Hero Arts die cut, and my butterfly is from StampinUP. I may not be correct about the PP being from CTMYH as I’ve had it for a long time and I don’t remember this pattern from StampinUP. I went around the sentiment die cut with a Spectrum Noir marker in navy to match the dark PP. It is quite an effective card visually and fits into a regular size envelope.

Thanks for stopping by, I appreciate you and your time.

not a flower in sight

As you can see from the above graphic, the challenge specifies no flowers at Seize the Birthday.

Having seen something like this on Instagram recently I wondered if I would be able to create something similar and this card is the result. Prior to adding the angled masking strips I used some tape to mask off an area that would become the sentiment space. Then using Gina K masking strips I masked off each section in angles. With some additional paper to mask as I was sponging, I proceeded to add colour in each space. Even with masking carefully I still managed to mess up a couple of edges, but not badly enough for me to have to begin over. The card I saw, had the artist using markers to fill in colour and then different colours in circles over each area creating a kind of Bokeh effect. In mine I used inks and sponges and then a stencil from TCW called crazy waves and sponged white pigment ink through the sections. Although it was visible I felt it needed a lift so I brushed Perfect Pearl powder in white over the top and the ink caught the shimmer really well. My butterflies are from Scrapbook.com and I used a pale lavender shimmer piece for the bodies with gold mirror for the pattern pieces. I also used a small body die from StampinUp to create the bodies for the butterflies as to my eyes they needed it. I used a Hampton Arts stamp to add the sentiment, masking off the unwanted word before stamping as the sentiment was too long and I didn’t want to cut the stamp. I backed the rainbow layer with foam tape and then added it to the card front. A few small clear gems and my card was finished. The most work was creating the masked off areas before adding colour.

I’m quite pleased with the end result and because I had inks and sponges out I did another slim line piece for a different card you will see in a future post. Thanks for stopping by, I appreciate you and your time.

We’ve had 48 hours of rain, which has lessened the fire danger dramatically and enabled fire fighters to keep a handle on a bad one burning up island. It has also ensured a lot of the smoke has dissipated which is good for all of us, but in particular people with chest conditions. I feel a sense of relief and although more sunshine is coming it isn’t likely to be as hot as the past couple of weeks have been.

Al fresco fun

The challenge at As You See It is: Challenge #354 – Dining Al Fresco. These days I’m not into sitting on beaches or on the ground in parks so I chose to keep my design as a more refined way to be outside. It is also our 45th anniversary tomorrow, which we both find hard to believe. I may give this card to my hubby which will make him laugh. Why? Well we usually forget our anniversary on the actual day and it has become a joke between us.

As it happened, I had this frame already cut on my desk because my original thought was to make a tablecloth and add things to it and I had the paper ready. After pulling it out various stamp sets I couldn’t find anything I liked that worked with what I had in my mind so instead I die cut the paper into this frame. Didn’t have time yesterday to do more but today I found this image and decided it would work. The stamp set used is from GKD and I stamped in black and then heat embossed clear. I added the birds by hand after sponging a bit of ink to give the look of sky. The sentiment is from a small YNS set and I cut it with an Infinity Oval from Hero Arts. Went around the edge with a marker and added the tiny heart. The corner hearts are the fallouts that I coloured solid red added a touch of glitter and Nuvo drops for dimension.

I’m actually pleased that I went in this direction rather than with what my original idea, as it has worked quite well and the card is more CAS. Thanks for stopping by, I appreciate you and your time.

Escape the ordinary

Dawn has chosen the theme Scenic, for our latest challenge here at cardz4galz. You can create your own scene or use a topper/paper image as you wish.

As I’m playing with my latest items that came as a birthday gift from my hubby, I decided to use one of the die sets in the kit. This is from Spellbinders called Deckside Dreams. It is a cool set. I used mainly oddments of scrap CS for my ship. The background is done with a StampinUp folder, the wave seafoam is from Kokorosa, the fish is a Gummiapan die, sentiment from Spellbinders and the sun is from an unnamed stamp set that I fussy cut. The little seagull uses a hack from Jennifer McGuire that she demonstrated, and it worked so well.

To be honest the fish was added to cover up a small smudge on the ships hull. I had some issues with gluing the stripes and must have gotten some glue there accidentally. Years go I would have freaked to have something like this, today, its a shrug my shoulders event, and what can I do to hide the booboo?

I’m rather pleased with my little scene and love the dimension this die set creates. It was fun to make this one. I look forward to seeing your ideas in the gallery over the next 2 weeks. Have fun.

Thanks for joining me today, I appreciate you and also your time.

bee happy decoupage

Every once in a while a challenge comes up that I already have something done that will work. The current one at Double D is one of those. Their challenge is Bee Happy Challenge and I had been playing with decoupage a while back and had this little image all ready to go. Even the oval was cut as it was left from another project. All I had to do was put things together in a pleasing arrangement.

I used a scrap piece of CTMYH CS that was slightly damaged for my background as it reminded a little of the honeycomb. I used a stamp from an unbranded set to add the sentiment and stamped it onto a piece of CS that I had used to mop up leftover ink. Also used one of the tiny bees in its corner. The 2 bees on the gold piece are transfer stickers and I added the 3 hearts, I think by StampinUP, for interest. Dies used are Hero Arts infinity ovals and a mixed edge rectangle by Essentials. The decoupage is from a kit from Crafters Companion.

Considering how busy I seem to be this week, getting this card done and posted is a nice bonus for me. Thanks for stopping by, you and your time are greatly appreciated.

spotlight floral

Our challenge recipe #197 at Double Trouble is to use the spotlight technique. Image following shows the recipe.

The stamp I used is an old unmounted rubber stamp from an unknown source. The square scalloped edge die is from LawnFawn and the small circle is a Sizzix set. Sentiment is from a dollar store Forever in time set. I coloured the image using watercolour pencils using 3 colours, Pink, green and yellow. The tiny gems are from Spellbinders. I used foam tape behind the focal image to lift it from the rest. I think this is a simple but effective card.

We hope you have fun joining in with your own creations and look forward to seeing them in our gallery.

Thanks for spending time with me today. I appreciate both your time and any comments you may leave.

favourite colour

The latest challenge at Seize the Birthday #310-Use Your Favorite Color. My favourite colour is almost always purple in any variation and I like it paired with yellow and or gold. I wasn’t too sure of what I might make for the challenge so decided to just play around with a few scraps and some dies. This card is the result of playing. I had no real idea in my head, except that I wanted it simple. My card front is from GKD, the dies used are from Essentials Mixed edge rectangle layering basics and a heart shape from Hero Arts infinity dies. I cannot remember which stamp set the sentiment is from as it was one of several I had in my stash of oddments although I suspect it is from a dollar store stamp set. The purple paper is from StampinUP and was sitting around on my desk for several weeks. I didn’t like the patterned side but I love the variation in tone on the purple side. The yellow is what I have in my stash. I cut another heart from gold which I then cut in half and added behind the purple one to give an edge to it. This was then popped up with some foam tape and added after I had glued the rectangles in place.

This is quite a simple card, and I like how it turned out. Using this die set was also a good idea as I’ve had it for some time and not used it nearly enough. Thanks for stopping by, I appreciate your time and any comments you may leave.

Black, white and gold elegance

A little thinking was required before I figured out an idea for a design at the current As You See It challenge. Fortunately, during a brief shopping expedition today, I saw a metal sculpture that gave me the idea for this card, and I quite like how it turned out. Picture below. Just Add Ink, has a Christmas in July challenge on so I shall add this to both these challenges.

First I used a couple of EF designs, one with stars and the other Poinsettia and ran scraps of black, gold and white CS through using them. Then I took some circle dies and cut them into three larger circles with scalloped edges and several smaller ones.

Supplies used: Hero Arts infinity circles, Sizzix scalloped circle die, Scrapbook.com glitter paper, Trinity Stamps bauble shaped gems, GKD sentiment heat embossed in Gold. Folders are from StampinUP and Taylored Expressions.

as seen in a store.

When I stamped my sentiment, I hand cut it and used a black Copic pen around the edges so it would stand out a little.

Thanks for stopping by, you, your time and any comments you may leave are appreciated.

happy mail

The challenge at https://cardz4galz.blogspot.com/ as chosen by Sue, is to make a fun fold and I chose to do an uneven gate fold. The little envelopes had originally been done for a colour challenge but I changed my mind and did something entirely different. Having them in my bits and pieces box ready to go I decided to use them here, particularly as I need a new home card. The background was something I created a while ago using various mica sprays so I cut it to fit the two folded panels. I also added some leftover strips down the side panel. The stamp set used is by Kitchen Sink and I’ve had it forever. I think I won it through the Mod Squad. I fussy cut two of the sentiment pieces but used my Fiskars blade on the rectangular one. Sentiments were clear heat embossed before cutting. The modern oval is from Spellbinders and I used a scrap piece of CS and a piece of vellum added on top. I cut the frame to go around it and added the envelopes as you see. A few tiny gems on each one finished the card nicely.

For a change, I quite like the end result immediately, which doesn’t happen often. Thanks for joining me today, you and your time are appreciated. Have fun making your own fun fold and we look forward to seeing them in our gallery.

geometric and stitched

So here I am with my first post for my new gig at Double Trouble. The requirement is for stitches, however you like to create them, along with 2 or more stamped images and 3 or more layers. An additional twist is to use a ‘punny’ sentiment.

I chose to use the sketch from TSOT #675 starting on August 5th. This card will not be entered in the TSOT challenge, because it would be backlinking.

I kind of liked the sketch background element in the inspiration picture and had a go at creating one similar to it. I made a mask and used it to ink the 4 sections of the panel. Distress Oxides used are Mermaid Lagoon and Twisted Citron and considering I don’t do this type of inking often, it worked out quite well. I had this Kokorosa stamp and die set on my desk and decided to try 3 images from the set. I used Versamark ink and a coppery coloured powder from Recollections to heat emboss and then I coloured them with watercolour pencils. To give a bit more strength to the die cuts I cut several more for each image and glued them together. I hadn’t quite decided on which stitched style I would use and considered doing it by hand, but in looking through my dies I found this pierced star set from Spellbinders and cut 3 stars. Once I had decided on placement they were glued down and the chicken images set on top. The pun sentiment, or as close as I can get to one, comes from the same stamp set, but the rectangle piece was cut using a die from StampinUP. After I glued this in place I used some Scrapbook.com Pops of colour underneath the words. The entire panel was then added to the GKD card front.

I’m quite pleased with how this one turned out and I like the way the background looks. I may do something like this again.

Thanks for joining me today. I hope you have fun making your own version of the recipe.