deepest sympathy

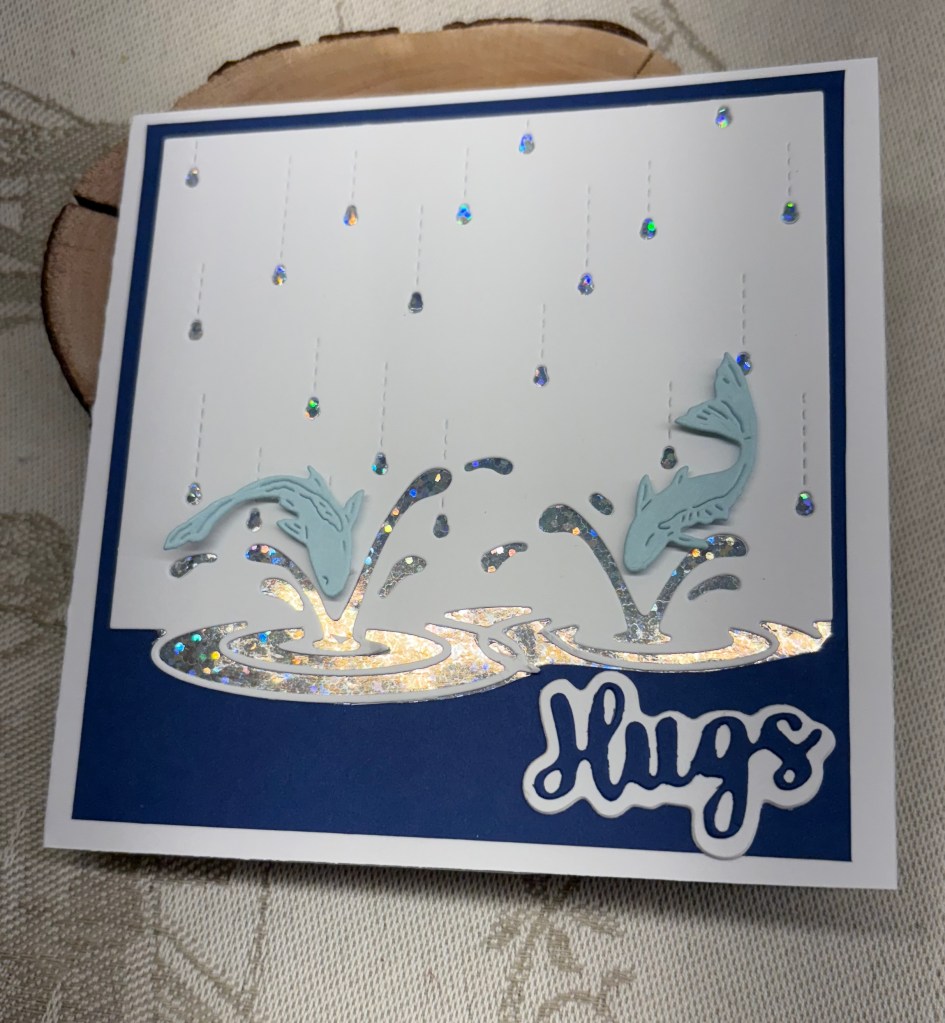
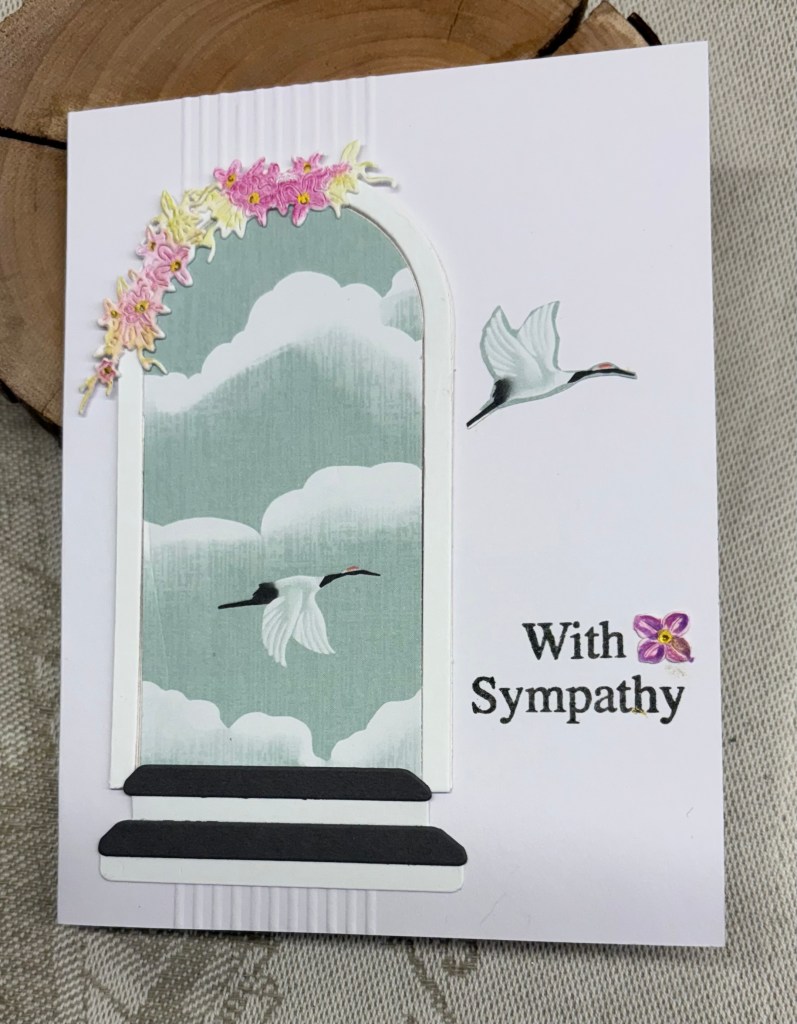
Another request for a sympathy card and as I’ve used some PP, I decided it would work in the challenge at Love Those Pretty Papers June Challenge. Although the theme is weddings it is mainly an anything goes challenge and I don’t need any wedding cards at the moment.

My card uses an older set from GKD, PP from my stash, and enamel dots from AlteNew. Die cuts are using infinity dies from Hero Arts.

Once I had the daisies stamped I heat set them clear and then used water colour pencils to add some colour. The sentiment was also heat embossed clear and then die cut using a StampinUP banner die. I used foam tape on the focal circle and on the sentiment banner.

A simple and fairly quick card, and all I had time for today.

Our new upright freezer was delivered earlier and it took me ages to clean up the garage in the area we needed it to go. The dog was also professionally groomed by the mobile groomer so it was a busy morning. I have to say I’m pretty tired now and my hands are getting sore, so it is time to stop.

Thanks for stopping, I appreciate it.

lemons galore

Another card from the La Dolce Vita collection, this one using another piece of patterned vellum along with the Citrus Spritz die set and the small banners. The Alphabet challenge is E is for Embossing Wet or Dry so I am entering it there.

After cutting all the bits and pieces I used a Q-tip to add ink to flower centers and a brush to add some ink to the lemons. I had the dry embossed white piece leftover from another project by Darice I believe. I decided to use it for behind the lemons. I fooled around with placement before attaching everything using a combination of foam tape and glue. I keep meaning to try foiling but as yet haven’t so instead I used scrap piece of gold CS to create the banner sentiment. To attach the vellum background I ran it through a Xyron machine as I’ve found the adhesive doesn’t show through this way. The blue card front makes the blue in the pattern more intense, although the photo doesn’t do it justice. Its much prettier in reality.

All in all I’m pleased with the end result. Thanks for stopping by, I appreciate you, your time and any comments you may leave for me.

vellum tile triptych

As You See It – Challenge #350 – Triptych. Another card using some product from my Weekender kit, this one using printed vellum. It couldn’t be more perfect for this particular challenge. After I cut a piece off the larger pattern piece I attached it to some white CS and then attached to the card base. I stamped the sentiment and using the matching die cut it in the shape. Before cutting I had heat embossed while the ink was wet. The gold thread is from my stash and I attached as you see with an additional smaller bow on top. Using some of the tiny clear gems, again from the kit, I added them to the centers of each tile, but they are so small the camera didn’t pick them up. They twinkle in my craft room light. The 3 blue ones were added and I called the card complete.

Probably the easiest card I’ve made in a while and I quite like the look. Thanks for spending time with me today, I appreciate you and your comments a lot.

Summer vista

This has been created using the Spellbinders Weekend Retreat kit. I did follow along with a tutorial by Jen McGuire so it is similar although not the same. Sometimes I find following along is helpful in learning the dies. This particular set has a lot of elements in it and I’ve seen some stunning creations from others using it. Everything used here is from the kit except for the EF which is from Sizzix – Tim Holtz, the sparkly paper and CS for the leaves which are scraps from my stash.

The card open and standing.

Seize the Birthday #307-Fancy Fold is all about folds and although this style of fold is fairly simple adding all the elements is anything but. Die cutting so many pieces is time consuming. I’m quite pleased with the end result but I have to say it took me most of yesterday afternoon to complete. I added a little sparkle to the water by using a Sakura pen and I heat embossed the sentiment. The new Card Stock from Spellbinders is lovely so I shall look at getting more of it at some point. Its a great weight, totally smooth and the colours are gorgeous.

Thanks for stopping by, I appreciate your time and any comments you may leave for me.

butterfly easel card

Challenge #252, as chosen by Debbie, here at cardz4galz, is for you to make an easel card. In my case I decided to use my latest StampinUP bundle die set and created a butterfly easel. It isn’t a large card but it certainly has impact and it was fun to make. It isn’t too bulky when flat, so can be mailed without additional costs.

I cut the card stock using the largest die which is designed to create a fold line, but if you don’t have the same die, you can still do the fold yourself by placing your die a little above where you want the fold to be. Once I had my basic card front I added a score line around the middle of one side and folded up the wings to give me the easel shape. Another large butterfly was added to this piece and then using more dies from the set I cut another butterfly in yellow and added the silver piece on top but only attachedat the body. Using some water colour pencils through the holes like you would a stencil I added colour. Once I added the body, I realized I had some parts of the folded easel showing so I carefully cut off anything I didn’t want. The sentiment is from Crafters Companion and the shaped edge is from another small die from the butterfly set which I popped up on foam so the rest stays upright. Using a Spectrum Noir shimmer pen, I edged the sentiment strip and the larger butterfly for some shimmer. And this completed my card nicely.

We look forward to seeing your creations in our gallery and hope you have fun creating.

Ruff

The Alphabet challenge is D is for Dogs this time around and I used a set from YNS to create my card. I like the cuteness of the images in this set. I also used an MFT circle die and a banner die from Scrapbook.com. Once I had the images stamped and heat embossed, I coloured them with watercolour pencils and Sakura pens. When die cut I added them to the small circles using some foam tape to lift them a little. I grounded them with some shading underneath. The circle panel was also lifted with foam tape and then the circles were added through the holes. Sentiment was stamped and heat embossed. Embellishments from my stash.

It is a very hot day today and as I got up pretty early, I did some weeding before it became unbearable. I shall probably do the same tomorrow if I can, but my hands aren’t happy, so it may not happen. At least I managed to get this card finished. Thanks for stopping by, I appreciate you and your time.

leaping fish

Anything Goes – Weeks #702-703 at Word Art Wednesday This is a fairly new challenge to me and I decided to enter it with this card. In a recent speed challenge I didn’t get a good cut with this Memory box die and it was easier to cut another one than to try to fix this one. That said, most of you know I don’t throw away anything unless I really cannot redeem it. With a bit of patience and a craft knife I managed to cut around the parts that were not cut properly. I backed the piece with some holographic paper for interest and then attached it to the dark blue layer. The fish were cut with my new Gummiapan dies using scrap CS and the word is a shadow and word die (no idea of brand) gifted to me at Christmas. I used the same blue CS and a white piece for the shadow. The card is 5 x 5″.

It was good to redeem a poorly cut piece and I quite like how it turned out. Thanks for stopping by, I appreciate you and your time.

Sympathy window

Once again I needed a sympathy card, 5th one this month. As Double D Frames Challenge is looking for frames, I figured I might as well make a card that works for that as well as for the friend it is intended for. At the same time it gave me a chance to use part of a Spellbinders die set that came with my kit for the Weekender Retreat. I used just the window arch and interior piece, plus the steps, along with a Gummiapan floral as a small topper, sentiment is from GKD and the background is DSP from StampinUP. Florals were coloured with pencils and because I messed up I had to add an additional flower near the sentiment as well as a fussy cut bird from the DSP to disguise the mess. I guess experience in card making means that we know what to do when we make a mistake. I used my score board to get the lines behind the scene. In the end I quite like the result.

We have heat in a big way, and I am glad that where we live usually means we also have a breeze as it helps to keep the house cool. Down in the town it will be almost unbearable. Tomorrow my dragon boat team are racing in an area that will be even hotter and I am glad that I will not be participating. I tried one race last year, did not enjoy it and decided that racing is not for me. Practices I enjoy as there is less pressure and fortunately the team understand my limitations. My hands sometimes just won’t hold onto the paddle properly which is disastrous if in a race. And if any of you are wondering whether your scissors are sharp, just do what I did and have them slip when cutting something. My finger is now bandaged so I don’t get more blood on anything. All I was trying to do was to cut my sentiment stamp in half so I could use it differently and I didn’t notice that the points of the scissors were going to hit my finger. BooHoo!

Thanks for stopping by, I appreciate you, your time and any comments you may leave. Have a great weekend.

Pillar fold with decoupage

Occasionally, I have participated in a challenge blog called Creative Creases and as they had requests for guest designers I put my name down . I was flattered to be accepted and this is my card creation.

Because I enjoy fun fold cards and had wanted to try something like this for a while this was the perfect opportunity. After a little research I came up with this version after following a tutorial found HERE. It was easier to make than I expected so after writing down measurements and watching it several times I was able to get a decent result. My papers are a mix from my stash. The background is from Hunky Dory (very old) and the darker purple is from StampinUP. The sentiment is from an older GKD set and I edged it with purple ink. The leaf is a leftover die cut and is from an Altenew set. The Pansies are from a craft club by Crafters Companion. When I first began making cards (oh so long ago) I used to do a lot of decoupage. The kit from this club sure made it easy, as no cutting was involved. I just had to punch out the pieces and add the foam tape. The additional pansies at the corners are actually photocopies of the original pieces and I cut out the bits I required here. The glittery frame are special stickers that I acquired in The Netherlands. Here is another view of the card standing up.

I had fun making this card and have several other decoupage pieces ready to use so more cards will be coming. In the meantime, thanks for joining me today, I appreciate you, your time and any comments you may leave for me.

balance

prepared pieces ready to begin.

Well this almost turned into a disaster, but I coped and still had 3 seconds left on the clock when done. Why, you ask – its the ‘dreaded’ speed challenge at As You See It Challenge #349 – Rapid Water and of course when in a hurry, whatever can go wrong usually does. In this case my die didn’t cut properly and I had to repeat the process on another piece of CS. That will teach me to make sure my cutting plates are in good shape LOL. After I stamped the image I quickly coloured using Inktense pencils and a water pen and then fussy cut as best as possible. I also stamped the sentiment and fussy cut around that. Stamp set is an unbranded one and the quality is definitely not there so the sentiments don’t stamp really clear on the word edges. With the more expensive brand sets this is never an issue. Anyway once I had these pieces ready it was mainly an assembly of the parts. After a quick glance at the clock and a deep breath, I cut down the blue layer to fit over the top fold square card base and adhered it. Then I added the water layer and even used two of the fallouts to create a wider splash zone. In adding the yoga frog and the sentiment the glue point jammed so I didn’t get enough glue to stick them properly. Doesn’t show here and is an easy fix now I’m no longer in a hurry. The die used is from Memory Box and I’ve had it for a long time.

After I’ve improved it one of my yoga group will receive this sometime this year. I shall also give my glass mat a good clean in a minute. Actually my entire desk needs a good clean. I need a craft fairy to magically inventory my new supplies and put them away and then to clean my entire space.

Had a fun Friday evening and full day Saturday with the Spellbinder’s Weekend Retreat. The items in the kit are going to be fun to use. I could have crafted along with the designers, but chose not to as it was more relaxing to just view. Had I tried to craft along I think I would have gotten quite frustrated. As it was, I became exhausted and fell asleep in my chair. I only woke up when I almost fell out of the chair. At least it was done in my time zone. Some attendees were watching and crafting at ridiculous times of the day and night. Took me all of yesterday to stop being so tired. The entire event is available to watch at anytime so I can always watch again if I need to.

Thanks for spending time with me today. We have sunshine with a cold wind here but it is supposed to get quite warm this week. Wildfires are burning in other provinces and our hope is that they don’t start here. It is so sad for those affected.