art deco step/easel card

Challenge #248, as chosen by me, here at https://cardz4galz.blogspot.com/ is all about Art Deco. I shall also be choosing the winners for this challenge.

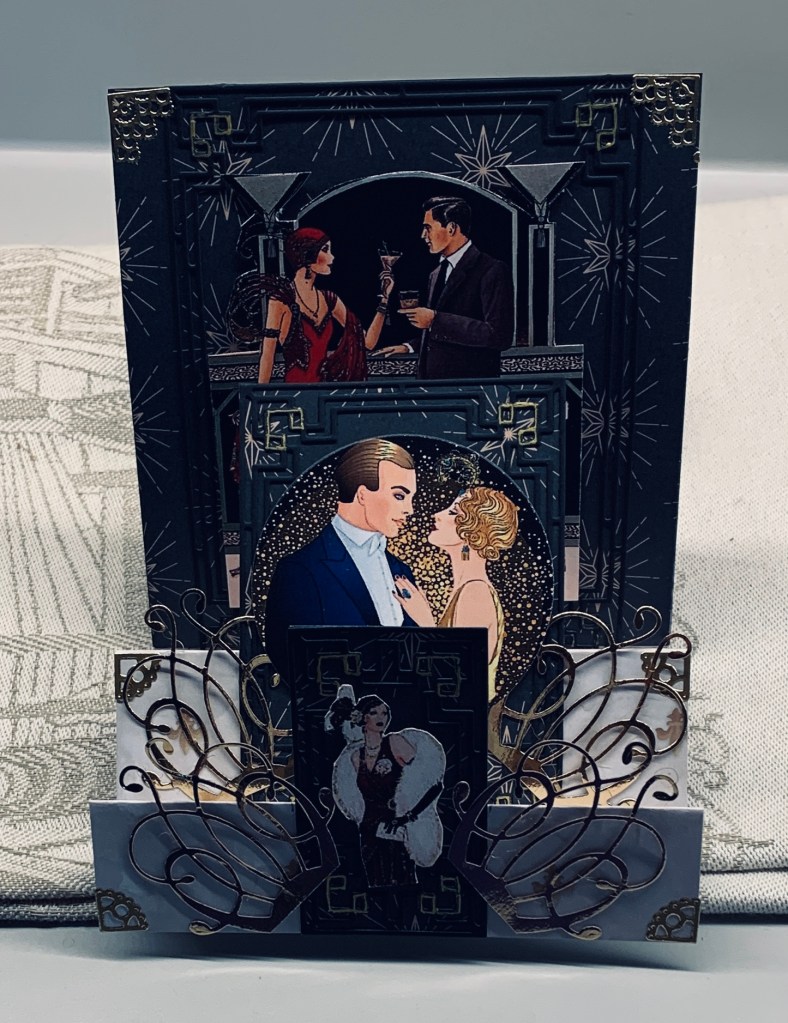
Recently I purchased a new paper pad that has a lot of night sky designs as well as patterns that I’ve used here. It is a good quality pad, but still a little flimsy to use without a card base. That said the card design called for a card base that is bigger than any heavier stock I have so I used the PP on its own and reinforced it underneath in a few places with scraps. The easel part of the card wasn’t holding the steps up properly so I added a band underneath that holds them more securely.

The black art deco frames are a set by Altenew and don’t show up as much as I wanted them to because of the darker PP in the background. I jazzed up a few sections a little with a gold pen. The corners are done with stickers from my stash, I don’t use them that much these days but at least I remembered I had them. The swirly bits are from a Memory Box die and I cut 2 then cut them in half. The images are off the Internet and then jazzed up with sparkle pens. The smallest image on the front I fussy cut and just popped up. The middle one I die cut with a Hero Arts circle and the back panel I fussy cut around the lamps and the arch before popping up with foam tape.

The photo doesn’t do the card justice, as although it’s somewhat dark, it isn’t as dark as it appears here. My hubby likes the card, and I’m sure it will grow on me over time. Right now I’m not sure how I will use it but there is space on the back to write a message when the time comes.

Thanks for joining me today, and I hope to see some spectacular designs in our gallery. Have fun creating.

layered butterfly birthday

https://seizethebirthday.blogspot.com/ challenge #303, is requesting layers and this is what I came up with. I started with a 5 and one half square card front and layered a half size smaller pattern piece, then half size again with the pink sparkle layer. Next I used a darker pink scrap that I ensured would fit in the rotation and layered another pattern piece on that before gluing to the rest. It seems that right now I am fixated on my butterfly bundle from StampinUp as this is the 4th or 5th card I’ve done using it. Using up a scrap piece of pink vellum I die cut the lacy part of the butterfly and then layered this onto a regular piece of vellum. Before I attached the layers I decided the pink vellum needed to be brighter so using a Wow embossing pen I went over it, then used some glitter embossing powder before heat setting. I also went around the edge of the plain vellum with the pen and heat set the edge in gold. When I placed it onto the PP it still didn’t have enough presence so I added a bottom layer in gold metallic CS, which I also used to create the sentiment and the body of the butterfly. The sentiment is from Hampton Arts and I heat set this in black before die cutting. Added 2 pink embellishments from Studio G to the label. Not counting the card front, this became a 9 layer card, but fortunately it is still thin enough to mail easily. The PP is very old and is from Recollections. Because I store my papers in vinyl sleeves they seem to stay clean and don’t fade so I can use them even when old.

Thanks for joining me today, I appreciate you and your time. Its a dragon boat paddling event for me soon, so this is it for today’s crafting. I’m glad I managed one card.

sunshine and rainbows

With a twist of rainbows being the latest challenge at CYHTP and a sentiment being focal for Word Power, this card works for both challenges. I used a tutorial from Natasha Foote to make my background.

As I still had two pieces of a photo my hubby discarded I decided to use them by cutting them into half inch strips and then weaving them. Once I had them stuck down I trimmed the panel and added it to the white card front. Then using a scrap piece of white I stamped the sentiment, and the sun rays, both from Concord and 9th and heat embossed clear. The embossing is from a small folder that came with my mini die cutter – brand We R. I then used my Hero Arts oval infinity dies to cut and went round it with a sponge and Chipped Sapphire ink. I used one of the smaller ovals to cut the sun ray piece as well. I attached the two together, added some foam to the back and then glued the lot to the woven piece. The gem sticker, which I’ve had forever in my stash, and never used, was added at the bottom. On the photo it looks a bit lost, but in reality it shows better. The photo here makes everything look a little darker than it does in my craft room lighting.

Thanks for stopping by, I appreciate you, your time and any comments you may leave.

linked together decorative

Having recently purchased these Decorative masks from StampinUp, they’ve been languishing on my desk waiting for me to use them and I finally got around to playing with them yesterday. For some reason the colours at As You See It were stuck in my head so this first piece was the result of using the first 3 masks and colours. I hadn’t planned on a second entry but as it works it will be added and it will also be added to the April 2025 Stencil Fun Challenge at Crazy is our Fame – Stencils are our game. Quite by accident it meets the pattern twist, which is fun for me. As I don’t do a lot of stenciling I wasn’t too sure if I liked the result at first. I had some fall outs on my desk from a previous project and thought I could use them but they kind of disappeared initially. After a bit of thinking I pulled out an Altenew stamp and die set and used one of the leaf stamps, which I stamped in green, and then heat embossed clear. After adding some foam tape to the back I placed it on the stenciled piece but didn’t like it much. More thinking and I cut a panel of vellum and then added the leaf to that. The fallouts were added on top and I attached it all to the stenciled piece. I stamped the sentiment, heat embossed that, then added it to a black piece and attached as you see. As I didn’t have the colour Peach Pie I used Tea Dye ink and edged the card front with it before adding the other piece on top. Stamped the sentiment in the same colour ink and heat embossed clear. The vellum mutes the background just enough for the rest to work and I’m happy with the solution.

For a card that I didn’t plan this turned out much better than I expected. I still have several other stenciled pieces to make into cards when I feel like it. Thanks for joining me today, your time and comments are appreciated.

daisies

It always surprises me, how a photo seems to change colours so that they don’t quite look the same as in reality. https://www.asyouseeitchallenge.com/ has a colour challenge and my card uses the colours but here the garden green looks much darker and somewhat teal like than it actually is.

To make this card I used a Kokorosa die and cut the shape from the grape coloured CS, here it looks lighter than in reality. I attached it to the green card front and decided to cut it again in the two closest colour matches so I could paper piece some pieces into the open shapes. I used some Nuvo drops for the flower centers which is close in colour to the pieced daisy. The little die set was a gift and I have no idea of the brand, but I cut the shadow in the peach and the word in black.

We have had a few warmish days that were also dry so the blossoms on the trees are looking really pretty now. Today we are back to some rain, but signs of spring are everywhere. Depending on where you live, I hope that you too are also seeing some signs of spring. The east coast of Canada has had a bad ice storm, which makes me thankful to not be living on that side anymore and I know there has been some weather catastrophes in parts of the USA. I always feel so sorry for people living through this kind of thing.

Thanks for spending time with me today, I really appreciate you.

Easter bunnies

The colour challenge and Just Add Ink made me want to make a card, the Easter theme at Double D and the usual anything goes at CYHTP ensured I combined my idea so the card would fit into the three challenges. In general I don’t do many of the holiday themed cards except for Christmas, but I do want to send a few Easter cards this year so I’ve completed a few. Using the colours from Just add Ink I created an Easter egg and decorated it. I first cut the egg shape by hand and then using some scrap strips of CS I inked colour to each strip. When it was dry I cut the fringe using scissors that are actually designed for cutting herbs. They are more useful in my craft room. After cutting off the excess I set it aside. I pulled out an old Easter set from GKD, and stamped the rabbit on some scrap that has rough finish similar to linen and used some Prisma pencils to colour it. I did use an alcohol pen for his ears, nose and cheeks and a white glaze pen for his tail. Using a blender pencil I smoothed out the colour but deliberately left it a bit rough so it looks like fur. After finding a pink piece of vellum I dry embossed it with this tulip folder. I added the egg and took a Doodlebug sticker of a rabbit head and added it behind the egg before fully sticking it down. Some additional stickers were added as a decoration and the sentiment, from the same set, was stamped, embossed and fussy cut as I wanted it to be stacked not side by side. The other rabbit is popped up on foam tape. The gray note card makes the pink vellum look slightly darker than it actually is.

As so often happens, I’ve already thought of an easier way to add the fringed elements to get a better edge line, but too late for this particular card. All in all I’m happy with the card.

Thanks for stopping by, your time and comments are appreciated.

using scraps creatively

Dawn has chosen Stripes as the challenge theme here at cardz4galz, and she will also choose the winners. It is a good way to use up scraps and in my case I chose a small unbranded banner die and cut a bunch. I glued them as you see and added some small die cut stars as well. Stars are from 2 different companies, one Hero Arts and the other unbranded. I also added a bit of sparkle to the stars using a Sakura gelli roll pen. The sentiment was gifted by a stamping buddy but I don’t know the brand.

The panel was added to a navy card base and I called it finished. Now it is your turn and we look forward to seeing your cards in our gallery. Most importantly we want you to have fun.

Thanks for stopping by, your time and any comments you may leave are appreciated.

Silhouetted flowers

My card was created for this challenge AAA Card Challenge #287: 1+1 and I used a silhouette with an organic shape as my plus one. Stamps are from Crafters Companion and I clear heat embossed the florals and sentiment before adding the organic shape. I used Distress Oxide Speckled Egg to add the shape and repeat stamped until I was happy.

Quick and easy but very CAS. For a change I like the result.

Thanks for stopping by, I appreciate you, your time and any comments you may leave.

Easter time

The current challenge at Just Add Ink #744…Choose Two! with my card using rainbows and shimmer as my two. The PP comes from a paper pad by Simple Stories and the shimmery elements are all from a sticker set by Doodle Bug Designs. I stamped the basket using a stamp from a GKD Easter set and fussy cut it. It was coloured with pencils and water before I popped it on with some foam tape. The chicks are the last two sitting on my desk and are from Kokorosa and the oval vellum was cut with a Hero Arts infinity die.

I added the eggs to the basket and a few more along the bottom of the card. The word is from the same sticker set. Three small flowers near the word finishes the card.

My mojo is still a bit lacking and I can’t seem to inspire myself that much at the moment. I’m grateful that I could make even one card today.

Thanks for stopping by, I appreciate you and your time.

make a wish

Challenge #556 – Sketch is the current challenge at CAS. Although I’ve been making cards and scheduling them for my little DT job, I haven’t been doing a lot of challenges this past week or two. Add that I had a slight slump in mojo at the same time it was nice that today I actually was feeling creative. I decided to make a card for the CAS Colours & Sketches as I haven’t entered there for a while. I also had this fussy cut scroll in my oddments box. I originally intended it for a project but it wasn’t right at the time so I set it aside. It seemed perfect for the sketch so I used it. The scroll is from a CTMH stamp set which I heat embossed. The cake is from Memory Box and I used a mop up ink piece and a left over strip to make my cake pieces. The candles and sentiment are from a GKD set. These were also heat embossed and then fussy cut. Prisma pencils were used to colour the candles. The embellishments are from my stash.

Thanks for stopping by, I appreciate you and your time. Have a great weekend everyone.