hexagon fun fold

card flat for mailing
upright showing the shape.

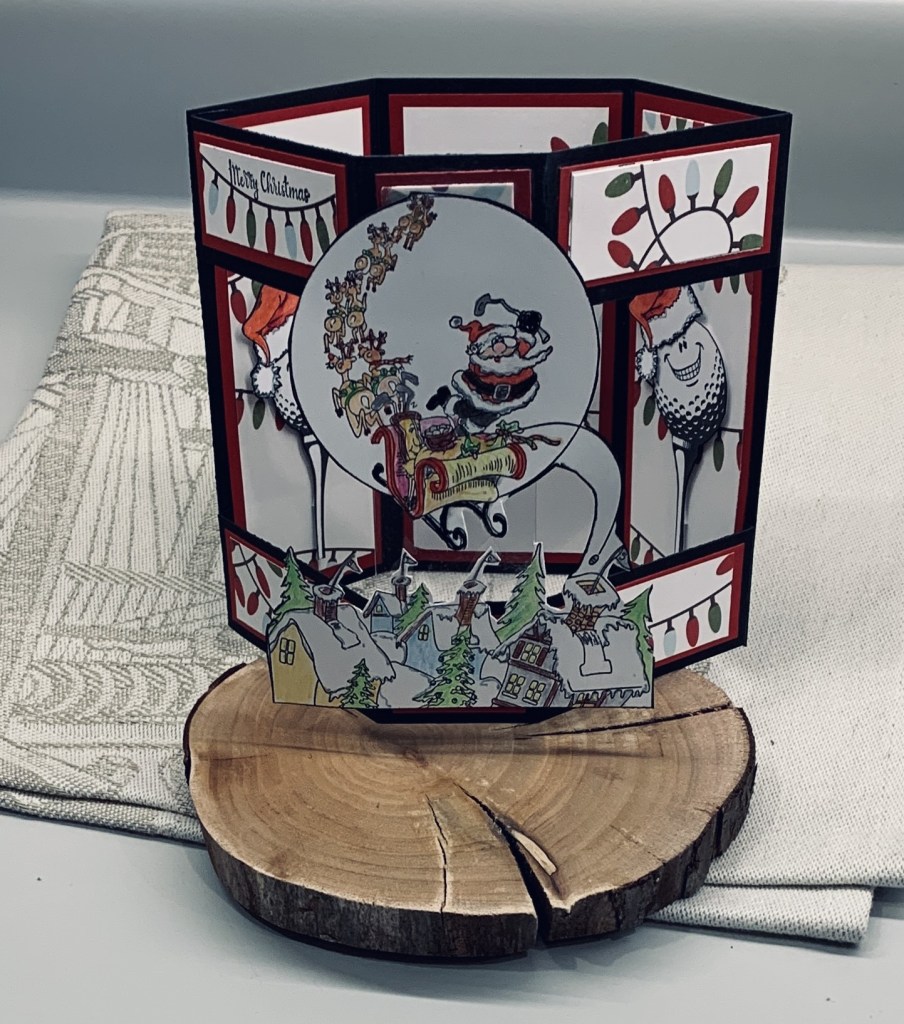
Another of my commissioned cards, this time with a golfing Christmas theme. I thought it would be a nice one for the challenge at Krafty Chicks challenge #746 – Christmas so am entering it there. I saw this fold on Pinterest and searched for a tutorial so I could make it my own version. I could have figured it out, but sometimes it is just easier to see how it is done and this tutorial was really easy to follow. The paper I used is from a paper pad from last year. My images are all from a stamping buddy who gifted me with an envelope full of golf related images and I am really grateful to her for them. She knows who she is. I fussy cut the Tee ball and the Santa hats using pencils to colour. Then I coloured the focal image using pencils and some glitter pens. Once it was coloured I fussy cut it strategically so it stayed together as one piece and I edged it with a black pen. Once I had the card base cut, scored and folded I added all the smaller panels and then taking the suggestion from the video I added a strip of plastic at the centre so the focal image has more stability. Except for the Tee balls everything is glued flat, although as this card is to be gifted personally not mailed, more dimension wouldn’t have been an issue.

I’m really pleased with how it turned out and I know my friend is going to be thrilled with it as will her father for whom it is intended.

I think I have two more Christmas cards to make and then I’m done for this year. I wasn’t going to bother with these two, but have learned that the mail strike may be over next week. The government stepped in and is forcing them to settle. Obviously there will be a backlog to clear, but at least people will receive the cards sometime in January, late but not so bad as to matter. I’ll confirm with my stamping buddies as soon as I am certain the strike it over.

Thanks for stopping by.

white on white

December 14th 2024 Anything Goes With A Twist of Poinsettias and https://allsortschallenge.blogspot.com/ are the two challenges I am entering this card into today. I didn’t take the twist of Poinsettias and the card is mostly white on white. Supplies used are as follows, EF from Sizzix, Dies from Taylored Expressions, Unbranded mini houses/snow set, and the tiny birds are from Poppy Stamps. I added some sparkle spray to my background piece before using foam tape to add to the note card. Because I had been using a paper towel underneath my spray, I had the idea of using it for my snow banks which gives it both sparkle and texture. The trees are also popped up with tape but I added the church, lamp post and birds flat to the embossed piece. I find it interesting that white can be so varied depending on what one is using.

Thanks for stopping by, I appreciate it. Have a good Sunday, we are hosting a potluck tomorrow so I am finishing up in my craft room now, as I won’t have much spare time tomorrow.

snow globe

Christmas Ornaments Challenge is the current theme at DD, and I’ve chosen a snow globe as my ornament. The die I used is an old one by Precious Marieke and it an easy one to use. I just folded a regular size card placed the die with one side edge deliberately missed so I could keep the fold. The 2nd circle die is often used to make a shaker style, but I chose to use it to cut my PP (an old paper pad), the interior piece and the bottom of my stamped piece. My poinsettias are a few leftover from a different project and I used them to decorate the base of the card. I added some leaves and foliage that I punched with a Martha Stewart punch. The stamp set is by MFT. I coloured it with watercolour pencils and some sparkle pens then curved the base of the stamped area and fussy cut the top portion before using foam tape to pop it up slightly. Sentiment is on the interior, as the music PP makes it busy, which would detract from a sentiment on the front. This is another of the commissioned cards a friend requested and it had to have some music and or a church. My village scene features a church in the background and the PP speaks for itself.

It is another extremely wild rainy day here today and there were a bunch of ferry cancellations this morning. Anyone in a hurry to get to or from the mainland would have been out of luck earlier. Thanks for spending some time with me today, I appreciate you and any comments you may leave.

interactive Flap card

One of my friends commissions several cards per year for her family and I try to do something a bit different each time. I shall add this card to the challenge at Peace on Earth

This is my first try at a flap card although I’ve had the Spellbinders die for some time. I found a tutorial to follow and this is the result. One thing I realized is that keeping the pieces in the orientation in which they are cut, makes it easier to put together. The frame didn’t seem to fit until I realized the orientation was off. The die set came with daisy flowers but as it is an intended Christmas card I used poinsettias instead. Mine came from a die by Dee’s Distinctively and I only used three, so have enough left for another card. The PP is from a paper pad but I’ve mislaid the brand name. Sentiment is from a Divinity Design set and I also added a sentiment on the underside of the flaps but it’s another temporarily mislaid set. Its probably underneath the stuff on my work surfaces.

Underneath the flaps

I used a small YNS shape die to add the pull tag at the top, but couldn’t find the stamp set with the words I needed, so I hand wrote pull. The next goal, after our party this weekend, is to sort out my craft room and find the missing sets. They aren’t gone, just hidden.

Once I figured out how it works after watching the video several times, it wasn’t that difficult to do and I’m pleased with the end result.

Thanks for stopping by, I appreciate you and your time.

Skating By …

Billie has chosen a Christmas theme for our last challenge of the year here at Cardz 4 Galz. I actually made 3 cards almost the same except for colours. I used a Christmas background stamp from YNS and heat set it with Verdigris on vellum. After cutting the panel down a little I added the sparkly strip to ground the penguin image. He is from a new set, on sale, by Crafters Companion. Once stamped I also heat set the image so I could colour without worrying about it spreading in places I didn’t want. Watercolour pencils were used. When it was dry, I fussy cut the image and used a black pen around the edges. After adding foam tape he was attached to the vellum piece, which in turn was attached to the shimmer card front. The sentiment is from the same set. The other 2 cards are the same except one is blue and one is gold.

When this set and another similar one arrived, I was surprised at the size of the image stamps. I was expecting them to be smaller. There were no matching dies that I could see, unfortunately. I do like the fonts used for the sentiments.

Thanks for spending time with me today. We look forward to seeing your creations in our gallery. Above all, have fun in your crafting space and enjoy the Christmas season.

sketch challenge

Yay, I did it, I met my goal of entering into the As You See It challenge for the entire year and this is my card for the current and last one of the year, Challenge #338 – A Window into the New Year.

I started with an embossed layer of metallic silver CS to which I eventually added the white layer. EF is an old one by Cuttlebug, so old that the hinge is broken and it is held together with tape. Stamp sets are from MFT and Spellbinders and that includes the curved Celebrate die cut at the bottom. I fussy cut the other two curved strips as I wanted them much narrower. After stamping the leafy branch and colouring it with some Sakura sparkle pens, I did the bird on a separate piece. He was coloured using Prisma pencils as well as a touch of sparkle for his scarf. Once die cut I popped him up slightly and added him to the branch. This panel was then added to the other. I added the curved pieces underneath and then the sentiment piece before considering it finished.

I’m quite happy with the end result, and already have the recipient in mind for this card. After a few days of house guests last week, this week is a bit more on the normal side. We are hosting a potluck on Sunday next for which I have some desserts to make, but other than this, I should have time to finish up in my craft room and actually get it clean and tidy too.

No sign of the mail strike ending so I guess cards will arrive sometime next year. The mind set of the strikers leaves me astonished at times.

Thanks for stopping by, it is appreciated as are any comments you may leave.

Gift wrapped

SSC349 An Elegant Christmas is the latest challenge at Sunday Stamps. It is a colour challenge, but there is an inspiration photo as well, and I chose silver, gold and dark green as my colours. Using a die from Kokorosa, I cut the green ribbon that looks like packaging to me. For the base I used a gray green CS and I stamped some stars from an old GKD set in both green and pale gray. Using a glitter pen I went over each of the larger stars to give them sparkle. The silver/gold bow is from an unbranded set and my gold tag is from a set my hubby bought for me a long time ago. In those days I never realized the importance of keeping the brand information, sorry. The sentiment is from a Divinity Designs set and I fussy cut this to fit the tag. Before I added the tag, I wanted more shimmer so I covered the bow and then sprayed the entire thing with shimmer spray. Its quite pretty in reality.

A simple and relatively easy card to make that looks better in my craft room than it does on the photo. Thanks for spending time with me today. I appreciate you all.

noel

https://daranddiane.blogspot.com/ This challenge is about winter so I created a snowflake background using an old folder by Cuttlebug on silver CS. Using a lot of scraps I figured out sizing and cut background pieces and PP to fit before adding them to the embossed piece. Using a Scrapbook.com alphabet die set I created the word in both red and white so I could offset the top layer slightly. Added them to each strip. I found the tiny poinsettias in a box that I had made from last year and added them as well as the puffy sticker Santa before adding the entire panel to the red card front.

I think I have about 30 cards still to make and the rest are already in envelopes ready to be mailed when the strike is over. The strikers were shivering outside the post office this morning as it is cold and frosty. I do not feel sorry for them at all.

Thanks for stopping by, it is appreciated as are any comments you may leave.

stack the holidays

Peace on Earth Christmas challenge #76 and this is my take on the challenge. I used a stamp that is still fairly new to me from YNS and stamped then die cut the image. I used mostly Copics to colour it, not my go to, so I’m not very good with them. Lots of sparkle from Sakura pens and with foam tape added it to the background piece. PP is from StampinUp. Sentiment is part of the set and I rounded the edges of it so it would fit better. Its quite a large stamp and doesn’t really lend itself to being cut smaller. Actually in thinking about it as I type, I could have cut each individual stamped word and stacked them beside the image. Note to self for another time.

While out yesterday, hubby bought me a Pan Pastel colour set so I’m looking forward to playing with the colours in the box. We hiked a trail with some friends and then had lunch at the local golf club. Lovely day after all the rain.

Thanks for stopping by, it is appreciated.

Favourite Colour combo

Challenge #239, as chosen by me, for Cardz4Galz is all about your favourite colour combination. Personally, I am a sucker for purple in any shade and I especially love it when it is paired with gold or even a bright yellow. As well I really like marbled papers, so I took a scrap piece to cut out the base layer of the ornament and then the fancy layer was done is gold. As you can see, I layered up some of the marbled paper behind a gold piece and then added the white layer on top. The white layer was dry embossed using a Sizzix 3D folder and I added a small amount of shimmer to it which the photo doesn’t pick up. The sentiment is a rub on left from last year. I have a few others that I shall use fully as I begin to get serious about Christmas cards. Once the ornament layer was dry I added some very thin foam pieces to lift it slightly from the rest. I cut a thin piece of gold CS, for the cord, and added a ring to it. Once this was attached I added the ornament. I don’t remember who made the ornament die and I’ve had it for a long time. Most likely it is either Sizzix or Memory Box. In those days it didn’t occur to me to keep the information about my supplies.

This card wasn’t difficult to make although the fancy gold layer is a bit challenging to adhere and requires some patience. We look forward to seeing your favourite colour combo’s in our gallery. Have fun creating. Thanks for stopping by to spend time with me today.