Feelin’ Sketchy

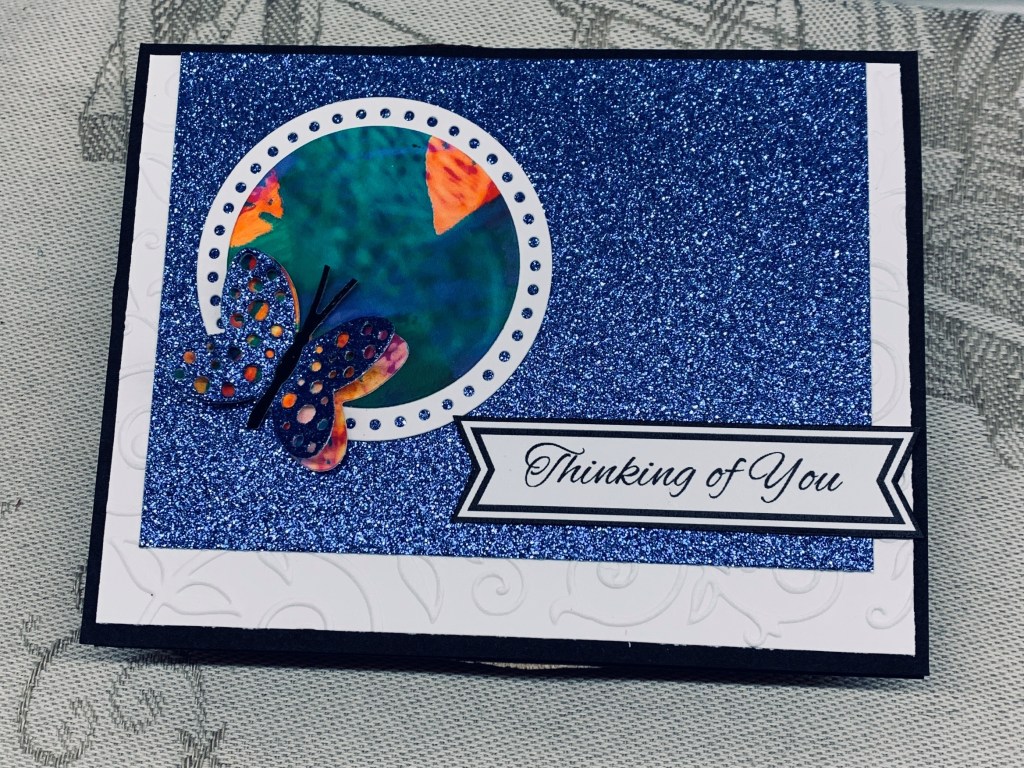
Its a sketch challenge at Sunday Stamps and I used one of my new panels as my initial layer. This panel is actually part of a photograph, printed on artist paper and taken by a good friend. Unfortunately, it got damaged and instead of throwing it out she gave it to me. I cut it up to use as my own PP and this is part of it. I rounded the corners before adding to note card. Then I took a piece of vellum cut down and rounded its corners. The die cut is from MFT and was added to an inked background scrap before adding to the vellum. I used this to hide my glue when adhering the vellum and used the embellishments to stop the vellum from curling up. The sentiment is from a Hampton Arts set.

When I did this card yesterday, I wasn’t sure I liked it, but seeing it again today I decided I do. I didn’t have time to post it until now, but I have an hour before my hubby takes me out and being in my craft room is always a good way to fill in time.

Thanks for stopping by. I appreciate you, your time and any comments you may leave for me.

sparkly thinking of you

The latest challenge at As You See It is a simple sketch and I came up with this card. I did make it with someone in mind as one of my dragon boat team members has had a fall recently. Her injury is pretty serious and involves her eye and vision after she fell into blackberry bushes. I’m pretty sure she is very low in spirits and I thought a bright sparkly card may cheer her up a bit. I dry embossed a Darice folder on the white CS and added a smaller panel of sparkly blue. The circles were left over from previous projects and I just put them together before adding them to the other layers. Using another piece of the bright coloured circle I die cut the butterfly with new Scrapbook.com dies and then added the sparkly piece over the other. Using a body die from a different butterfly set I cut the body in black, resized it a little and added it on top and then onto the card front. The sentiment is a freebie received from Natasha Foote a while back. I feel like it needs something else, but I’m not sure. Let me know what your thoughts are if you can.

Thanks for stopping by, I do appreciate it and I hope you are enjoying the last few hours of the weekend.

wildflower field

It is a sketch challenge at Just Add Ink #707…Sketch! My artist friend gave me a print that was a watercolour originally and which she didn’t consider it very good. She suggested that I cut it up to use as a background, which I did, and ended up with about 5 panels of which this is one. Using my everyday detail dies I cut a few circles, taking colours from the background I coloured one and glued the two pieces together . Then I added the Kokorosa sentiment again taking a colour from the background. Before gluing it to the background I trimmed off the edge as you see. This was then glued to the rest. I added some sparkle black to give a border and then added it to the gold card front. The poppies are leftover from a recent sympathy card, not posted as yet, and I added the red bits over the white die cut before adding it as you see here. Embellishments are from Hampton Art.

I quite like the end result and prefer the painting cut up into smaller pieces, rather than as a whole larger picture.

stars

This card has been inspired by the colours at Inkspirational, an actual entry to the challenge and the mood board at Double D. I masked off a blank card so I could add colour to the middle without worrying about the edges and using a Clarity stencil brush I added Broken China ink letting it fade as I went. On a separate scrap piece of CS I die cut the star shapes using Infinity dies from Hero Arts. I kept using this piece to ensure I had the right placement for the rest. Then using an unbranded background die I cut three in the yellow. I added each one as you see then die cut more stars sponging one in the lighter blue, a couple with the gray/silver tones from scrap CS and two more in a darker yellow with one in a sparkly yellow paper. These were added and layered a little. The sentiment is from a Kokorosa set and was stamped in Broken China. I’m quite pleased with the end result and am happy it works for two challenges.

Thanks for stopping by, I appreciate your time as well as any comments you may leave me.

Birthday pansies

Its a colour challenge at Sunday Stamps, SSC337 IN THE GARDEN and this is my take on it. The embossed layer is something I did a long time ago and only used a portion of piece at the time. It is a 3D folder, but I’m trying to reorganize my supplies and it is temporarily misplaced and I can’t remember the brand or folder name. I mounted the layer onto a patterned piece from Simple Stories received recently as a freebie from Scrapbook.com. The pansies came off a store bought card from last year and I simply couldn’t throw them away. Using the same PP as the back layer and an unbranded die I cut and added the leaves with a bit of paper piecing. I replaced the foam for popping them up and added as you see. The sentiment is from vertical greetings by GKD and I went over the letters with a sparkle pen before adding it at the side. I also used some Waffle Flower Candy dots for added interest.

Thanks for stopping by and I hope you are having a lovely day.

Double Stenciling

At Seize the Birthday #285-Double Stenciling the challenge asked for a, new to me, technique of double stenciling. I am not the best at stenciling but I gave it a go. Initially I used Gesso with a pebble stencil and then realized that I had to wait for it to dry before I could stencil again. So I patiently waited, but did remove the stencil for cleaning before carrying on. Once it was dry I went over it with a faint touch of ink from a sponge and then I replaced the stencil as best I could and using a music note stencil I added the notes using the same ink that was left on the sponge. It kind of worked although I’m sure it isn’t quite what was intended based on the video I watched first. I liked it enough to mount onto a black layer leaving a 1/16″ border. This was added to the card base. Taking the Lavinia stamp and some black ink I stamped the rabbit/hare onto a scrap piece and fussy cut when it was dry. I couldn’t fussy cut the tiny hairs so I did a quick stamp onto the background and went over the hairs with a micro pen to get them darker before gluing the separate one on top. Using an unbranded Love die I cut 3 in black gluing them together and adding it as you see. Three pearl embellishments finish the card.

I am also going to enter this card as a 2nd entry into the June Stencil Fun Challenge.

Thanks for stopping by, I appreciate your time and your comments.

summer vibe

Challenge #228, as chosen by Heather is all about summer fun. I decided to use some new dies, along with a few paper scraps to create my card. I started with the flip flops using a YNS die set and built my flip flops in two colours. The little embellishments are part of the set. Then I pulled out an MFT die and did the sunglasses, after which I cut two sets of letters one in black and one in PP. After dry embossing a scrap piece of blue CS I added some torn strips at the bottom, tucking in the flip flops. This PP reminded me of sand. I had the half sun, from SSS, left from a previous project so it was used here. Before attaching the focal piece I went around the edge with a black Copic pen and then added to the GKD card front. Once I had the letters attached with the black ones behind I added them as you see.

It was then I noticed a small mark underneath the shades and very obvious to the camera if not to the naked eye. At first I tried to remove the shades so I could repair it but it started to do more damage. Fortunately I remembered that I had this 3D hat sticker from way back and I was able to find it. Strategically placed the damage is fully covered without ruining the card. In fact I think I like it better with the hat.

This will be my last challenge with Make My Monday, as I have decided to step down from the design team. Life has become very busy lately and I am finding it difficult to keep up with 2 DT blogs as well as my normal crafting. With my paddling practice for the dragon boat team I am with, I am often physically exhausted and in arthritic pain. It is better to unload something that could become a potential source of stress, before I let people down. The exercise is a healthier option, even if physically demanding, than sitting in front of my computer or at my desk for hours on end.

The card fits the current challenge at CYHTP so I am entering it there: Anything Goes With A Twist of Beach

Thanks for stopping by and I appreciate your time and your comments. Good luck with this challenge.

Timed thank you

My promise to myself was to join in the challenges at As You See It for the entire year. Of course that promise didn’t take into account how busy I might be or how on occasion one loses mojo. These past two weeks have been crazy with a lot of other activities besides crafting and if I’m honest, I’m a bit tired so my mojo is definitely not in play right now.

I had a couple of ideas for this card and neither worked. The one idea I liked was impossible in the ten minute window, but will work for normal crafting so most likely a card will be done using it. The first one I tried wasn’t any good at all but I was able to use part of it for a different project.

In the end I came up with this and consider it uninspired but the challenge isn’t after perfection or huge inspiration so here goes. I will say that I didn’t quite make the 10 minute requirement and went over by ten seconds. When the timer went off, I almost jumped out of my chair in shock. Nevertheless, I’m still entering the challenge. I can see that at time of posting there aren’t many entries so at least this one is one more and it can be disqualified due to the timing if the DT’s wish. It certainly isn’t a winning entry in my eyes, but it isn’t so bad that I have to be ashamed of displaying it.

To make the card I added scrap PP to a thin layer and because the edges weren’t great in the middle section I added some Washi tape to make it look nicer. The hearts are fallouts from another project as are the little decorative bits I added. The hearts are why I went over the time slightly. My hands are sore today and I couldn’t seem to glue the bits on easily. The sentiment is from Hampton Arts and I repeat stamped it across the patterned piece.

Challenge #325 – Timed Thank You

Thanks for stopping by, it is appreciated. I hope everyone has a satisfying weekend. TGIF, I need the break.

father’s day

fun fold front
second part of the fold and interior
fully open inside.

The theme at Cardz4Galz is Summer Fun and for many a round of golf is purely that. A friend has commissioned several cards from me recently and this is for one of her Dads. Due to remarriages she has two. A couple of my stamping buddies helped me a lot two Christmases ago when I needed golf related images and didn’t have anything suitable. I’m so lucky with my group, as they stamped and mailed several images for me to use and all images used here are from what they sent to me. I believe these are from StampinUp, AI and CC Designs. I also used a stamp from CTMH, and some dies from both Hero Arts and SSS and my inside PP is from StampinUp. The front PP and the strip on the interior fold is a stenciled piece I did last year and wasn’t sure about at the time. I don’t remember which stencil I used but it was done on black watercolour paper with Distress Oxide inks. I added some shimmer as well because it helped me to like it more. Using it here in this way has made me like it a whole lot more than I did when I first made it.

After die cutting the image circle on the front I added a frame to it as well added a few clouds to the sky area. I messed up the clouds and was ready to throw it away, but our artist friend dropped by and while here, fixed it for me. The sentiment was fussy cut and also added. For the inside flap I coloured and fussy cut the golf bag and popped it up as you see. Then I used a leftover white embossed circle, using the debossed side to which I attached the golf iron. The circle looks like a big golf ball. On the back of the flap I added a white piece for the personal message. The PP was added to each side of the interior and I built up a small scene for the golf cart. The golfer was fussy cut and coloured using Prisma pencils and I added the sentiment strip above because I found it amusing. It’s a busy card, but it was fun to do and it’s different in style to many I make.

We hope you have fun with this theme and we can’t wait to see your cards in our gallery. Thanks for stopping by, it is appreciated.

Circle Framed Thanks

This card actually started out as something else and was intended for a different challenge. The original idea wasn’t working, but as you know I hate to waste stuff so I set the panel aside giving my brain time to decide on what to do. How I created the panel was by using Versamark and several different stamps, from Hampton Arts and Joy Clair. Once heat embossed white, I added the inks using sponges that were still wet from yesterday. I had already been playing with these little butterflies which come from Scrapbook.com and were a freebie in my last order. As well I had these small cut circle frames left from something else. Scalloped circle dies from Sizzix is where these came from. I cut the inked panel down so there would be a small border when attached to the card front. I also inked the circle frames to be darker and added the butterflies as you see. There are Pops of Color dots on each of their bodies.

I’m actually quite pleased with the end result, and doing this has helped me to figure out how to complete my original idea too. We have overnight guests coming tomorrow and I should be in the kitchen doing prep for the meals so when the guests are here I can spend time with them instead of being in the kitchen. I may or may not get back into my craft room, but we shall see. The card works for the following challenge:

Inkspirational Challenge #317 – Word Prompt – Frame

Thanks for stopping by, I truly appreciate you and any comments you may leave.