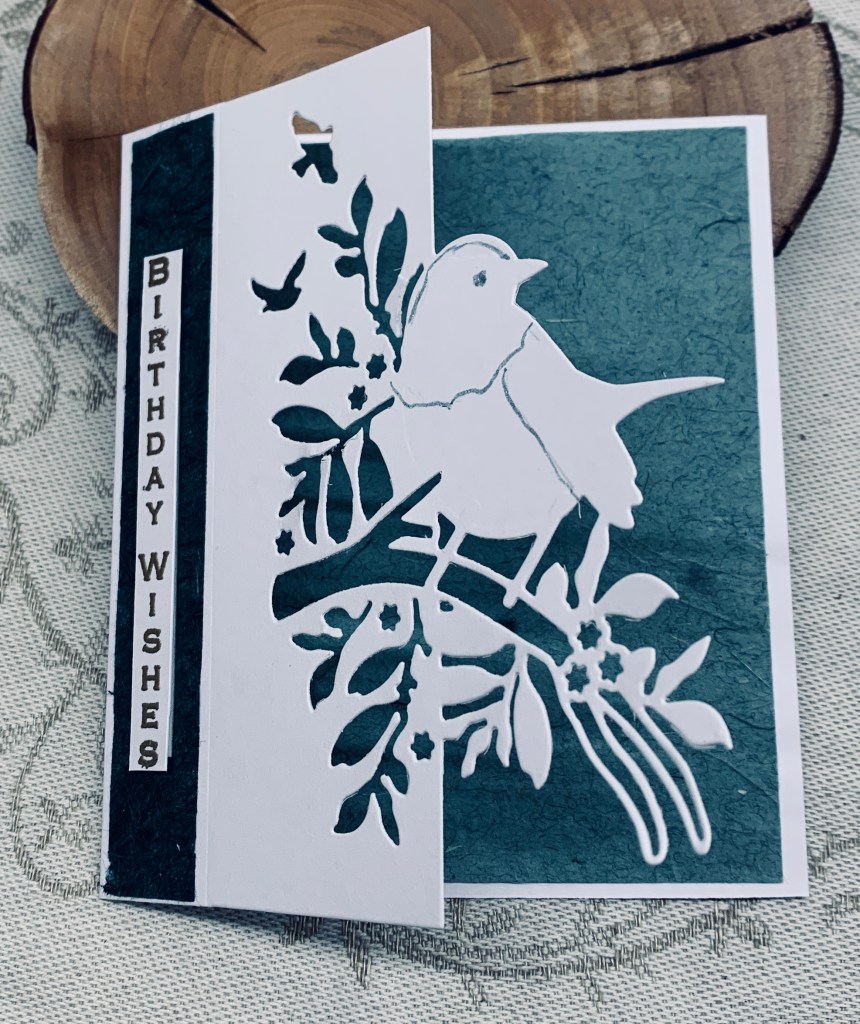
For this any colour with green birthday challenge, I decided to keep it very simple and used a die, 2 tones of green paper and a gold embossed sentiment. Stamp set used is by GKD and is an oldie called Vertical Greetings. It is probably one of my most used sets. My die is one I purchased when visiting my sister in the Netherlands by Jeanine’s Art, a few years ago. I cut my card front down to a 5 inch height so the die fit properly and then cut along one edge. Adding the mulberry paper to the inside gives a nice contrast to the white die cut. As well I added some sparkle using a pen to the embossed lines of the bird so the definition is more apparent and I added an eye with the same pen. With a darker green strip of mulberry paper I added it down the card front and popped my sentiment up on top.
Thanks for stopping by and I hope you are enjoying some nice spring weather, which is what I am seeing from my window today.
Movie Madness is #223 challenge theme as chosen by Debbie who will also choose the winners. For my card I pulled out two MFT sets that I’ve had for a while and not used very often. There are a lot of tiny pieces with these sets and I have to be in the mood to play with them.
Initially I chose the movie and decided how I would represent it as a Drive In event. First I cut the screen and the frame. I coloured the frame black with a Copic marker and the screen was done with a gray pencil. I stamped the rain drops using a Design by Ryn stamp and heat embossed clear. Then I die cut the umbrella using an unbranded die to which I added colour. The movie title is computer generated as is the sentiment at the bottom of the card. I added some clear tape over the screen before attaching to try to make it look more realistic. After die cutting the car and the people heads, I used pencils to colour before assembling. It is easy to get frustrated with these tiny pieces and it took some time to get it together but I like the end result. A little bit of splatter in gold before I added the screen and car and it was finished.
Thanks for stopping by, it is appreciated and I hope to see your creations in our gallery soon.
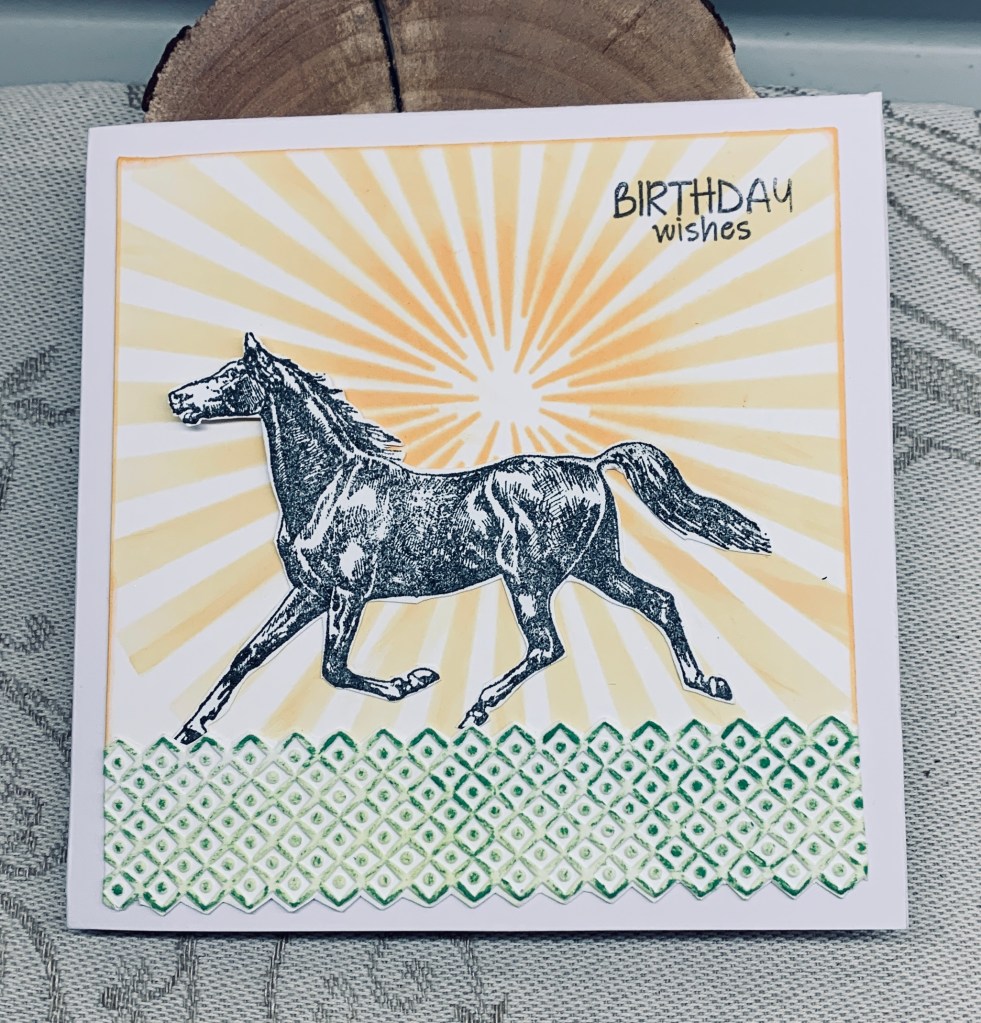
It has been a few weeks since I stenciled this background and I decided it was time to use it. I took an old wooden block stamp and stamped my horse using a little heat embossing to give him some shine. Then he was fussy cut. I attached him to the background and put the entire piece to the side as I had another project with a deadline to complete. Today I took another look and decided to add an embossed border using a small unbranded strip folder. The pressure was strong enough to slightly damage the edges so I fussy cut around it and then added some inks before adding it below my horse. Added a yellow border using a pen before attaching it all to the card front. The sentiment is from a Kokorosa set.
The card fits two challenges so I shall be adding it to CYHTP – weather related and Stencil fun – twist not taken.
Thanks for popping in to take a look, it is appreciated.
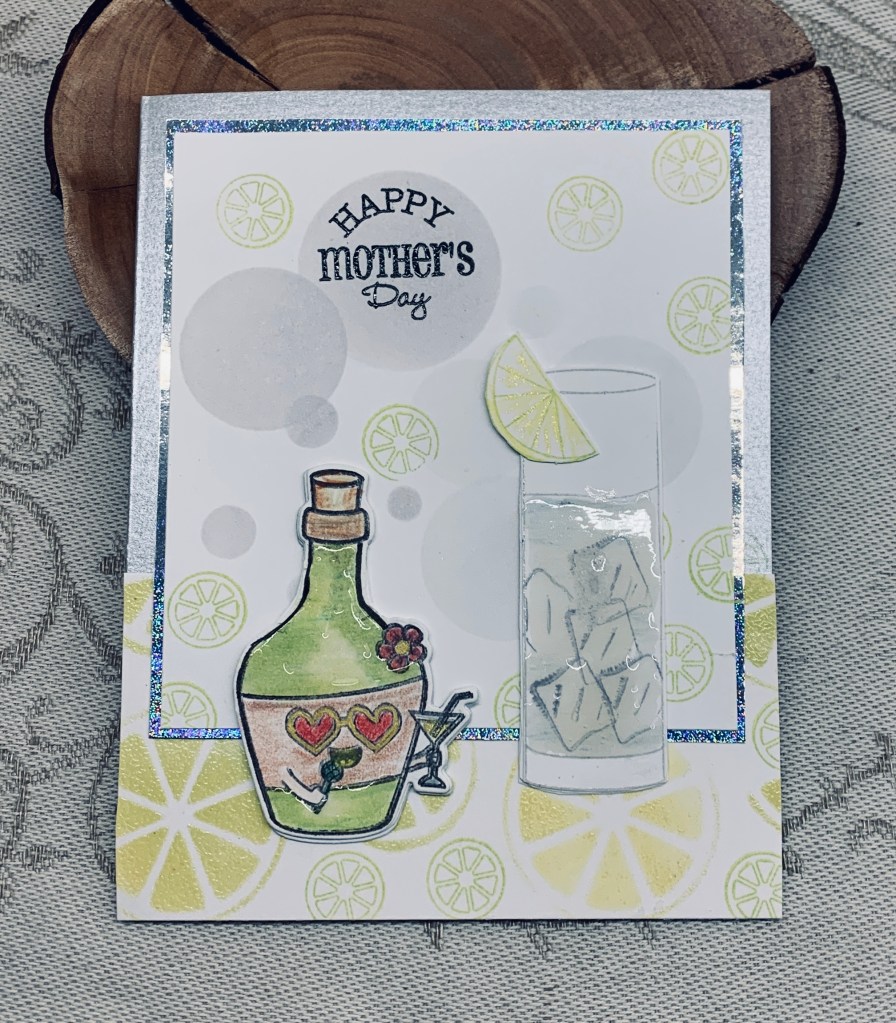
A friend has commissioned several cards from me and we went through themes for what she wanted. She has two mothers due to remarriages and one mom loves music and flowers and the other likes her gin and tonic as well as flowers. This is the second of the two cards, you will get to see the other one soon. In the meantime I looked at a few challenges and the challenge at Inkspirational has Fold as the word prompt and Crazy is our Fame is as usual all about stencils with the addition of flowers. I feel fortunate that I was able to make a card that works both for the recipient and for two challenges. As I was thinking about doing a fun fold it was a no brainer to make it part of the Inspirational challenge.
I began by doing the card front. As it happened I had a previously stenciled scrap piece leftover from something I did last year. I cut it the size I wanted and added it straight to the card front. Taking a white scrap I used a homemade circle stencil and lost shadow ink to create the illusion of some bubbles. I backed this piece with some holographic paper to get a sparkly border. Several stamp sets are involved in this card. They are, YNS, Penny Black, CTMH, Joy Clair and Hot off the Press. The sentiment on the front was added inside the bubble and I added a few lemon/lime slices as well. This piece was added on top of the stencil portion. The fun liquor bottle was die cut in several layers then glued together for dimension. It was coloured using mainly Prisma Pencils and Spectrum Noir markers. The glass was stamped with Lost Shadow and I added ice cubes as well. Added a bit of colour to the liquid after which I adhered both images to the card front before adding Nuvo Crystal drops to give the illusion of glass and liquid. For the inside, I added two additional stenciled panels backed with the same holographic paper. Stencil used is from Simple Stories. Before gluing I sprayed some shimmer to them using a product from Imagine. I cut the band for the folds and scored. Then I also cut some pieces for the stand up panels and did the same to the white CS, as I had done on the front, stenciling some bubbles. I cut this piece into 4 and added each to the yellow pieces. On separate scrap CS I stamped the florals and the two alcohol related images. These were coloured, fussy cut and then added to the bubble panels. I had seen a video of how to assemble a card in a style similar to this one, and I used the idea shown to assemble mine and get things in the right place. I added a white panel to the back of the card for a personal message. Of course, now I can’t find the video I borrowed from so cannot attribute to the demonstrator. I do know she is located in Great Britain.
This card has taken me at least 10 hours to create, but the friend who commissions them is always so thrilled with the results, it is worth the extra effort. I had fun doing it and am happy with how it has turned out. The problem is going to be what I do the next time she asks me to create for her. LOL.
Thanks for stopping by, it is appreciated as are any comments you leave for me.
Challenge number 223 is National picture of a bird day and while a Canada Goose isn’t deemed a national bird, it is certainly recognized world wide as something from Canada. Make my Monday invites you to play along if you can.
In order to make mine, considering I don’t have any stamps like this, I searched online for a freebie I could trace. Using a light box I traced the outline, using a Copic fine line pen, onto a piece of watercolour paper. Then I went around the image again this time using an elegant writer pen. Using a water brush I went over the image to get the look you see here. These elegant writers end up changing colour with water and one achieves a weird but great look. I backed this piece with some teal CS and added it the card front. My sentiment comes from a set by Lisa Elton and my bulrushes are a Cheapo Die that I cut several times. I coloured them with Prisma pencils and framed the bird on each side.
I’m quite pleased with how this turned out, as my first thought was, oh no! It helped that my hubby was intrigued by the card. Thanks for stopping by and have fun playing with your own bird ideas.
Seize the Birthday #280-Spring Floral is the theme challenge right now and I had almost forgotten until the reminder arrived. For the longest time, I have been wanting to try my hand at making tulips from paper, and I decided now was my chance to give it a go. I took a scrap piece of music die cut 3 circles using a Hero Arts set and then inked the edges of them front and back with Worn Lipstick ink. I folded them as suggested in something found on Pinterest and what you see here is the result. Using a flourish die and a scrap piece of green CS I cut the flourish. It is quite big so I cut it down some to make it fit on my card front. Using the same CS I die cut some small hearts using a Memory Box set and added them at the bases of the flowers then I added the flowers to the flourish. This flourish die is an old one and acquired before I had sense enough to keep the brands and names of my products, but it is most likely from Sissix or Spellbinders. To finish the card I added a slightly curved sentiment (from Kokorosa) in two places and some pearls from my stash.
I hope the earthquake felt by some of you is now just a memory but someone did mention an after shock. We live in an earthquake zone and it is often mentioned on the news as being a possibility here. I think we are less vulnerable in our current location, than we have been prior to moving here, but we are still insured for it just in case.
Thanks for spending some of your valuable time with me, it is appreciated.
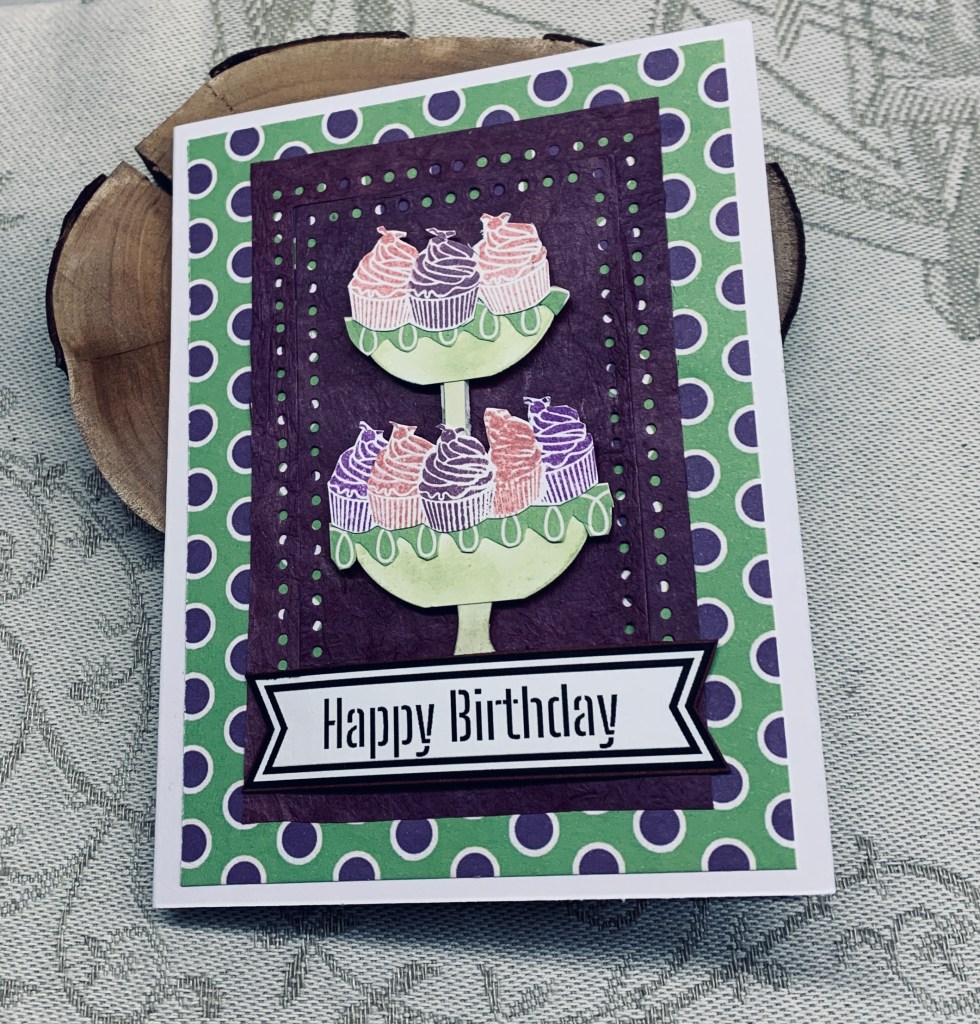
The photo shows a luscious cake and while the challenge is all about using the photo as inspiration, I really wanted to have a cake. The problem was that I have no stamps of any cakes except cupcakes. I went searching and found a couple of digi stamps that I could use, but I wasn’t totally sold on them. In the end I used one of the images as a guide and built my own using a small cupcake stamp from GKD and inks similar in colour to the photo. I built my own tiered stand by die cutting a couple of ovals and then cutting them in half after which I fussy cut some PP to give a border to the stand and also a base. I brushed on ink to make them green. The cupcakes were done on a separate scrap piece and I made a mask so I could stamp them in different colours and get the shape I desired. Then I fussy cut them. I built the bottom section then added another tier after which I added some foam tape to pop them up. Using some Mulberry paper and the Everyday Detail dies I cut the background rectangles and added them to the patterned piece. The sentiment is another of my freebies from Natasha Foote. These are a nice gift as all I have to do is print them onto CS and cut them out.
It took a while and more than a little creativity but I’m pleased with the result. Its kind of fun to build my own image as I used to do before I learned about stamping and long before dies and Embossing Folders were around. Thanks for stopping by, your time is appreciated as are any comments you may leave.
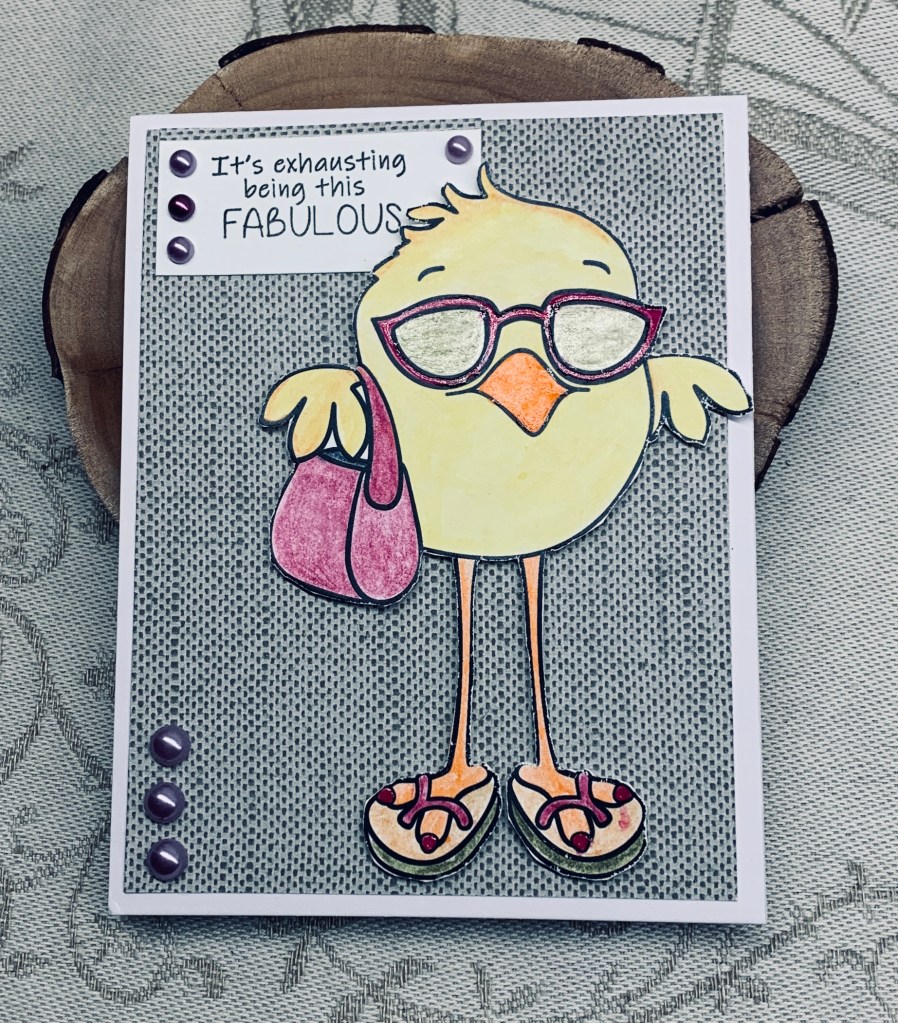
Helen has chosen the theme of cute animals for the current challenge here at cardz 4 galz and I’ve chosen a fashionista digital chick for my focal image. I won these digital images a long time ago and they’ve come in handy for several cards. My sentiment is from a Kokorosa set, the pearls are from my stash and the background PP is from StampinUp. The chick was coloured using a combination of pencils and Sakura Glaze pens and then fussy cut. I popped her up on foam tape.
The sentiment amuses me and I have another stamp that it can be used with too. A very simple card and relatively easy to make.
Thanks for stopping by, it is appreciated. I hope your day is a fun one and I look forward to seeing your creations in our gallery soon.
The stamp set used here was received as a small prize from JUG’s and is by one of the design team, Lisa Elton. I had been wanting to use it more fully and the challenge at CAS seemed just right as it is a colour challenge. I used Distress Oxides in Shabby Shutters, Mowed Lawn and Pink Lipstick which are as close as I can get to StampinUp inks. There is one small stamp used from another set by Hampton Arts as it allowed me to add a few longer stems. Basically I randomly stamped the stems and then added the peas in pods and the flowers all on watercolour paper. I added a some additional colour to the peas using an Inktense pencil. The panel was edged using a Spectrum Noir pen in a similar green as Shabby shutters, then added to the note card.
Two CAS cards in one day is a kind of miracle for me. Although my skill has improved it isn’t my go to for card making although I love what others do in this style.
I think this card may make a nice welcome baby card down the road. For now it will be added to my stash. I really appreciate your stopping by and thanks in advance for any comments you may leave. They are enjoyed.
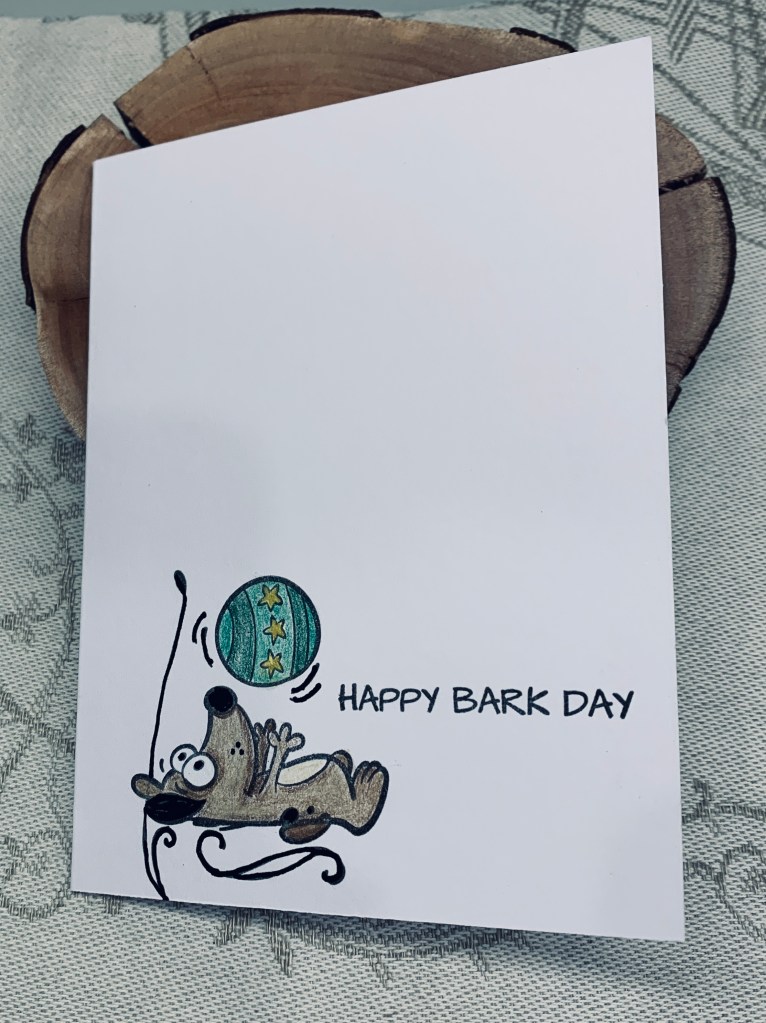
This card was made for two challenges, one at Double D asking for cute animals and the other is AAA which is a CAS sketch.
My image and sentiment are from a YNS set and the two florishes are from a Hampton Arts set. After placing the note card into my Misti I proceeded to stamp both the pooch and the sentiment. I made a mask for the dog and then stamped the florishes. To colour the image I used Prisma pencils, some Sakura Glaze and a gold pen. To smooth out the pencil lines I used an old blender pen as I find it easier than using Gamsol. In fact I am considering refilling this pen with Gamsol for ease of use.
The clean and simple theme made it an easy and fairly fast card to make.