Daisy, Daisy ….

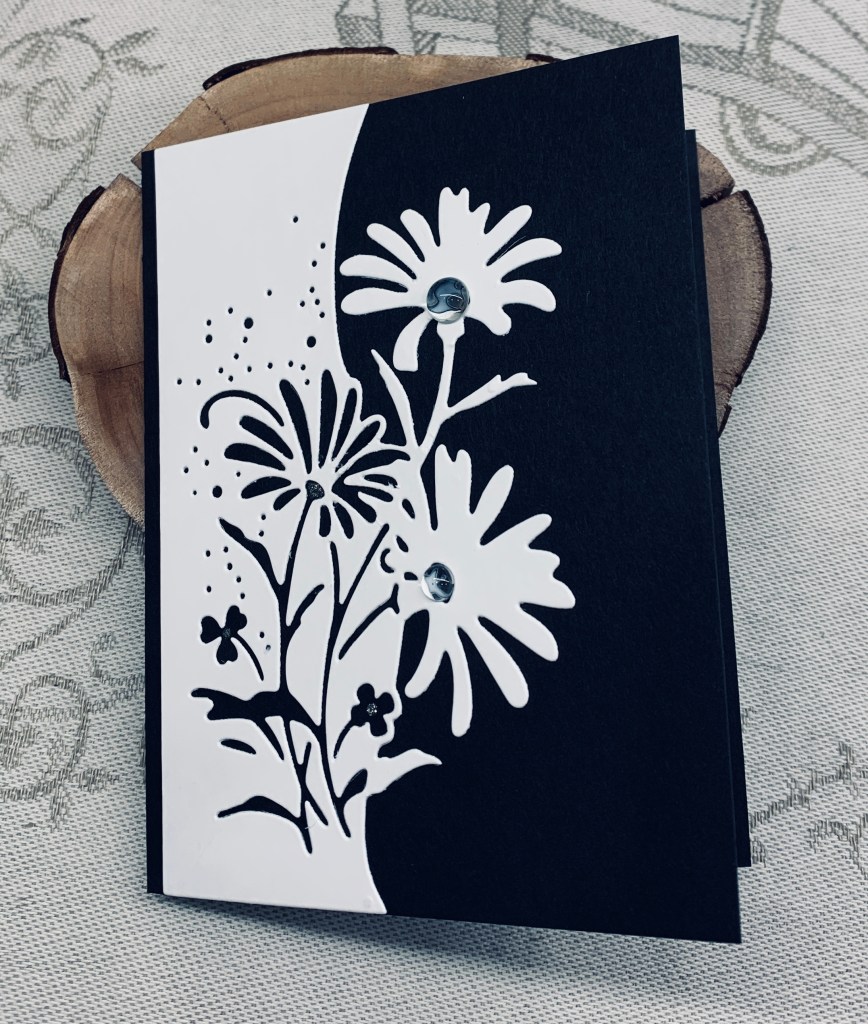
I shall start my post by saying I’ve made several new purchases lately and the die used here is one of them. It came from Kokorosa Dies. Some of my other newbies will get used but not today. As to my craft room size, my hubby had my space customized for me not that long ago and already I am out of space. Fortunately he is also artistic and has a studio of his own and I am able to store a few larger items there.

I kept my card very simple and without a sentiment for the time being. I may add one when I decide to use the card but most likely will just add something on the inside. I love the simplicity of black and white cards so basically the die cut was just added to the black note card. I added a couple of clear Trinity Stamp gems to the larger flower centers and used a glitter pen on the smaller ones for some added interest. I’m never sure if a card like this would be considered CAS although to me it is fairly clean and simple.

Thanks for stopping by. Your comments are welcomed and appreciated. Have a great day everyone.

smitten

Having been messing about with various designs recently I had this heart left from a project where I just needed the shaped aperture. I had scored the entire card prior to cutting so the cut out had the score lines as you see here. I added the red sequins down the center and then set it aside. Today I saw the challenge at Color Hues and decided that it would become part of a card for this challenge. A recent purchase gave me some small narrow embossing folders and I decided to try one. Using a scrap piece of this bright pink CS I added the embossing and thought it needed to stand out a little more. So I took my Aged Mahogany stamp pad and swiped over the raised parts. This is still in the colour tones of red, but on the photo it looks more gray than it actually is. Using a tiny sentiment stamp from a Lisa Elton set I stamped the word, went over it with a red glitter pen and added 2 tiny hearts from the same set. Glittered these as well. Rounded two corners using a punch and added it the panel. Note card is a shimmer white CS.

I’m not totally in love with this card although as so often happens it may grow on me later. Thanks for stopping by and also for any comments you may leave. I hope you are having a great day.

star wishes

Instead of splitting my card using paper I chose to do it with a die that works best on the diagonal. I then backed it with some glitter CS behind so that it twinkles through the openings. Using the same CS I die cut a small star using Hero Arts Infinity dies using foam tape to attach it. The sentiment is from a Joy Clair set and I heat embossed it in silver. I chose this particular sentiment as it gives me choices in how to use the card.

I’m happy with the end result and hope you like it too. Thanks for stopping by, you are appreciated in many ways.

Birthday roses

Taking a white panel I decided where I wanted my heart to be and die cut it first. Then I took the panel back to my score board and scored as you see. Using a small scrap piece I added the rose bouquet using a Taperology rub on transfer. This was then placed behind the heart and I used foam tape to lift up the panel slightly. I used a pink card front similar in tone to the pinks in the transfer and added the panel to it. Then I stamped the sentiment from Joy Clair in black but it seemed a bit harsh so I softened it by stamping a few times using a silver pigment ink from Scrapbook.com. The sentiment strip was cut using a Spellbinders die and I added to Pops of Color dots to finish the card. As CAS as I can get and a pretty end result.

Thanks for stopping by, your time is appreciated as are any comments you leave.

sweet pea

For some time I’ve been wanting to try a fractured card design and decided that the current Make My Monday #218 challenge to use patterned paper, was the perfect forum for me to attempt it.

Having won this stamp set by Lisa Elton, a DT at JUG’s, and because this style card needed small images, I figured it would be just right for my example. I’ve had the set for a few months and it was something else I’ve been wanting to use for a while.

I had this StampinUp paper in my stash and I paired it with some copper CS and a similar in tone, mirror CS for my fractured strips. The image was stamped and coloured using some Distress Oxide green inks with a border of Aged Mahogany hearts. When the ink was dry I added Nuvo Crystal drops to the peas for some dimension and shine. The sentiment was stamped and die cut using an unbranded rectangular set.

I’m quite pleased with the result and may try a few others using this technique quite soon. Thanks for stopping by, and any comments you leave are always appreciated.

paper piecing

I just purchased this die from Kokorosa as I had seen it a few times and liked it. It’s a great way to use up some PP actually. Anyway I pulled out some StampinUp DSP that I like and cut the frame and then I also cut some regular CS so I could give it some stability and dimension. The die comes with all the additional pieces so you can cut out smaller curved bits. Once I had built up my outer frame, I took all the fallouts and put them in order so I could add the other PP on top. Then I popped each one back into the section it came from. I ended up with a tiny amount of white showing here and there as it wasn’t easy to make them fit exactly. The initial frame bends out of shape just a little and I think this is the reason it was more challenging. That said it isn’t so bad that I would discard the card. The sentiment is from MFT and I had it from a previous project where I changed my mind because I found it a bit big. For this card is works well. I quite like the end result and it is a card than can be used for a male or a female.

Thanks for stopping by and thanks in advance for any comments you leave. I appreciate each and every one.

jungle scene

When I made my safari card I had quite a few die cuts leftover so I set them aside for future use. I also had a poorly embossed background card which I really didn’t like much but didn’t want to waste so I added inks to it to see what would happen. I thought it looked okay so I’ve used it here. I die cut circle at one side and carefully added another inked scrap piece behind it when I popped up the back ground on foam tape. From there it was a matter of adding all the small die cuts which I coloured using mostly pencils but a little ink as well. I played with placement of all the elements before fixing them in place. A couple of the hanging vines are as close to Crushed curry as I could manage while my Tiger and Monkey are on the neutral side as is my card front. I quite like the end result and hope it fits into the current challenge at As You See It. I made the card a few days ago but didn’t have the opportunity to complete and post it until just now.

It is much more vibrant in reality than it is on the photo. After working for a few hours on my hubby’s project I am needing a break from my desk. He has offered to take me out for dinner so I get a break from the kitchen tonight. YAY!

Thanks for stopping by and I really appreciate your comments when you leave them.

green and copper

It has been quite crazy around my home for the past 3 days and I haven’t had much time in my craft room. Finally though, we have our heating issues sorted hopefully forever. Because of this although I managed to keep up with some commenting I hadn’t been checking challenges and I almost missed the deadline on this one. I was supposed to be doing a small typing job for my hubby, but instead I quickly assembled this card.

Using a copper sparkly CS I die cut the word using an older MFT die. Checking through my scraps I found this dark green corrugated piece which went nicely underneath the word. I glued it all and added a few coppery/gold coloured gems from Trinity Stamps and a sentiment above from Hampton Arts. It is a simple card but I think an effective one.

Thanks for stopping by and any comments you leave are always appreciated. I hope you have a nice weekend everyone.

hearts galore

Challenge #217 as chosen by Sue J, here at Cardz4galz, is all about Reds and/or pinks. My example uses mainly pink shades with a white panel. Although you can’t see it well the background PP behind the circle is a pale pink with a faint pattern. My hearts are all from an unbranded heart bouquet die and I added pink sparkle using a Nuvo glitter pen. Its so old I was surprised it worked. The sentiment stamp is from a Hampton Arts set and I added 2 additional hearts one each side. Circle die is from HeroArts infinity dies and I cut a frame for the circle in the same CS as the note card.

It was a bit fiddly gluing all the hearts around the edge of the circle but it worked out and I popped up the panel on foam tape so most of the hearts are only stuck on the edge of it.

Valentine’s Day is not too far away so having this ready is a bonus as I’m usually scrambling for these cards. Thanks for stopping by and all comments are appreciated.

Always …

The hearts used here were left over from a different project and were cut using Hero Arts Infinity dies. I saw a card on Facebook, but I can’t remember which group. I think it was GKD and I really liked the design so this card is inspired in 3 ways, firstly the challenge, secondly the mood board blues and then the card I saw. I cut a panel and then using an older Tim Holtz die set I cut the corner section. My first cut was not great, so I set that one aside and did another. I was thinking about how to continue when I had the idea of using the poorly cut piece as a stencil so I could add bits of colour in a few places. I pulled out some textured CS and cut a piece that would fit behind the white panel. Then I placed the temporary stencil and added some different inks in just a few spots. While I was doing that I thought maybe the stencil would work over the hearts so I proceeded to that too. I added the blue piece to the white layer and then took the hearts and sprayed them with sheer shimmer spray so they have a lovely sparkle and it actually shows on the photo. I added the sentiment and went over that with a sparkle pen then added it all to another layer of textured blue CS which I added to the card front. I popped up the hearts with foam tape and added a few sequins.

In thinking about it, I decided to also add the card to the challenge at January 2024 Stencil Fun. I’m not sure if a homemade stencil qualifies but nevertheless I think it is fun to add there as well. I wasn’t sure I would like this card, but I actually do and am happy with how it turned out.

Thanks for stopping by, your comments are much appreciated.