For this card I used a new stamp set from YNS and an EB folder from SSS. I coloured it using some new metallic pencils and think they will work better on darker CS, but they look okay here. I added a bit of sparkle in a few places and die cut with an infinity die set from HeroArts. Went around the edges of both pieces with a black pen and added to a silver card front. The challenge at Just Add Ink is to add alcohol so this stamp was perfect for the challenge.
AAA cards is asking for CAS in black, white and gold while JUG’s wants something in a circle. I figured making one card for these 2 challenges was doable and this is what I came up with. My card uses a stamp set from YNS and I stamped the background onto black CS and then heat embossed it with gold. I die cut the aperture into white shimmer CS and added the black panel behind it. I also heat embossed the sentiment. I felt it still needed something so I took a scrap piece of shimmer gold CS and die cut a frame using 2 close in size dies. Once this was added I felt it was more complete.
I’ve mailed all my international Christmas cards last week and now can concentrate on the Canadian ones with less pressure. I still need approximately 50 cards, but I have several designs on the go so I can get them done relatively easily and I hope to have them finished by the end of the week.
Our friends are coming for a few days next week and once again they are going to assist with the Christmas decorations. I am so spoiled by this particular friend and feel very lucky that she wants to help me with the decor again.
Thanks for stopping by, it is appreciated. I hope all of my American friends had a good thanksgiving and fun family events.
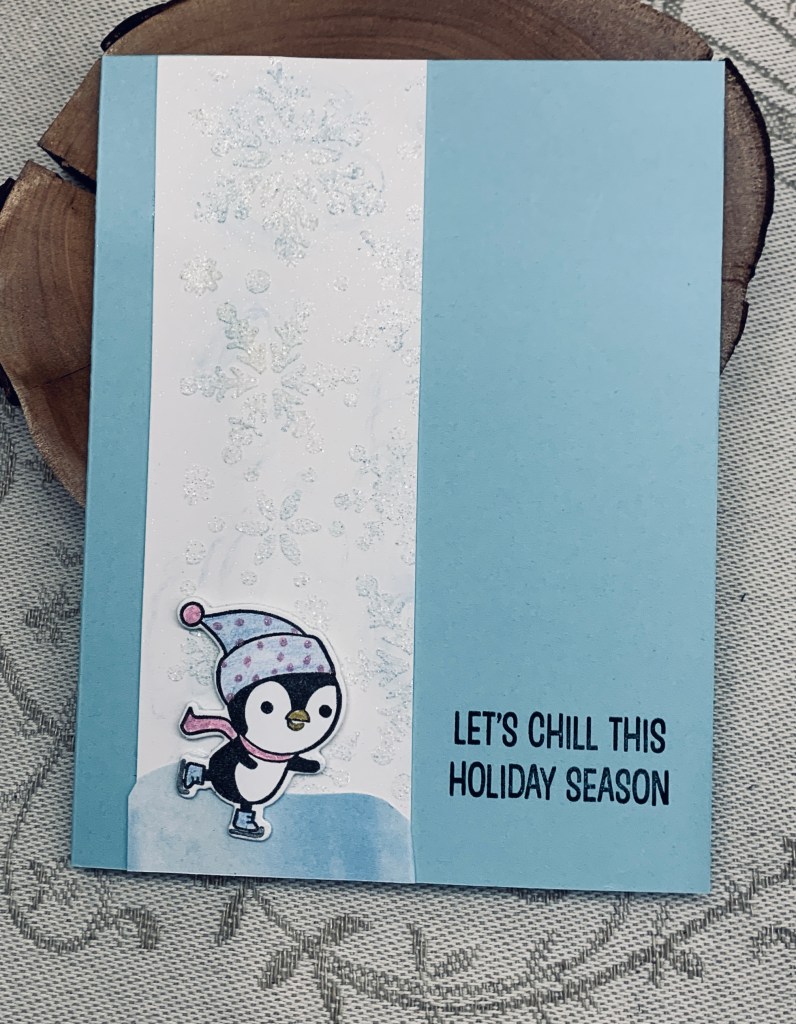
Yesterday I was fooling around with stencils and I created a few different panels. I cut one down and used the smaller piece for this card. It is a snowflake stencil, but I’ve forgotten by whom. I used some glitter glaze by Brutus Munroe through the stencil and when dry added a bit of ink very lightly over the raised portions. After adding it to the blue card front I added a small piece at the bottom to give the illusion of a rink and added the little penguin from a new YNS set. Sentiment part of that set too. I used some of the colours from the Moodboard to colour in the penguin. Decided to keep it totally CAS so no other embellishments.
I am adding it to the challenge at JUG’s. Thanks for stopping by, it is appreciated, as are comments you leave.
Welcome to the new challenge here at Make My Monday. Debbie has chosen the theme Wreath. I have just purchased some Holographic paper and I thought it would make a great wreath when paired with this unbranded star wreath die. I pulled out the paper that has tiny stars all over it and proceeded to die cutting. Having decided on a black card front I placed it down trying to figure out my next step. I decided to use some vintage printed music sheet paper and some soft peach shimmer CS and a word die from Scrapbook.com. It is a two part die so I glued the music bits to the base before adding it to the center of the wreath. I had a couple of small stars left over so I added one doubled up star to the center of the O and one on the same peach with music on top to the side. I also cut some strips of both the peach and holographic paper and added them to the side of the card as you see. Basically this card is almost a one layer so mailing it will be a breeze.
I’m glad I made this purchase as it will be fun to do other designs using the papers. I shall be sharing this card at: https://peaceonearthchristmas.blogspot.com/ – anything goes Christmas challenge.
Thanks for spending time with me today, it is appreciated.
This die cut stocking is from a set by Marianne Design. It had the snowflake and a tiny heart as part of the set. I cut it in copper and added the snowflake along with the little bow as you see. I also added a small gem and the Spellbinders banner. I set it aside and did some other cards that were part way finished while I let ideas gel in my head. Because I’ve been lazy at putting things away, the stamp I’ve used – also by Spellbinders – was on my desk so I stamped it onto a card front using Versamark and heat set it with gold. I took the stocking and played with it for a minute decided that it would look okay and added it using foam tape for dimension. Then I added a few more gems before calling it finished. I am adding it to the challenge at As You See It. I really like the stamp and did another card in a similar fashion but with a snowman instead, but I like this version the best.
I’ve spent most of this afternoon, playing with alcohol inks so now my craft room smells of rubbing alcohol. I made such a mess I had to use the alcohol to clean my hands and my glass mat, but it was fun to play.
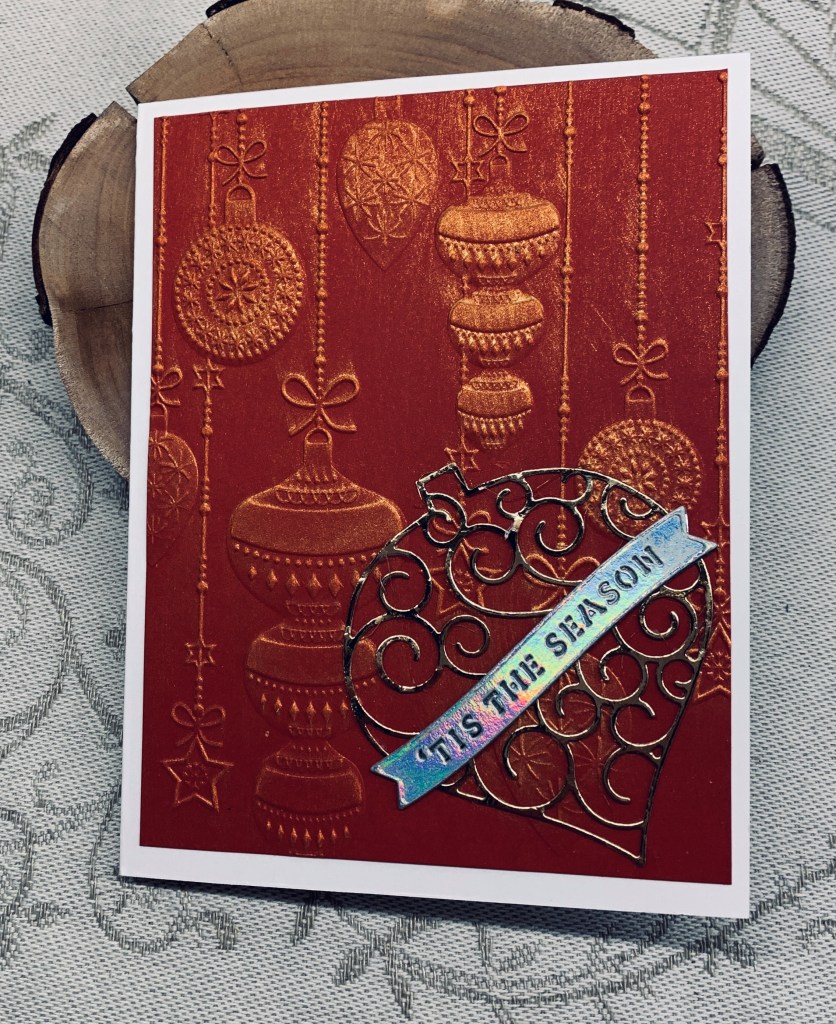
As mentioned in my last post, I’m in full blown Christmas crafting mode and I was playing yesterday and the day before with my new 3D folder from Sizzix. I cut 4 panels out of the red CS and put them through the machine and then took metallic inks in both silver and as in this one, gold. My inks are from Scrapbook.com and are metallic pigment inks. I swiped carefully over the raised sections allowing the ink to highlight those areas. Then I took some gold foil CS and using an ornament die front section I cut the filigree ornament. My first thought was to use both parts of the die, but it covered up too much of the layer so using just the part here worked best. Using a new set from Spellbinders I die cut the sentiment in a silver CS so it would stand out more over the gold.
At the time of creation, I wasn’t thinking of challenges, just of getting a few more cards done. I ended up with 4 like this and 2 of a completely different design. This morning I was out at my yoga and a birthday celebration lunch for a friend and hadn’t even thought about card making so on my return to my craft room, I was surprised to find the challenge at Color Hues was up and in the colours I had already used. What’s that word for when this happens, serendipity, I believe. All I had to do was create the post. So easy and such fun.
The new challenge at Cardz4galz begins today and Helen has chosen embossing (wet or dry) for the theme this session. For my example I chose a StampinUp/Sizzix folder called Scattered Sequins and gently ran a gold metallic ink pad over them for some colour and shine. My stamp set is from Your Next Stamp called Crafty cocktails and the sentiment comes from that set too. I stamped and coloured my chosen images using Prisma Color pencils and I added Nuvo Crystal drops to the drink for some shine and so it looks more like glass. I decided to add a small half oval Holographic piece behind my images for more sparkle and shine. I went around the edge of the panel with an ink pad before adding it to a shimmer note card. The ink gave it just enough definition to stand out from the card front. For once my camera captured colours in the holographic piece.
I’m quite happy with how this one turned out and like the cuteness of the stamps. I also think the sentiment is perfect for someone who may need a lift in spirits, pun not intended. Thanks for stopping by, it is appreciated.
I’m in full Christmas creating mode at the moment and if a card fits a challenge, great, if not, no worries. Choosing the layout I liked quite a lot from a while ago challenge I decided to cut some PP for a background. Quite by accident the paper I chose fits with the Double D challenge so here is one of the several cards that works.
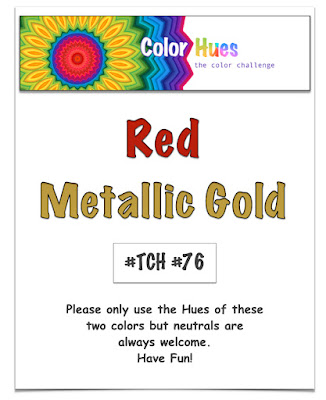
I don’t measure the PP, just eyeball it and cut. As the paper is two sided it is very easy to match because its all in the same colour family. In this case, snowflakes on one side and stripes on the other. Using an older and much loved favourite GKD die I cut a few snowflakes from holographic paper and added them both in front and behind the larger StampinUP snowflake. I initially thought I would use it alone, but it didn’t standout enough. The dies used for the words are from Spellbinders and I cut the one shown here in both silver and black, slightly offsetting them so it would standout from the background. I added one silvery large gem to the center of the snowflake and decided that adding more would be a mistake.
I hope your day has been going well. I’ve managed 6 more cards today so I feel productive. Thanks for stopping by, it is appreciated.
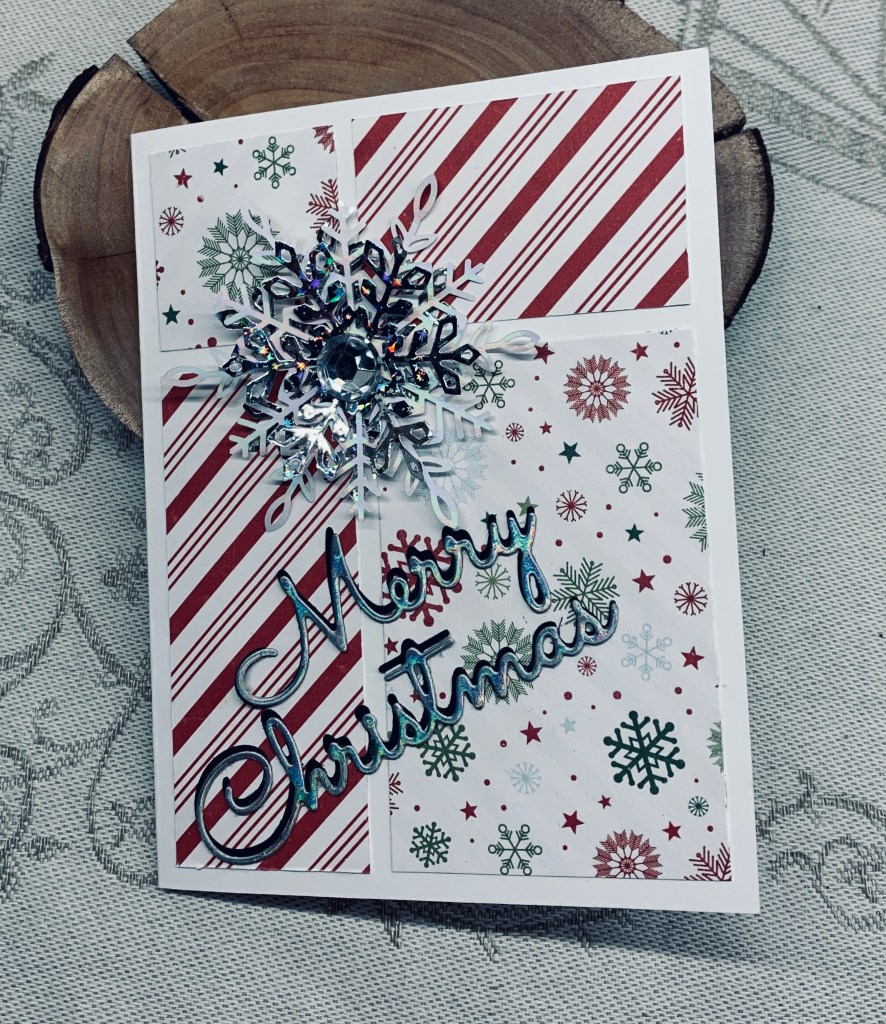
I think this will be the last card I do that is about fall and or thanksgiving and initially I had no idea of what to make. I knew I had the stamp set from YNS but wasn’t sure I wanted to do leaves. Then I remembered this ancient Sizzix die of the owl and wondered if adding it along with leaves would work. I’m happy with the result and I like the sentiment (YNS) as it can be used with anything. The sentiment was stamped with a dark brown ink. The little owl was die cut in both copper and brown with a layered yellow beak. The leaves were stamped and coloured with inks and two of the smaller ones were done separately and die cut so the owl would look as if he had some leaves falling around him. It is a simple card and fits into the CAS Fall moodboard at AAA so I’m adding it there.
Thanks for popping in and for any comments you leave me. It is appreciated.
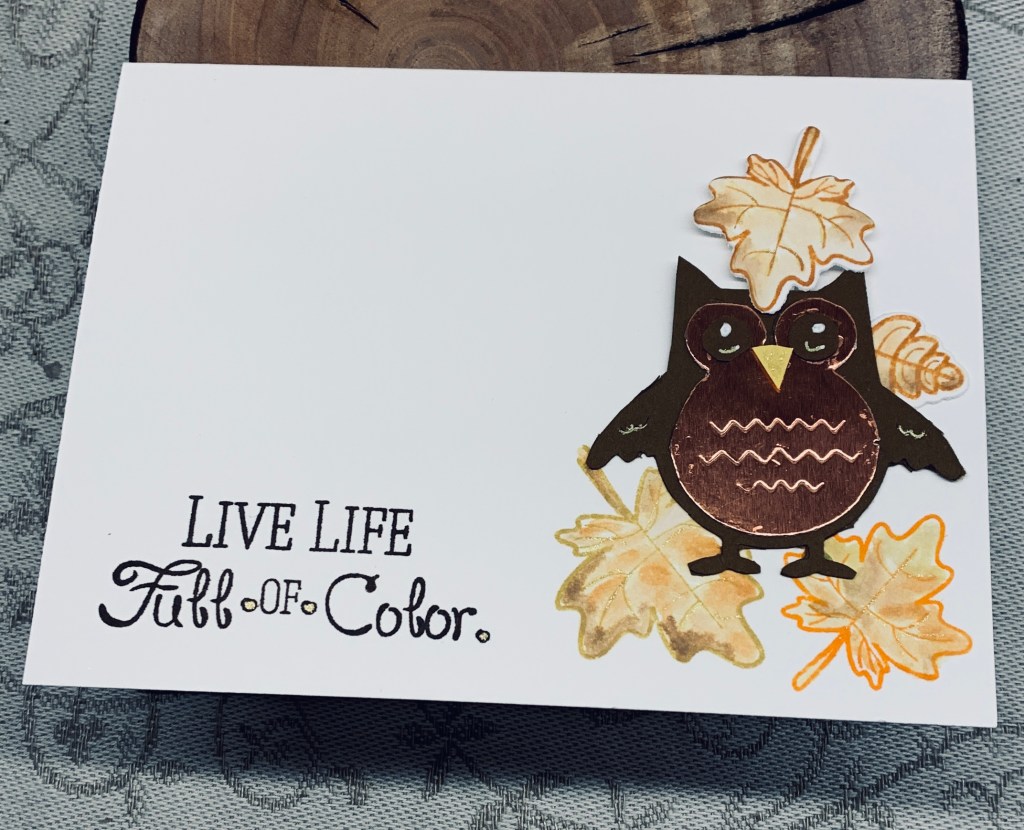
The moodboard at Inkspirational has a chalkboard along with candles and pinecones and that particular part of the board inspired this card. The foliage/pinecone stamp was already in my stamping platform and is from an old set for which I have no information. I stamped onto some beige/brown CS using 2 inks, then when dry, I fussy cut them. The black piece is cut using dies from Gina K which includes the candles. I left them white but added colour, using pencils, to the wick and the flames. After fooling around with placement I added the main parts as you see and then took a Martha Stewart punch and added the copper and silver branches as well as the small sprigs at the very bottom. These came from StampinUp. Sentiment was heat embossed in gold and is from YNS and gems are from my stash. There is some gold sparkle here and there but it doesn’t show in the photo. The card front is something I inked the other day and wasn’t happy with, so the black layer helped me to use it. It is a small square card and is kind of cute in real life.