sunshine feel better

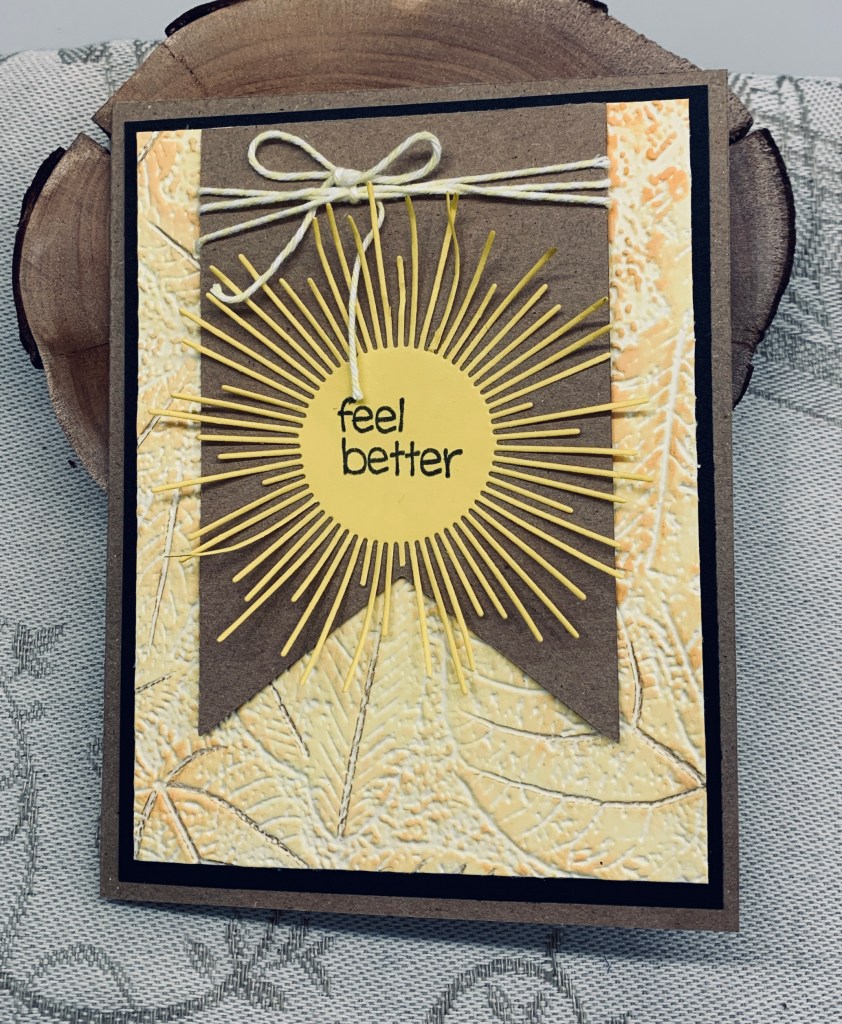
The colour challenge at Color Hues was asking for Kraft and yellow so I put my thinking cap on and came up with this card. I am out of Kraft CS in my usual size but fortunately remembered that I had a few pieces of 12 X 12″ in my stash somewhere. I cut the card front and die cut the banner from the same CS. Using a scrap piece of CS I dry embossed and went over it gently with two yellow inks, Squeezed Lemonade and Wild honey. After wrapping the cord around the banner I glued it to the embossed layer. After a search through stamps and dies I found this die from SSS. I’ve only used it a couple of times because it so challenging to get a clean cut. Even with a Magic Mat I wasn’t successful. Then last week I saw something on Instagram with a tip about intricate and difficult dies and tried out the tip. It is amazing how it works and I got a pretty decent result. The tip is to use an old bubble wrap envelope cut to the size you require. You put the piece on your platform bubble side up, put your CS next and the die on top. Run it through and see the magic. From now on I shall be keeping all my used mailers so I have enough to be going on with. Before adding the die cut to the banner I stamped the sentiment. I added a black piece behind the yellow to help it to stand out.

I am quite happy with how this one turned out and shall enter it into Color Hues and also to CYHTP twist not taken. Supplies used are: Banner dies from StampinUp, sun ray from SSS, EB folder is a 3D Tim Holtz/Sizzix called Foliage and twine is from my stash.

Thanks for stopping by, it is appreciated as are your comments.

snowy village

For this card I used a fairly new set from MFT stamps and my new modern oval dies cut in two sizes for a border. I layered cream CS onto Kraft CS and then added another layer of Kraft wrapped with some yellow ribbon tied at the side. The scene was coloured with Prisma pencils and I added some Cosmic Shimmer Fluffy stuff to give dimensional snow. I’m not totally happy with this card and feel it needs something else. For now I’m leaving it alone as I’m sure an idea will appear in my brain at some point. It works for the challenge at Sunday Stamps so I am adding it there.

It has been a rainy gray day up till now, but the sun has appeared so things seem a bit more cheerful outside. Thanks for popping in and I hope you are enjoying a good day.

warm winter wishes

My card uses some new stamps one of which is this Christmas Paper background which I heat embossed in gold. The little images are from a stamp set called Holiday Chill, the trees are tiny die cuts from an unbranded set and the tag is also new. Except for the tag all are from the YNS closing out sale. I coloured the images with pencils and added a snow hill to ground the penguin and trees. Red thread is from my stash and I heat embossed the tag edge using a Versamark pen.

I don’t know how others manage not to make a mess, but heat embossing when I do it means powder everywhere no matter how careful I am. I have a tray on my counter that is supposed to contain the powder, but somehow it still ends up everywhere else.

Thanks for stopping by, it is appreciated.

Pumpkin faces

AAA cards wants spooky, Just Add Ink is a colour challenge and JUG’s is asking for pumpkins. It isn’t often that I can combine three challenges with one card, but I think I’ve managed it with this one.

It is a totally one layer card and started with a Tim Holtz pumpkin stencil. I masked off the areas I didn’t want and using the challenge colours (as close as I can get) I stenciled the 4 pumpkins. I added the stalks separately. I added the stars and the gold cord ribbon and the sentiment. The cord was stamped with a gold pigment ink as was the last pumpkin, but the stars were heat embossed. Stamp sets are all from GKD and are older sets.

Thanks for stopping by, it is appreciated. I’m off to make a dessert for later as we are going over to our neighbors to play cards after dinner. I said I’d bring a dessert and my hubby made French crepes, which I will stuff with apples and figs. Whipped cream for topping and an easy but fun dessert it will be.

modern oval

Inkspirational has a designers choice challenge and wants to see an envelope that matches the card and Seize the Birthday is asking for Lime Green and Hot Pink colours. Having a few new products to play with, I decided to combine the two challenges with one card. Firstly, I die cut card stock, from GKD, in the colours using my new Spellbinders Modern Oval dies. I graduated one die smaller each time. Each layer was popped up with foam tape. On the white oval I stamped the image using a new Altenew stamp set called Inspirational Quotes. I used one of the sentiment stamps from here too, heat setting it with clear embossing powder. Using Distress Oxide inks in Picked Raspberry and Twisted Citron I water coloured the image. Using some pencils in the same tones I added a bit more depth here and there. I added the same floral image on the linen envelope using only pencils to colour it, because I didn’t want to add water to the envelope. My embellishments are from Trinity Stamps.

I hope you are enjoying your weekend. We have a storm rolling in, but at least most of the exterior painting is now finished and things are put away so we should be fine. Thanks for stopping by, it is appreciated.

little house new home

A friend requested a new home card and this is what I came up with for him. The little banner was part of his request as he wanted his niece’s nickname on the house. I did a bit of research to see what was out there and found this fun fold. As I don’t have any of the dies that the person showing the fold had and I don’t have much in the way of new home stamps and dies, I basically created this by hand. To do the windows I used a scrap piece of yellow CS and a window die that cuts 9 windows. I then cut the whole thing up so I could have window frames but I did have to glue some bits together to get the center piece down the middle. I fussy cut the holes into the background CS and added the frames around the spaces. Before I did that I also used an EB folder from Sizzix, to give some brick texture on the card front and I added a small amount of ink here and there for a more realistic look. I have a new die set from Spellbinders that does modern ovals and I used the smallest one for the door and simply cut it to the length I needed. A little embossing on it for dimension and a white pen gives it a decent look Gold pen for the handle. I added some packaging behind the windows to make it look like a pane of glass and some MFT die cut bushes for underneath the lower windows. The added benefit here was they hid some poor cutting edges. For the roof I die cut some copper and used a border die from Heffy Doodle to cut the edge. I then tried to add the same border die in other places without cutting but it still cut through in places so I taped it all back together on the backside before gluing it on. The inside used a Kitchen Sink stamp set which is very old, I think I won it in a Mod Squad challenge, and I took 2 sentiments and added them together.

I’m quite pleased with how it turned out and my friend is thrilled so the effort was worth it. Thanks for stopping by it is appreciated.

I’m sharing this with Can You Handle the Pressure Anything Goes with a twist of spooky. I didn’t take the twist with this card.

A Christmas welcome

The challenge says choose two, and I believe that I have both a door and a window here, but I also have a flower so one way or another this should count for the challenge. When I first saw it I wasn’t sure what I might make, and then I remembered this older Hero Arts Christmas kit set and decided it fit the challenge well. I die cut the panel out of cream CS and carefully inked the bricks using a small brush. With Prisma pencils I coloured the rest as you see. I ensured the hinge fold for the door was burnished so it would stay slightly ajar and added a white piece behind it. The dog and the welcome were stamped inside all from the same set. I paper pieced some gold CS into the lanterns and added the same CS behind the half window above the door. Added the same CS to the handle and mail slot and a poinsettia flower to the door. I did cut the panel down a bit to ensure it would fit a normal size card base as normally there would be a welcome mat at the bottom. I had just finished the card when our friend, who is currently painting our exterior, asked me if I would make a New Home card for him. He wanted something specific on the house and had I known beforehand I would have used this card for him. That said I’ve seen a fun fold that will also work for a New Home so I shall be doing that for him tomorrow. At least I have one more Christmas card for my stash.

Thanks for stopping by, it is appreciated. Oops, I just realized that I missed the challenge time frame. We had a neighborhood power outage today and even though our generator helped to keep many things going our computers weren’t working. We couldn’t take the chance on the power fluctuating on and off based on the work being done by hydro.

elegant diamond

When I saw this diamond stamp (from Spellbinders) on a tutorial, I knew I just had to have it and as a sale came up on Scrapbook.com I bought a bunch of things with this being one. I wanted something simple but different for the challenge at JUG’s and it seemed the perfect time to ink it up. The ink used was Distress Oxide Tea dye which was the closest I could get to a tan colour, then I added tumbled glass and the flowers were done with Spiced Marmalade and a Prisma pencil. The flower stamp and leaves are from 2 different Altenew sets that are also new purchases.

While the ink was still wet on the lines I added some clear heat embossing and then I watercoloured the diamond centre. I fussy cut the flowers but the leaves had their own die which made it easy. Popped up the sentiment so the rest could be added slightly behind. Added some sparkle with a Sakura gelly roll pen to the sentiment and the flowers. The Kraft card base is from GKD.

I quite like how this one turned out. Thanks for stopping by, it is appreciated.

blue leaves

When I saw this challenge, I remembered that I had this gorgeous copper metallic CS and I thought it would be great to use. I decided to die cut it with the largest frame from a Recollections set and cut the card base so it would fit. During a recent sale at Scrapbook.com I purchased a few new stamp sets with matching dies and this is from one those sets. It is by Altenew and I really like the set. I chose a CS from my stash that was close in colour to the challenge and stamped my image with Blueprint sketch to get some depth. I deliberately didn’t season my stamp first knowing I wouldn’t get an absolutely great image because I really wanted it to look a bit smudged and not crisp. I added a bit of clear embossing powder and heat set it so it had a tiny amount of shine. Once it was die cut I played around with placement but before gluing it I decided to step it up a bit using some copper Nuvo Drops. The idea for doing this came from a tutorial by Natasha Foote only she used a pen to add lines to her leaves. As well I didn’t do all the leaves. When it was dry I once again played with placement and marked where I wanted my sentiment to go. Stamped this directly to card front and of course smudged it. Oh no! Starting again I stamped it on a scrap piece, die cut it then die cut another piece out of copper and offset the two so I could cover up my mess. Adhered the leaves, added a few more copper dots and declared it complete. I’m quite pleased with how this one turned out.

We have much needed rain today and most likely it will continue tomorrow. I’m sure I shall be complaining about dreary weather as the months progress, but for now I am accepting it. Thanks for stopping by it is appreciated.

pink halloween

Having seen this technique done by Natasha Foote, I wanted to give it a try. I also needed another Halloween card, requested by my neighbor for someone who likes owls. As my buddies know, not my go to type of card usually. Seeing the pink challenge at DD gave me the opportunity to combine the new technique and a Halloween card so here it is. I watched the video a couple of times and then came up with this background. Tash used fine embossing powder but I used Ultra Thick as I wasn’t going for a smooth finish here. I did apply several layers of UT though. I added it to the black card front and set it aside. Using an Infinity circle die from HeroArts I die cut my circle and stamped it with a few images from 2 holiday sets. I added some silver sparkle to the stars and to the owl. It seemed a bit empty so I took the face stamp and used it to fill in a few areas. I managed to smudge them a bit and was going to start again but decided that ghostly faces may be a bit smudged so I left them alone. Then using an alcohol pen I went around the edge of the circle so it had a thin pink border. The sentiment is flat but I added the fussy cut spider to the bottom just for fun. The background is very shiny but the photograph makes the colours look more coral than pink. In reality it has 3 different tones of pink and one dark shade that is kind of burgundy. Stamp sets used are from GKD.

Thanks for spending time with me today and for those living in Canada, Happy Thanksgiving.