Happy Baaa’thday

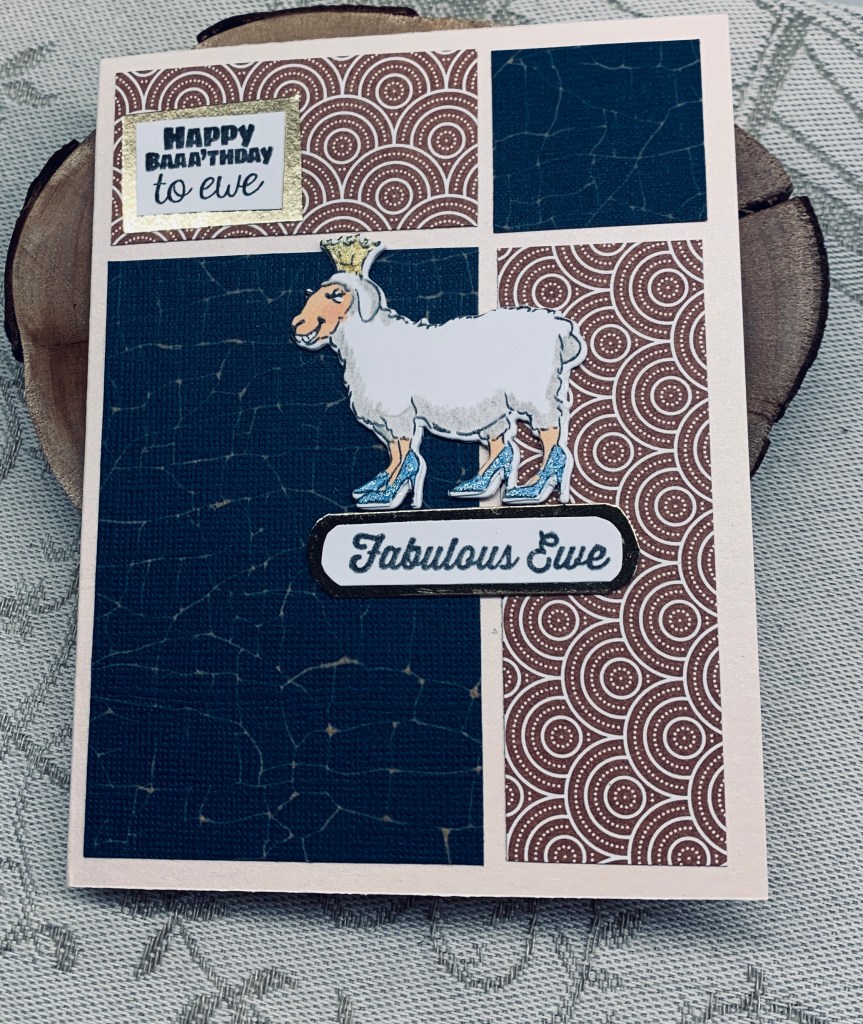
Welcome to the new challenge at Make My Monday with the theme being Pun/Fun Sentiments. Recently I have been playing with this particular layout and I had these pieces left on my desk. I decided to use them here and added the rest using an Art Impressions stamp set that I find amusing. I love a lot of the A.I. sets and they often have punny sentiments to go with the images. I thought the sheep went with the circular spirals as they remind me of wool. Once I had stamped and coloured the image I die cut it and added two more die cuts behind for dimension and stability. She was coloured using a Prismacolor gray pencil, some Sakura Gelli roll pens and an Ohuhu pen for face and legs. I used 2 of the sentiments and bordered them with gold CS. I also stacked the one under the ewe so it was almost same thickness as the ewe. The ends were rounded by hand.

I had fun creating this card and hope you are amused by it as much as I am. Thanks for stopping by, it is appreciated. I hope to see your creations in our gallery and that you have fun participating.

Inks and leaves

I had inked a few backgrounds a while back and also had precut the main die cut panel when testing out a new die from YNS. The green panel looks very dark in the photo but is way more vibrant in reality. I decided to put them together today as my space is getting crowded with partially finished projects. The leaf I added from the corner is a new set from Catherine Pooler including dies and I added some additional interest to the leaves using a gold pen. The sentiment comes from another new set, this one from Altenew. I wasn’t sure if this would fit into a challenge but the one at The Card Concept seemed like a good one to enter so it will be linked there. I’m not 100% sure which style it fits into. It seems to me it is more Mixed Media, but there is also a lot of texture too.

I hope you have enjoyed a good weekend. Many thanks for stopping by.

birthday pumpkins

Image found on the Internet.

The challenge at Double D is all about pumpkins. Being 100% honest, I’m a little fed up with creating the fall colours so initially I was a bit ho hum about joining in. That said I love the card that DT Barbara made and thought perhaps I could do something in different colours too. I don’t have many stamps specific to fall and only have one pumpkin stamp so creativity was definitely the name of the day here. Firstly I looked at some images online and found a napkin with a design I liked. I printed the image because I thought I might fussy cut a few of the pumpkins and use them. Then I decided that instead I would create my own using the picture as a kind of guide. So my card is inspired by the mood board, Barbara and this napkin.

I used a stamp set from GKD that has lots of small images, including the sentiment I’ve used, as well as an image from an Easter set by GKD. I began by stamping the urn using Blueprint Sketch and I clear heat embossed this. I masked it and stamped the pumpkin in the same ink and I added a bit more ink to shade it before fussy cutting. I stamped few more pumpkins and fussy cut those. Before fussy cutting I photocopied 2 pumpkins and reduced the size 50% before printing. I added these small ones to some CS so I could fussy cut. In the end I didn’t use all the images but have them for another time. I placed the larger image on the card front so I could see placement and made a couple of pencil marks for attaching later. Then I stamped the edges of the card using 2 inks , Tumbled glass and Blueprint sketch not worrying about a crisp image as I was going for the slightly shabby look. I added the stitching in Speckled Egg and the leaves by mixing the two inks. One gray/white pumpkin was placed behind the one inside the urn, the others were added as you see with one being stamped behind the lower part of the urn.

I added the panel to a blue SSS notecard after I had inked the edges for a bit more definition. A sparkle pen here and there and I was pretty happy with it. Actually I’m more than happy with it as it turned out so much better than I expected.

Thanks for stopping by, I really appreciate it.

Moodboard
Barbara’s card.

jack Frost

I started this card with the vellum challenge, at As You See It, in mind, but with no real idea as to what I would create. In looking through my paper files I came across a couple of sheets of Patterned Vellum from The Paper Company. They are so old I don’t think that this company is even around these days. Anyway I chose the one you see here and decided I would make it look as if it was a thin window. When I held it over the shimmer card front it didn’t show that well so initially I thought to colour the back with white ink or a pen. I wasn’t happy with that and had a bit of a brain wave in that I remembered a technique of pressing through the vellum so it sort of embossed it, but also showed up white on the other side. Using a silicone mat and a couple of those round heads used for shaping flowers etc., I did the section that shows behind the side panels. It took time but gave me exactly the look I wanted and even better, as I was doing it I thought it kind of looked frosty and would work for the challenge at Inkspirational too. The term Jack Frost came to mind, hence my title. The benefit of adding it the way I have, meant that no glue shows through and it is popped up foam tape for some definition. The sentiment is from Spellbinders cut from the same shimmer CS. Originally I was going to leave it sort of like white on white, but in the end I went over it twice, once with a silver pen and then again with a sparkle one and it stands out nicely against the rest. I added some bling from Trinity Stamps and called it finished.

To answer the challenge question regarding my favourite thing to do with vellum is a challenge all of its own. I don’t use it as much as I probably should, but do like to use it when I don’t want to hide too much of a design or PP.

Challenge links are: Challenge #310 – Vellum Favourites and Inkspirational Challenge #301 – Word Prompt

The card looks way better in person than in the photo, and I’m quite pleased with it even though it was tedious tracing the design from the back. Thanks for stopping by, it is appreciated.

Dachshund witch

The challenge this time at Cardz 4 Galz is to use Dogs or Puppies in your creation. Surprising both myself and my stamping buddies, I’ve created another Halloween card. As most people know I’m not a Halloween fan and seldom make cards using this holiday theme. However, in going through my stamp sets I realized that I had this little Dachsie stamp from Crazy Dogs and I have a friend who would truly love a card like this featuring him, so here it is.

I began by stamping and colouring the dog and the witches hat, which came from an add on set to the Crazy Dogs lot. Pencils and a glaze pen were used to do the colouring. Using an Infinity set from Hero Arts I cut the ovals and layered them along with the dog on top. Dog was die cut but the hat was fussy cut. I also stacked 2 more die cuts behind the image for stability. I set this aside while I pondered the next step. Using a scrap piece of CS I sponged Halloween type colours all over it and then I added the die cut borders. These are from an old ribbon die. The corner spider webs are from Spellbinders and I did two as you see in the photo. I attached this panel to the card front and then added the ovals on top. The sentiment comes from an old GKD stamp set and I added some Spiced Marmalade to the edges with a light coating over the rest, to take the white glare off the piece. I did fussy cut this sentiment because I didn’t like how it looked as a rectangle with stark straight edges.

The card will be added to the following challenges:

https://twooldbatshalloweenchallenge.blogspot.com/

https://halloweencraftsallyearround.blogspot.com/

sunshine feel better

The colour challenge at Color Hues was asking for Kraft and yellow so I put my thinking cap on and came up with this card. I am out of Kraft CS in my usual size but fortunately remembered that I had a few pieces of 12 X 12″ in my stash somewhere. I cut the card front and die cut the banner from the same CS. Using a scrap piece of CS I dry embossed and went over it gently with two yellow inks, Squeezed Lemonade and Wild honey. After wrapping the cord around the banner I glued it to the embossed layer. After a search through stamps and dies I found this die from SSS. I’ve only used it a couple of times because it so challenging to get a clean cut. Even with a Magic Mat I wasn’t successful. Then last week I saw something on Instagram with a tip about intricate and difficult dies and tried out the tip. It is amazing how it works and I got a pretty decent result. The tip is to use an old bubble wrap envelope cut to the size you require. You put the piece on your platform bubble side up, put your CS next and the die on top. Run it through and see the magic. From now on I shall be keeping all my used mailers so I have enough to be going on with. Before adding the die cut to the banner I stamped the sentiment. I added a black piece behind the yellow to help it to stand out.

I am quite happy with how this one turned out and shall enter it into Color Hues and also to CYHTP twist not taken. Supplies used are: Banner dies from StampinUp, sun ray from SSS, EB folder is a 3D Tim Holtz/Sizzix called Foliage and twine is from my stash.

Thanks for stopping by, it is appreciated as are your comments.

snowy village

For this card I used a fairly new set from MFT stamps and my new modern oval dies cut in two sizes for a border. I layered cream CS onto Kraft CS and then added another layer of Kraft wrapped with some yellow ribbon tied at the side. The scene was coloured with Prisma pencils and I added some Cosmic Shimmer Fluffy stuff to give dimensional snow. I’m not totally happy with this card and feel it needs something else. For now I’m leaving it alone as I’m sure an idea will appear in my brain at some point. It works for the challenge at Sunday Stamps so I am adding it there.

It has been a rainy gray day up till now, but the sun has appeared so things seem a bit more cheerful outside. Thanks for popping in and I hope you are enjoying a good day.

warm winter wishes

My card uses some new stamps one of which is this Christmas Paper background which I heat embossed in gold. The little images are from a stamp set called Holiday Chill, the trees are tiny die cuts from an unbranded set and the tag is also new. Except for the tag all are from the YNS closing out sale. I coloured the images with pencils and added a snow hill to ground the penguin and trees. Red thread is from my stash and I heat embossed the tag edge using a Versamark pen.

I don’t know how others manage not to make a mess, but heat embossing when I do it means powder everywhere no matter how careful I am. I have a tray on my counter that is supposed to contain the powder, but somehow it still ends up everywhere else.

Thanks for stopping by, it is appreciated.

Pumpkin faces

AAA cards wants spooky, Just Add Ink is a colour challenge and JUG’s is asking for pumpkins. It isn’t often that I can combine three challenges with one card, but I think I’ve managed it with this one.

It is a totally one layer card and started with a Tim Holtz pumpkin stencil. I masked off the areas I didn’t want and using the challenge colours (as close as I can get) I stenciled the 4 pumpkins. I added the stalks separately. I added the stars and the gold cord ribbon and the sentiment. The cord was stamped with a gold pigment ink as was the last pumpkin, but the stars were heat embossed. Stamp sets are all from GKD and are older sets.

Thanks for stopping by, it is appreciated. I’m off to make a dessert for later as we are going over to our neighbors to play cards after dinner. I said I’d bring a dessert and my hubby made French crepes, which I will stuff with apples and figs. Whipped cream for topping and an easy but fun dessert it will be.

modern oval

Inkspirational has a designers choice challenge and wants to see an envelope that matches the card and Seize the Birthday is asking for Lime Green and Hot Pink colours. Having a few new products to play with, I decided to combine the two challenges with one card. Firstly, I die cut card stock, from GKD, in the colours using my new Spellbinders Modern Oval dies. I graduated one die smaller each time. Each layer was popped up with foam tape. On the white oval I stamped the image using a new Altenew stamp set called Inspirational Quotes. I used one of the sentiment stamps from here too, heat setting it with clear embossing powder. Using Distress Oxide inks in Picked Raspberry and Twisted Citron I water coloured the image. Using some pencils in the same tones I added a bit more depth here and there. I added the same floral image on the linen envelope using only pencils to colour it, because I didn’t want to add water to the envelope. My embellishments are from Trinity Stamps.

I hope you are enjoying your weekend. We have a storm rolling in, but at least most of the exterior painting is now finished and things are put away so we should be fine. Thanks for stopping by, it is appreciated.