far in miles …

In between other chores or obligations, I’ve spent a bit of time in my craft room sorting through paper scraps, which were getting out of hand. This morning I decided to use a few of the strips and make some backgrounds for using later.

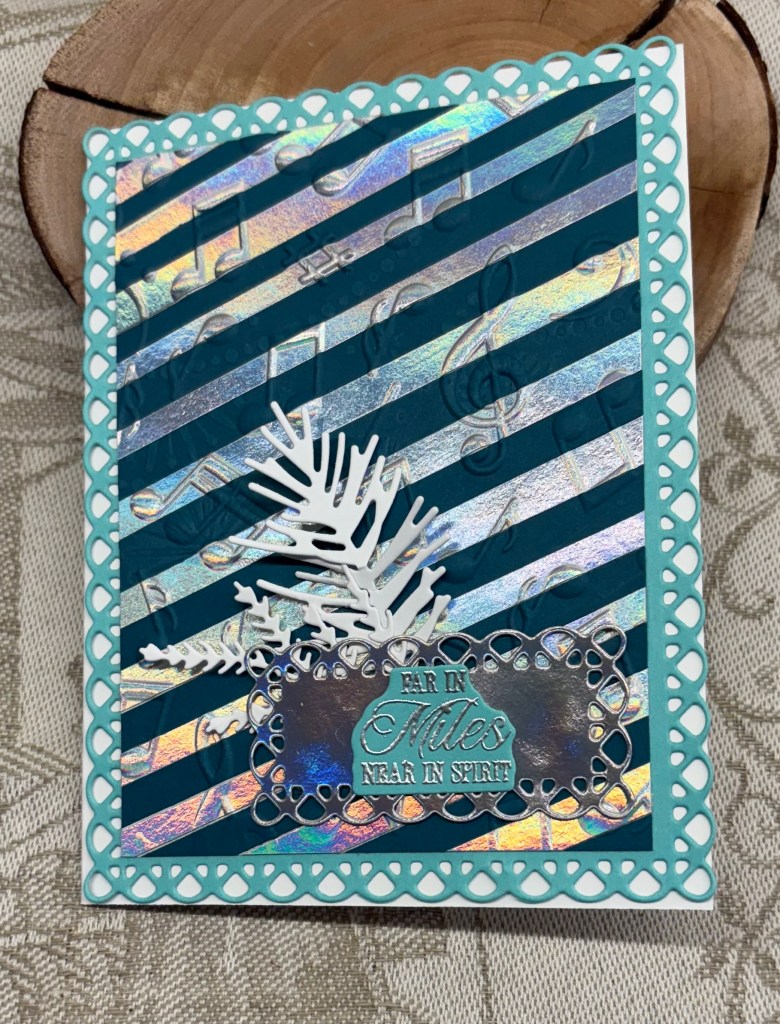
Noticing a new colour challenge, I decided to use some of the strips in the colours and this card is the result of my playing around. I’m actually quite pleased with how it turned out. I used two different shades of teal, the darker in the striped piece with the lighter as a border. I also dry embossed the piece with a spellbinders EF that I received recently. Dies used are an unbranded rectangle set, leaves are from Waffle Flower and my sentiment is from Spellbinders heat set in silver.

It isn’t an elaborate design as the stripes do all the work and it is quite striking in reality.

Challenges I’m entering are:

Color Hues #122-Teal and Silver – haven’t entered this one for a while so it is time.

Anything Goes With A Twist of Food and/or Drink – twist not taken

diamond fold Christmas

Having seen Sam at Mixed Up Craft, and her new mini series on Diamond fold cards I chose this one to try for myself. I watched the video twice so I understood the basics and then as she suggested took a screen shot of the template so I could keep the measurements handy. After that I chose my base card and the PP before proceeding to follow along with the video. My base card is from Recollections and isn’t a heavy weight type which made it easier for scoring and folding. My paper is from a pack by Alchemy of Art purchased in a sale. And the silver CS is also from Recollections. The die sets used are from Spellbinders, and Essentials.

It isn’t a hard card to make, but it does take time as the scoring and folding are fiddly. I had to stop and start as my neck and shoulder kept causing my left hand to cramp, but I got there in the end. This is another card that will be given by hand to the recipients even though it does fold flat and will fit into an envelope. They are coming to visit soon so it will be waiting for them in their room. If postage wasn’t so high I would enjoy making more of this style and posting them, but the costs involved are making it prohibitive. The card I made for my sister cost me $8.50 to mail.

Thanks for joining me today. In between posting and keeping up with my little DT jobs, I’m also baking for my upcoming party. This particular dessert can be frozen for several months so it is an good one to make ahead.

I shall enter this card into the following challenges:

Just Us Girls Challenge #801 – WORD Week – Winter

Krafty Chicks challenge #794 – Christmas

MLCCB #65 Anything Christmas Goes

white on white with a touch of silver

In my recent splurge on sale items I acquired this die set from Crafters Companion called Rays of Light. Then I saw a card example by Natasha Foote showing what she called a stepped up version of white on white and it triggered an idea. This is what I came up with. The Poinsettia is another new die by Waffle Flower, the word die is from Scrapbook.com and the tiny bird in the O is from Poppy Stamps.

I cut all the pieces and slowly assembled them by paper piecing the fallout layers back into the frame. Then the stitched die cuts were backed with foam tape and added on top. After attaching the Poinsettia I carefully added the word at the bottom. To make this fit into the challenge over at ABC Christmas I added the tiny bird. Initially I cut him in silver but it disappeared so I added a white layer on top. I’m quite pleased with how this turned out and because I am giving it to the recipient I didn’t have to consider size, weight or postage. The recipient loves the cards I make and apparently keeps them for posterity.

Thanks for stopping by, I appreciate you, your time and any comments you leave for me.

ABC Christmas Challenge – W & X are for? Wings – tiny bird, X is for stitching.

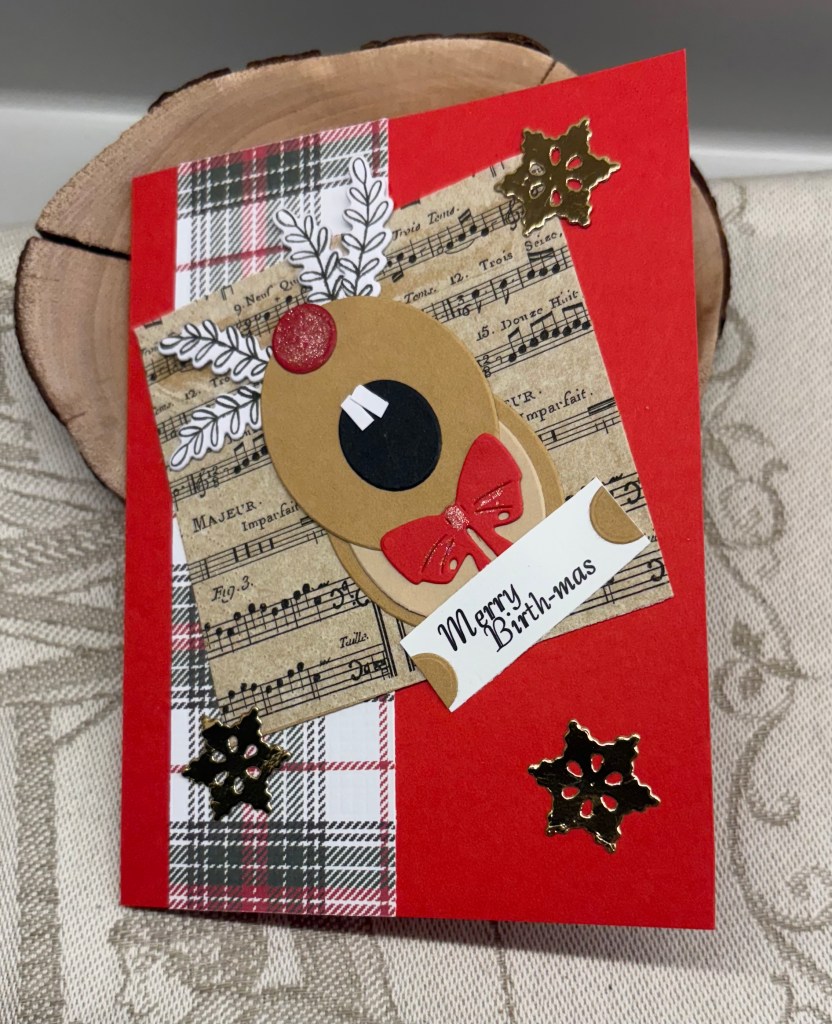
merry birth-mas

My last card as a guest designer at Seize the Birthday, and I’ve had such fun creating for each challenge. With this challenge asking us to use Christmas supplies and because I do have a male friend whose birthday is on Christmas day, I’ve decided this card is for him. This is always a birthday challenge but its asking us to use Christmas supplies to make it.

The strip of plaid CS used here is from a store bought card I received last year. The napkin music is the last piece of others I’ve used in the past. My Rudolph has been made by die cutting ovals and attaching them together. I cut a couple of small circles, one for his nose and another for his hands and I hand cut his teeth and then glued them as you see. Not my idea, but something I’ve seen on Pinterest and adapted for my own version. The bow is from an unbranded die set, the little stars are part of a die set by Marianne Designs and I used an MFT stamp and die set to create his antlers. A little bit of red sparkle on his nose and bow made him look more festive. The sentiment was created on my computer and is another thing I’d seen online. Initially I tried using stamps but couldn’t make it work nicely, so creating my own was the next option.

I’ve had a blast designing for Seize the Birthday and hope you have an equal fun time creating your own birthday cards with Christmas supplies. Thanks so much for stopping by, I appreciate you and your time.

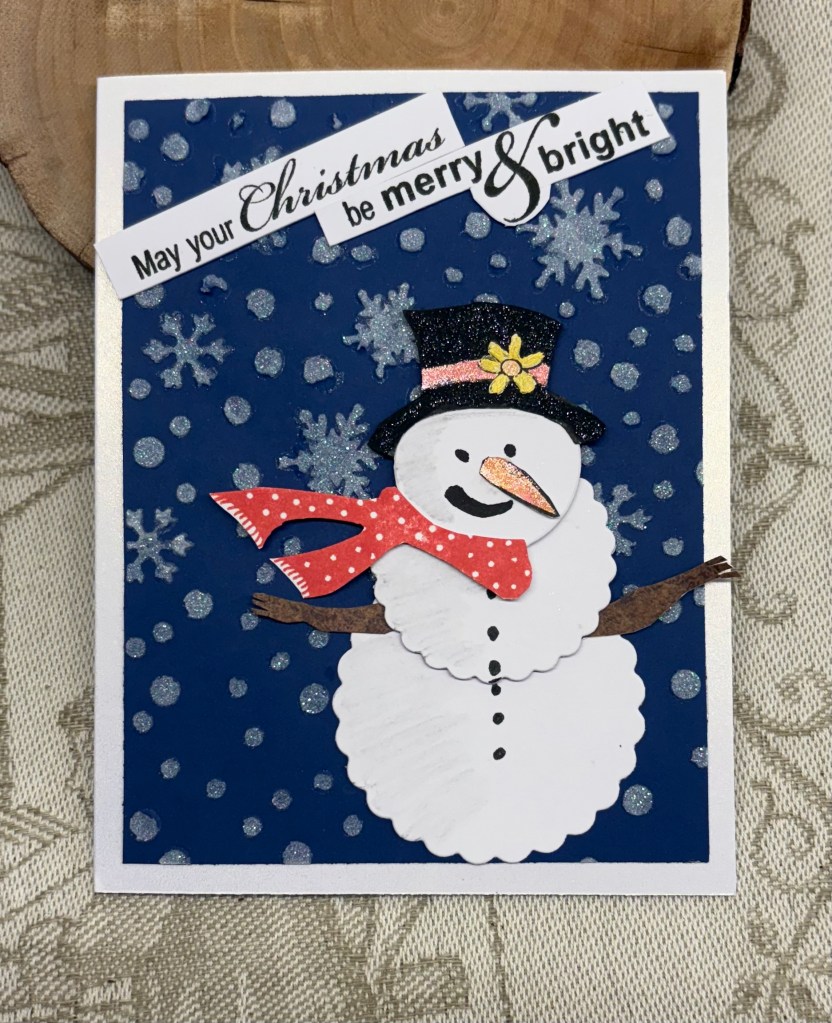
build me a snowman

Welcome to our latest challenge here at cardz4galz, chosen and hosted by Caz. She wants us to build a snowman and I took the build part very literally and actually built my snowman.

Using a die set from Sizzix, I die cut two sizes of scalloped circles and then one smaller regular circle from Spellbinders. An old stamp set from Dare 2B Artzy was used as a template for his hat which I stamped separately and then fussy cut to adhere on top of the circle and I used the nose and scarf from this set as well. The twig arms I did by cutting from a scrap piece and I added the eyes, mouth and buttons by hand. A black Spectrum Noir sparkle pen was used on his hat along with some Sakura glitter pens for his hat band, flower and nose. And I added some shading using a gray pencil on his body. I assembled the snowman and set him aside.

Using a navy blue piece of card stock, a stencil called WarmWishes along with some sparkle stencil butter from TCW, I made the background. When dry I cut it to size attached it to the card front and then added my snowman. The sentiment is from the same stamp set as the other bits, but I cut it into two pieces so I could make it fit where I wanted it to go.

We look forward to seeing your snow people in our gallery soon. Thanks for joining me today, I appreciate you and any comments you may leave.

colour blocks

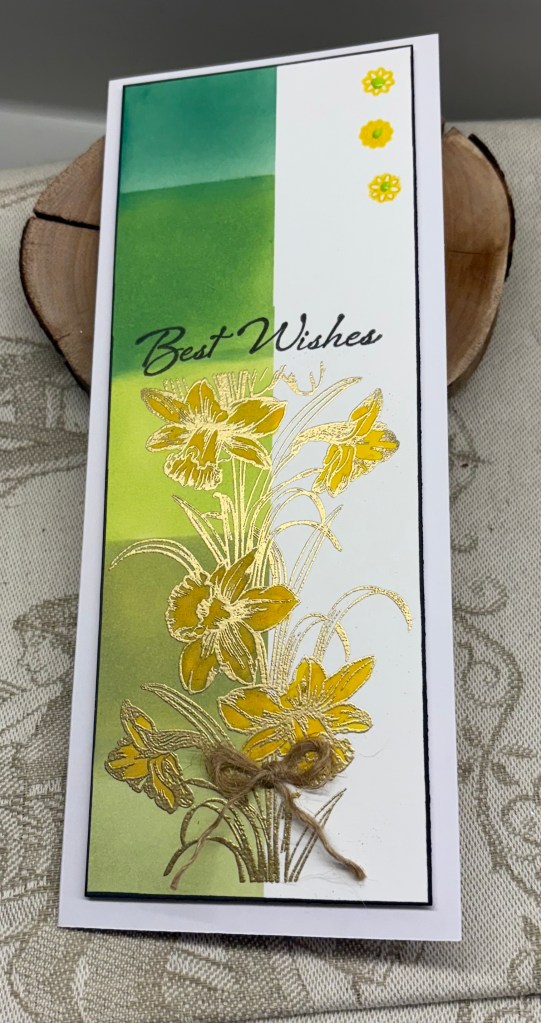
Challenge #204, here at Double Trouble is called ‘Its a Tall Order’ and if you’ve guessed its about creating a slimline or a mini slimline card you would be right. If you follow the sketch at TSOT #683 then you get an extra chance to win, but be careful to ensure you don’t backlink. My card follows the sketch but I can’t add it to the challenge because it would definitely be backlinking. The recipe calls for 3 colours, 2 images, 1 Slim line or mini and the twist is to use something beginning with T.

First I masked off a section of my card layer and then using a mask I could move up and down easily I proceeded to sponge ink in colour blocks similar to a paint chip. I used 5 different greens . My focal image is from a GKD stamp set that I’ve had for a long time and I stamped it with Versamark and then heat set in gold. Using another GKD set I chose 2 stamps that I could use in the top right hand corner. These were stamped in yellow and I added a green Pop of Colour dot to their centers. The sentiment is from Hampton Arts and my added twist, which I almost forgot, is a twine bow. Before adding the layer to the main card I used a yellow distress Oxide to colour in my daffodils and I went around this layer with a black marker to give a border.

Thanks for stopping by, your time and your comments are always appreciated. We look forward to seeing your creations in our gallery and hope you have fun coming up with your own ideas.

tree delivery

Going to a craft store and sorting through their sale items is both a great and a bad idea. It didn’t take long to spend $100.00. The die set and the paper used on this card are all products from the sale. There are two different Santa’s in this set along with some other accessories and I created a second card along with this one.

Once I had cut all the pieces I slowly put them together, but first I added the colour and let them dry where necessary. For Santa I used alcohol markers and for the trees and truck I used water colour shimmer paint. The sentiment is from Woodware and the candy cane is ephemera from StampinUp. I used a glitter pen to add a bit of sparkle on the background, but it isn’t visible in the photo. My hubby felt this card was the cutest of the two.

Thanks for stopping by, I do appreciate you and your time.

This is to be a second entry into the Peace on Earth challenge #99.

hand painted baubles

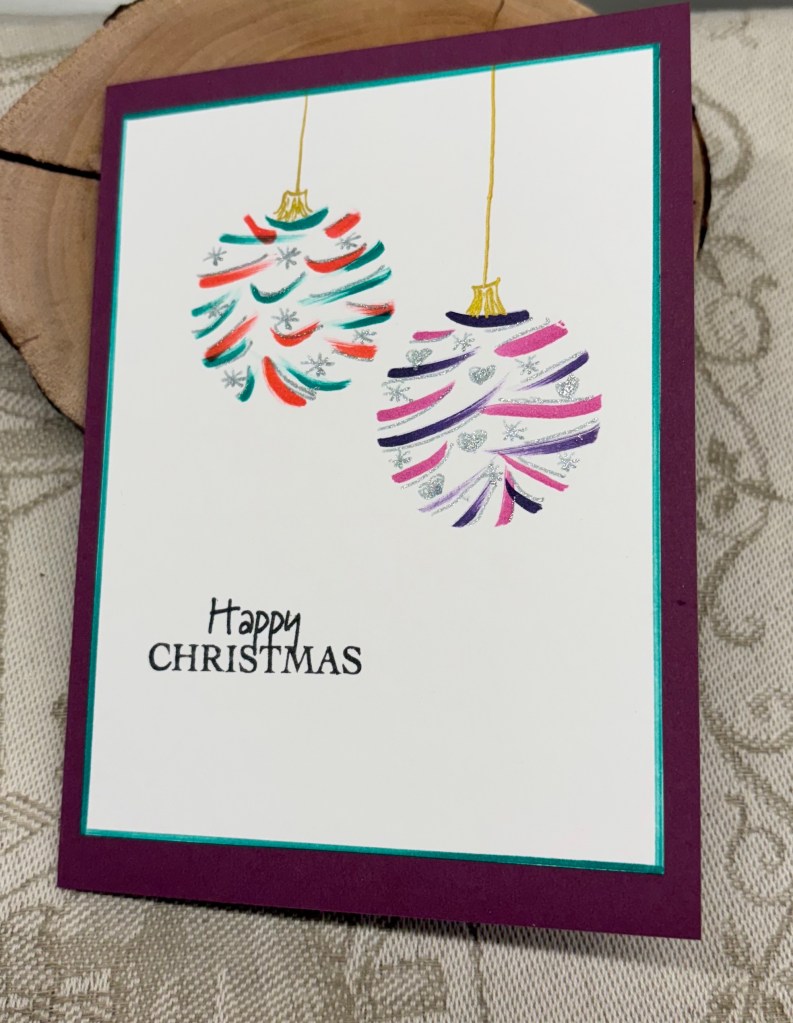
Having seen something similar to this on Pinterest, I wanted to try a version of my own, but I’m no painter. In the end I created a stencil, pulled out my trusty TomBow markers and came up with these. They were so easy to do that I made about five of them. I added some sparkle elements with a Sakura pen and filled in a few areas, then I took a gold pen and free handed the top of the ornament and the cord.

With another marker I went around the edge of the white CS before adding it to the card front. My sentiment is from a Woodware set. I never would have thought I’d be free handing this kind of thing, and I’m pleased with how they turned out. CAS and pretty at the same time.

I don’t believe I’ve entered into the Holly and Ivy Christmas challenge before, so this is being added to their current challenge.

dressed up wine

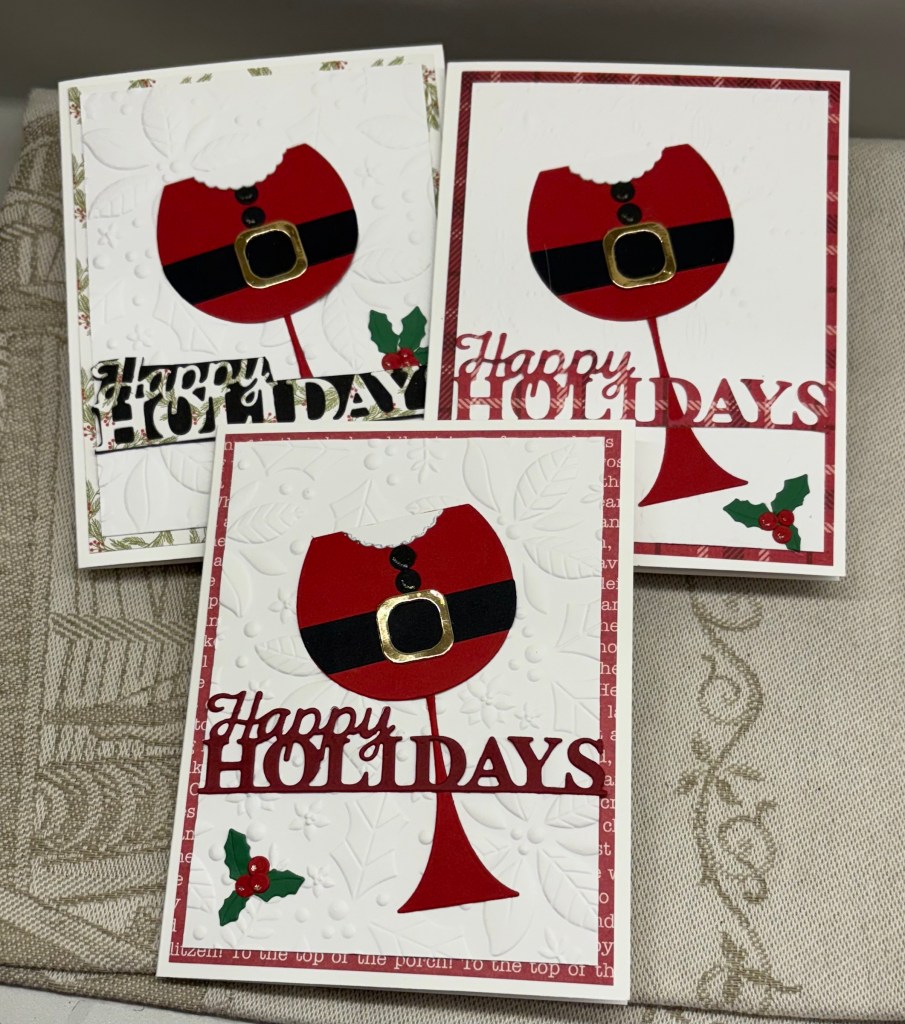
Using a Kokorosa die, I created a series of these cards, all similar but not exactly the same. They are intended for the ladies in my yoga group.

Using a SSS EF I dry embossed some white CS and backed it with some PP before adding it to the card base. Once I had the pieces in place on the wine glass I glued it all together and added it on top. The sentiment comes from a GKD set I think, but as it was stamped a long time ago and stored, I can’t quite remember which set. I added a tiny amount of sparkle on the buttons and some small red gems.

Once I had all the pieces cut, the series was pretty easy to put together, and I created 8 in total. On some I used different EF but all were 3D folders. I really wish companies would standardize their folders as it would make things a lot easier to work out which plates to use to get the look we need. Some of the 3D ones are really hard to get through the machine.

a few of the others.

Thanks for spending time with me today, I really appreciate you and your time.

My card is being entered into the challenge at November 2025 Peace On Earth Challenge #99 which is always an anything goes.

pull off ornament

I’ve been wanting to make one of these folds for a while, and finally I’ve achieved it. My yoga group likes to purchase a gift for our teacher and this year there are a few more participating, so we need a card that can accommodate everyone’s signature. This design fits the bill and the bonus for our teacher is that she can remove the ornament and hang it on the tree if she wants.

To make it I followed a tutorial at Sunny Day Stamping: https://sunnydaystamping.com/the-easy-way-to-cut-angles-angled-fun-fold-card/ and adapted it to what I required.

Using a new unbranded die from Amazon I die cut the ornament several times with the top piece using a glitter CS. Once cut I glued them together for strength. The sentiment on the front is from a Woodware set and the one on the inside is from an old GKD set. I can’t remember where the small snowflake came from but I added fall out dot to the center and some silvery sparkle to the rest. The larger snowflake in the back is from Spellbinders I think. Using some blue CS and a stencil from Kaiser with gold stencil butter from TCW I created the angled piece and when dry I cut it to get the angle and edges right. The inside back has a piece from some Xmas CS that is from 2 years ago and I added a white piece on top which has the sentiment. I also added another white piece on the inside angle side to allow for everyone to write when the time comes.

This card fits the challenge at October 2025 – U for Uncluttered and V for Vertical and mine is using the V for vertical so I shall enter it there. This will be my second entry.