put a bow on it

It has been a while since I had the time to enter into a Sunday Stamp challenge, but today I managed it. SSC367 Put A Bow On It is the theme and because I had been playing the past two days with using kitchen foil, alcohol inks and some leaf printing, in a way this card almost made itself.

I placed the leaf panel into a stitched rectangle unbranded die and cut it to size although it required some replacement of the die to achieve the length I wanted. Yesterday I had added some crumpled kitchen foil to some card stock and earlier today I played with adding inks to it. I quite liked how it ended up so using an Altenew die, I cut the leaf sprig you see here from part of it. After adding foam to the back I added it to my leaf print panel. The little tag is from a set that my hubby bought many moons ago and I didn’t keep the info on the 2 sets he gave me. The sentiment is from a SSS set and I heat embossed in gold. I found the red and gold thread in my box and by pulling the threads apart I was able to combine both and make a bow. A lot of blue air, as my fingers would not cooperate, but I managed in the end. After adding a bit of colour to the tag I attached it and using tweezers pulled a bit of the thread through the hole.

While playing I hadn’t really thought about a design for the finished panel, but I did have the Sunday Stamps challenge open on my computer and when I took another look at it, I realized I had the makings of a card to meet the challenge. As you can see I added a border of some CS that was similar in hue to the colours in the leaf and then using the leftover piece I added it to my card base so it fit the sketch. Once the top layer was added it met the theme perfectly.

I’m pleased with how it turned out and had fun playing with the inks although if you had seen the mess I made of my glass mat and fingers you would laugh. Fortunately a little alcohol on a sponge helped me to clean it all up easily. Many thanks for stopping by, your time and any comments you leave are truly appreciated.

leaves – thinking of you

9:59 minutes

As You See It has one of the ‘dreaded’ speed challenges currently, Challenge #355 – Lively Leaves and I literally made it just under the wire with this card. Earlier this week I had been playing with leaf printing and I had a piece already done, but I thought it might be considered cheating if I used it here. In the end I decided on this design and once I had chosen my dies, Pattern paper and card front sorted it wasn’t too difficult. What took time was trying to add foam to the back and I resorted to cutting a black piece of foam with the die but it took forever to poke out the bits and of course it stretched a bit in the cutting so that was a bit of an issue too. Next time I do this I’m going to glue the PP to the foam ahead of any cutting and cut them out as one piece, but that thought was too late for this card.

So the die used is from MFT, the background piece is from an ancient paper pad and I ensured the dragonfly was front and center before cutting. The sentiment was on my desk as it had fallen out of a small pack of ephemera and I decided to use it because I had forgotten to prepare a stamp ahead of time. I tried to match the card front to the tiny dots in the leaves.

I learned yesterday, that a close friend has had what appears to be a mild stroke, so I am going to send this card to her. They still don’t know whether it was a stroke for sure, so a barrage of tests have been done but she won’t get all the results for a few days. In the meantime they are allowing her to return home. She is a semi retired Geriatric nurse and her hubby is as well, so I guess they feel she will be okay at home while they pursue it further. Because they live in a small town up north, most of the complicated testing has to be sent to Vancouver so results take a while.

Thanks for stopping by, I appreciate you and your time.

Vellum thanks

It is my turn to choose the theme for the latest challenge #257 here at https://cardz4galz.blogspot.com/. My theme is that you use vellum and here is my example. I found a piece of pink vellum in my scraps and decided it would work well. I used a very old rubber block stamp and stamped the words using Versamark ink which I then heat embossed in gold. I wanted it to pop up a little so it took me some time to figure out how to add foam tape so it wouldn’t show but I managed it. I had a scrap piece of gold card and I used an unbranded stitched rectangle set to cut out a piece the right size. I couldn’t find a way to turn it into a frame using a die, so I carefully measured and then with a ruler and craft knife cut the inside to give me a frame the thickness I was hoping for. I used some foam tape around all the sides for dimension and added the vellum to it. Taking an old corner floral stamp from a GKD set and using a slightly darker pink than the CS I stamped each corner not worrying about any doubling up as I knew most of it would be covered. Taking a butterfly stamp from Crafters Companion and a piece of regular vellum I stamped 3 and heat set them using clear embossing powder. When it was cool enough I turned it to the backside and used some inks direct to the vellum. Let that dry, but it was taking a bit too long so I did use some heat to hurry it a bit. Fussy cut them out and added the bodies in black glitter using a small die from a StampinUP set. They were added to the frame as you see and I finished the card off with 3 gems from my stash.

I honestly wasn’t sure this was going to work or even be pretty, but in the end I am happy with the result. It does look better in R.L. than on the photo.

Thanks for spending time with me today. We hope you join us in our gallery and we look forward to seeing what you create.

fall is coming

On a dog walk yesterday I found a beautiful fall leaf that was mostly intact so I brought it home. Not having the time to play with it, I set it aside with a damp cloth on top so it wouldn’t dry out too quickly. This morning I decided to use it and while thinking about it, I also checked out the latest challenge at Double D. They were calling for butterflies so I decided to combine my leaf with a butterfly.

I cut a 6X6″ card then spent some time painting the back of my leaf with colour, which when done, I spritzed slightly before laying it in position on my card. Using the tool I generally use to press stamps in my Misti or Stamping wheel, I carefully ensured it was pressed fully onto the card. I left it for a minute or two and then gently peeled off the leaf and what you see here is the result. I did stipple a little bit of green with a brush. There was enough colour left that I was able to do another much smaller piece for use later. The sentiment comes from a Joy Clair set and my butterfly is die cut using scraps and a StampinUP set. I chose to use some green embellishments from my stash that came from a package purchased at Michaels a long time ago.

My hubby was so enamored with the leaf print that he stole the card from me before I put it together and proceeded to take photos of it. When I got it back I went around the edges with a brown Spectrum Noir marker and then added the rest. I have to say I’m quite pleased with the end result and the leaf sure makes an interesting texture on the card.

Thanks for spending time with me today, I appreciate you and your time.

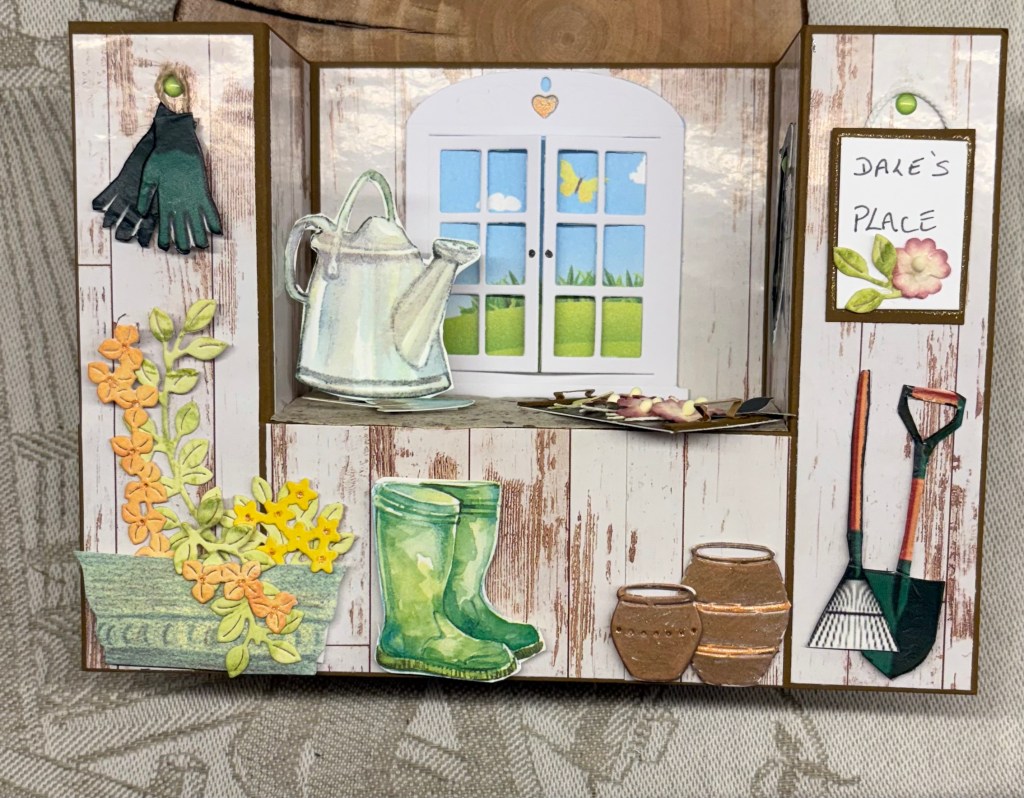
dale’s place

above showing card standing upright left side it is lying flat.

Our friend, who is always so generous with her time and talent, has a birthday coming up soon. She is a keen gardener and I wanted to make her a special card. Having done a bench style card for my hubby earlier this year, I had the idea of making another in a garden theme. I returned to Sam at https://mixedupcraft.com/2020/06/13/cute-bench-fold-card/ and this time CASE’d her card. In my case I don’t have a garden stamp set or dies, but I did have some pieces cut from a store bought card that I had saved and with my new Spellbinders kit could make florals and some pots. The gloves, rake and shovel were Internet sourced which I resized, printed and fussy cut. Like Sam I created a tray even including handles and I added some tiny flowers I’ve had forever and incorporated a few die cut leaves as well. The window is an A.I. die and the scene in the window is cut from another item I saved, which I think came from a chocolate box or similar. The wood grain paper is a dollar store product and the counter top is from my stash. I hand made the sign adding some cord and a tiny gem to hang it from. I did the same thing with the gloves and also with the saw hanging on the inside right panel. The planter is from my stash and I cut it down to make it work better and disguised the section where I added the piece together, with flowers. My flowers and leaves were sponged with distress oxides and I coloured the two pots with a copper marker and then some Sakura gel sparkle. I figured out how to add the watering can so the card can still be folded flat although as we see our friend often I’m hoping to give it to her rather than mail it.

When I began the card, I wasn’t really thinking about adding it to any challenges, but after checking a few I found that it does fit into some themes so I’m going to add it to the following:

https://thefourseasonschallenge.blogspot.com/, Colour around birdhouse and pots help my card fit into this challenge

https://secretstamper.com/2025/08/creative-creases-106/#more-47548, Anything goes fun folds

https://dd-tripleb.blogspot.com/, the butterfly in the window and the blooms on the shed.

Thanks for stopping by, your time and any comments you may leave are always appreciated.

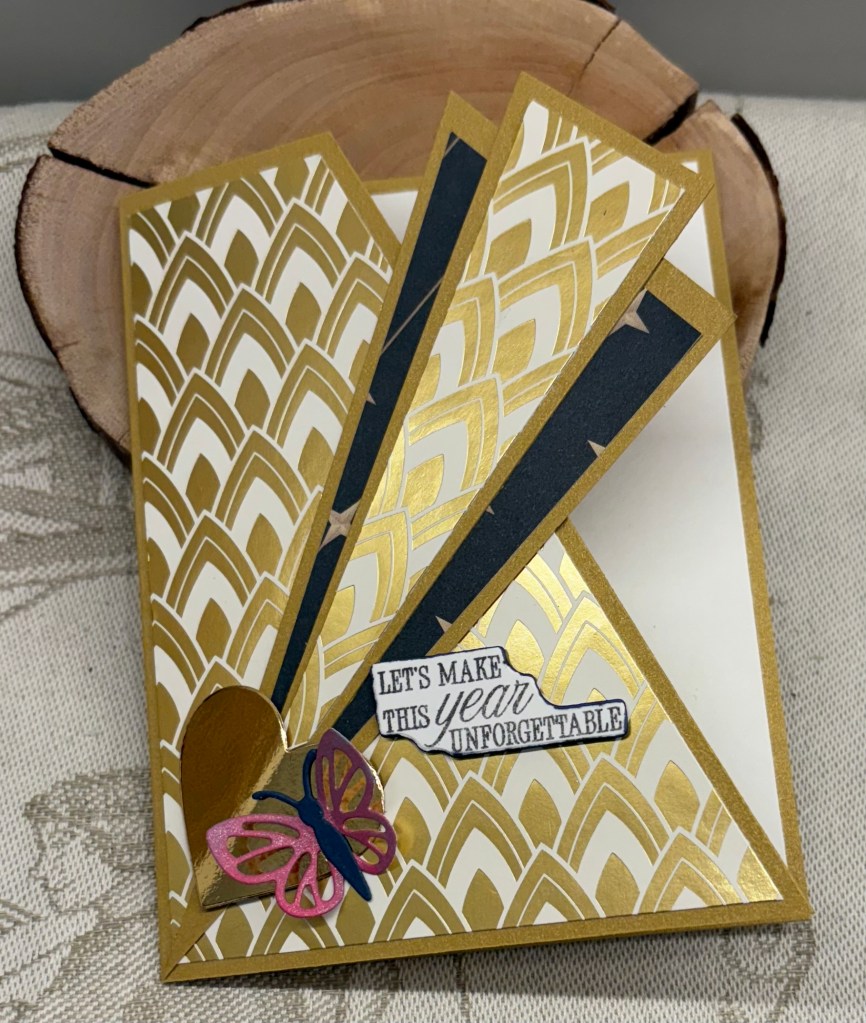
Art deco look


Standing up and open

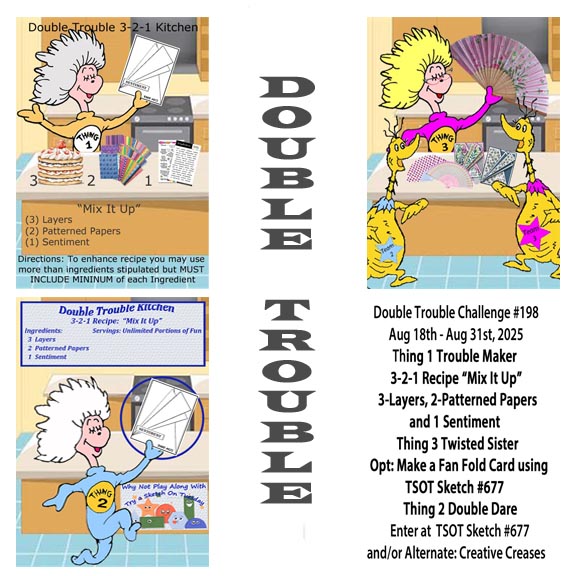
Our current challenge here at Double Trouble, is to use 3 layers, 2 pattern papers and a sentiment, but you can also use the sketch at TSOT # 677, and make a fan card which is what I chose to do. They look difficult, but are actually easier than one thinks. Due to backlinking I cannot enter my card into the TSOT challenge, but it is an example of combining the two challenges for anyone interested.

I followed a tutorial found HERE as this person had changed sizes to an A2 style which is my preferred size to use. Also one of my stamp buddies has done a card like this and she recommended the same tutorial.

My card uses a mat gold card base, PP from CTMYH, small piece of PP from a paper pad, a sentiment from Spellbinders, a Hero Arts die cut, and my butterfly is from StampinUP. I may not be correct about the PP being from CTMYH as I’ve had it for a long time and I don’t remember this pattern from StampinUP. I went around the sentiment die cut with a Spectrum Noir marker in navy to match the dark PP. It is quite an effective card visually and fits into a regular size envelope.

Thanks for stopping by, I appreciate you and your time.

not a flower in sight

As you can see from the above graphic, the challenge specifies no flowers at Seize the Birthday.

Having seen something like this on Instagram recently I wondered if I would be able to create something similar and this card is the result. Prior to adding the angled masking strips I used some tape to mask off an area that would become the sentiment space. Then using Gina K masking strips I masked off each section in angles. With some additional paper to mask as I was sponging, I proceeded to add colour in each space. Even with masking carefully I still managed to mess up a couple of edges, but not badly enough for me to have to begin over. The card I saw, had the artist using markers to fill in colour and then different colours in circles over each area creating a kind of Bokeh effect. In mine I used inks and sponges and then a stencil from TCW called crazy waves and sponged white pigment ink through the sections. Although it was visible I felt it needed a lift so I brushed Perfect Pearl powder in white over the top and the ink caught the shimmer really well. My butterflies are from Scrapbook.com and I used a pale lavender shimmer piece for the bodies with gold mirror for the pattern pieces. I also used a small body die from StampinUp to create the bodies for the butterflies as to my eyes they needed it. I used a Hampton Arts stamp to add the sentiment, masking off the unwanted word before stamping as the sentiment was too long and I didn’t want to cut the stamp. I backed the rainbow layer with foam tape and then added it to the card front. A few small clear gems and my card was finished. The most work was creating the masked off areas before adding colour.

I’m quite pleased with the end result and because I had inks and sponges out I did another slim line piece for a different card you will see in a future post. Thanks for stopping by, I appreciate you and your time.

We’ve had 48 hours of rain, which has lessened the fire danger dramatically and enabled fire fighters to keep a handle on a bad one burning up island. It has also ensured a lot of the smoke has dissipated which is good for all of us, but in particular people with chest conditions. I feel a sense of relief and although more sunshine is coming it isn’t likely to be as hot as the past couple of weeks have been.

Al fresco fun

The challenge at As You See It is: Challenge #354 – Dining Al Fresco. These days I’m not into sitting on beaches or on the ground in parks so I chose to keep my design as a more refined way to be outside. It is also our 45th anniversary tomorrow, which we both find hard to believe. I may give this card to my hubby which will make him laugh. Why? Well we usually forget our anniversary on the actual day and it has become a joke between us.

As it happened, I had this frame already cut on my desk because my original thought was to make a tablecloth and add things to it and I had the paper ready. After pulling it out various stamp sets I couldn’t find anything I liked that worked with what I had in my mind so instead I die cut the paper into this frame. Didn’t have time yesterday to do more but today I found this image and decided it would work. The stamp set used is from GKD and I stamped in black and then heat embossed clear. I added the birds by hand after sponging a bit of ink to give the look of sky. The sentiment is from a small YNS set and I cut it with an Infinity Oval from Hero Arts. Went around the edge with a marker and added the tiny heart. The corner hearts are the fallouts that I coloured solid red added a touch of glitter and Nuvo drops for dimension.

I’m actually pleased that I went in this direction rather than with what my original idea, as it has worked quite well and the card is more CAS. Thanks for stopping by, I appreciate you and your time.

Escape the ordinary

Dawn has chosen the theme Scenic, for our latest challenge here at cardz4galz. You can create your own scene or use a topper/paper image as you wish.

As I’m playing with my latest items that came as a birthday gift from my hubby, I decided to use one of the die sets in the kit. This is from Spellbinders called Deckside Dreams. It is a cool set. I used mainly oddments of scrap CS for my ship. The background is done with a StampinUp folder, the wave seafoam is from Kokorosa, the fish is a Gummiapan die, sentiment from Spellbinders and the sun is from an unnamed stamp set that I fussy cut. The little seagull uses a hack from Jennifer McGuire that she demonstrated, and it worked so well.

To be honest the fish was added to cover up a small smudge on the ships hull. I had some issues with gluing the stripes and must have gotten some glue there accidentally. Years go I would have freaked to have something like this, today, its a shrug my shoulders event, and what can I do to hide the booboo?

I’m rather pleased with my little scene and love the dimension this die set creates. It was fun to make this one. I look forward to seeing your ideas in the gallery over the next 2 weeks. Have fun.

Thanks for joining me today, I appreciate you and also your time.

bee happy decoupage

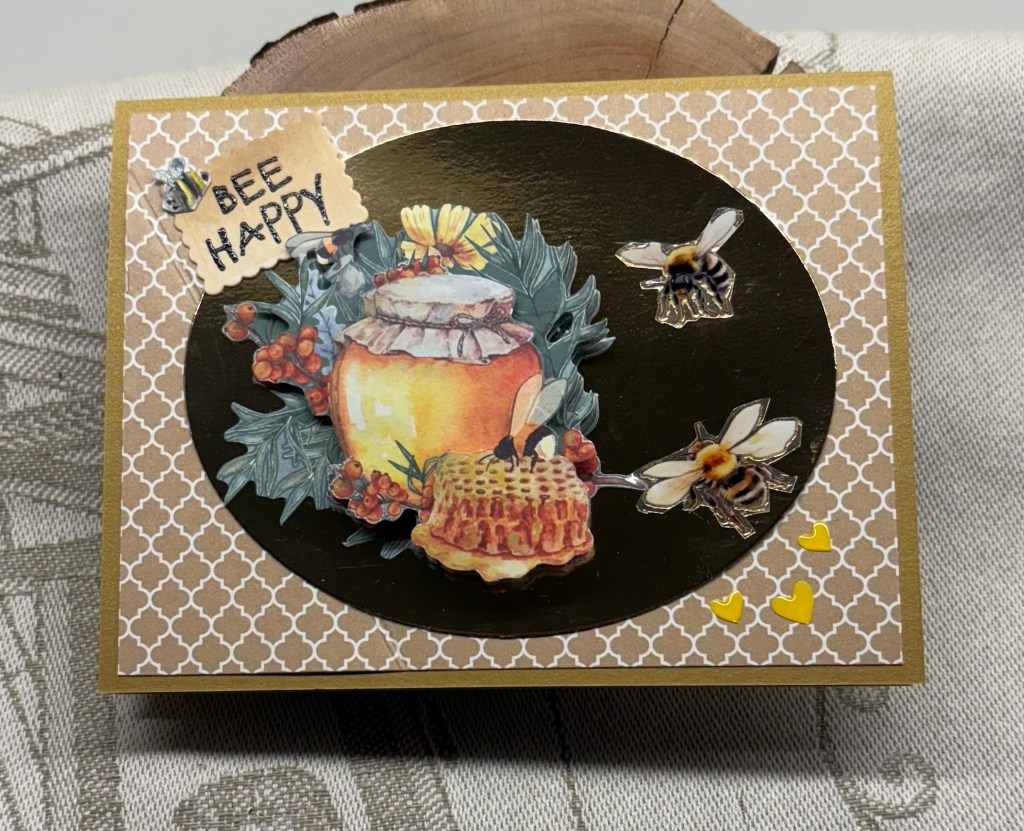
Every once in a while a challenge comes up that I already have something done that will work. The current one at Double D is one of those. Their challenge is Bee Happy Challenge and I had been playing with decoupage a while back and had this little image all ready to go. Even the oval was cut as it was left from another project. All I had to do was put things together in a pleasing arrangement.

I used a scrap piece of CTMYH CS that was slightly damaged for my background as it reminded a little of the honeycomb. I used a stamp from an unbranded set to add the sentiment and stamped it onto a piece of CS that I had used to mop up leftover ink. Also used one of the tiny bees in its corner. The 2 bees on the gold piece are transfer stickers and I added the 3 hearts, I think by StampinUP, for interest. Dies used are Hero Arts infinity ovals and a mixed edge rectangle by Essentials. The decoupage is from a kit from Crafters Companion.

Considering how busy I seem to be this week, getting this card done and posted is a nice bonus for me. Thanks for stopping by, you and your time are greatly appreciated.