It’s hip to be square

For challenge #233 at Cardz 4 Galz, Debbie has chosen the theme of square and you can use squares or make a square card as I have done. My card measures 4 and 1/4 with smaller square layers on top. Basically I used all the scraps that I had sitting around. I used a stencil on one layer and added a half circle of the bright pattern paper so that the negative circle layer fit nicely on top. I edged the layer with more of the bright pattern paper and used a butterfly I made some time ago using Scrapbook.com dies. I also added a bit of yellow ink over the negative die piece to reduce the white.

It was a good feeling to use up all the small scraps I had sitting around and it was an easy card to make too.

Thanks for stopping by, your time is appreciated as are any comments you may leave for me.

for you with love

black and white panel is from Here

Sunflowers Challenge is the current challenge at Double D and this is my take on it. I don’t have many stamps with sunflowers so I looked through Pinterest to see what I could find. I really liked this panel and it was free so I downloaded it and then resized for my card front. I added some score lines on each side for added interest. After searching through my stamp sets I found a couple of different ones in 3 separate Gina K floral stamps and I chose this one from A Year of Flowers. I also used the 2 sentiments from this set. Once I had the image stamped I coloured it with Inktense pencils and bit of water. It curled at the edges naturally as I fussy cut it while it was still slightly damp. I popped it up with foam tape so that the sentiment section is peeking out from behind. I added a bit of shine using a Spectrum sparkle pen and I also spattered a bit of it over the top. A couple of small gems from my stash and it was finished.

I’m quite happy with the result, especially as I’m not very inspired to make cards at the moment. I did think about colouring the panel, but preferred the starkness of the black and white on top of the Yellow card front.

Thanks for stopping by it is appreciated as are any comments you may leave for me. I’m off to do a Zoom call with a friend we don’t see as often as we’d like.

s=peach=less

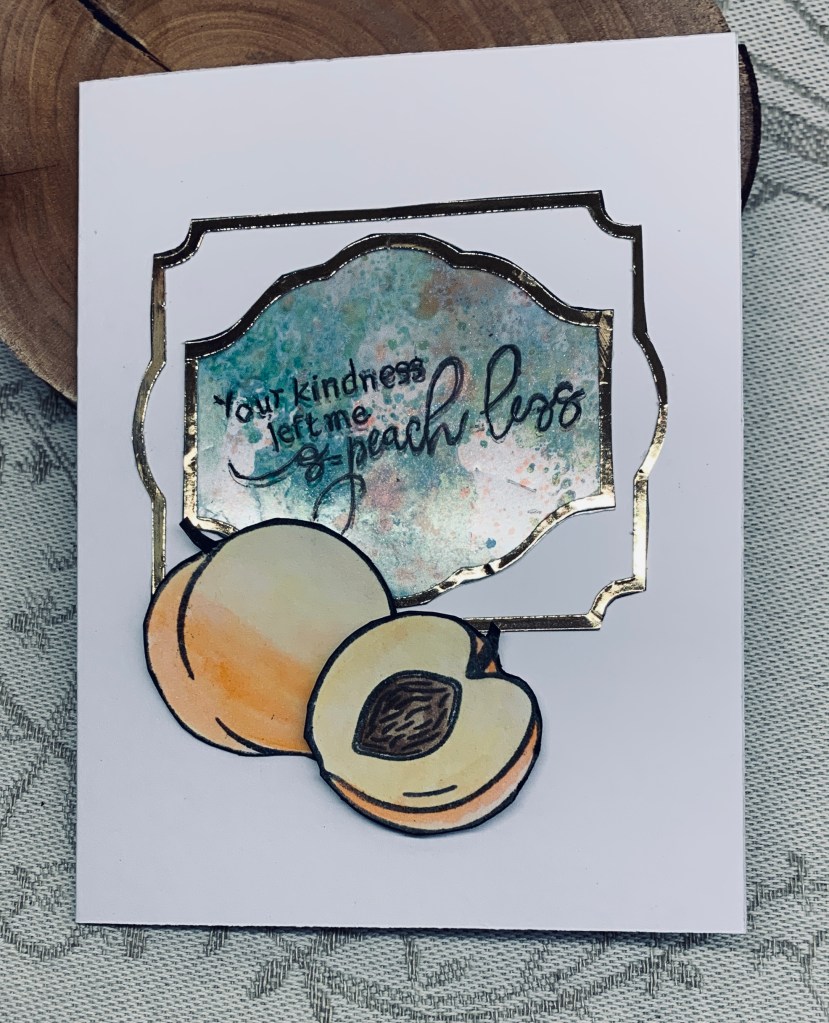
Challenge #331 – Fast Fruit the current challenge at As You See It, is a speed challenge, and these always get my adrenaline going. Card took me 9.59 minutes to make so just under the wire to make it work.

Assembling my bits and pieces required a lot of thought as I don’t have much in the way of fruit stamps. I did pull out a very old StampinUp set and tested doing an apple but wasn’t happy, at which point I remembered I had this peach set from MayMay Made It.

Yesterday I had played with cutting out some frames from a pre printed freebie set and I had also played with some backgrounds, one of which I’ve used here. I selected the stamps I wanted to use, placed them in the Misti with some scrap CS, pushed the timer button and began. Stamping the peaches was easy, but stamping the sentiment ended up with a mess. It moved and re-stamping meant a slight double image. I have to remember that the photo CS my hubby shared with me, makes the stamps stick tight. At this point I chose to ignore the timer as it was making me nervous. Instead I took the background and added it to the frame proceeding to fussy cut around it. Not a brilliant job, but not terrible. Then I took the other frame added it to the card front and placed the inked piece as you see. I quickly inked the colours into my peaches and fussy cut them. While they were drying I took a pen and carefully went over the sentiment and hoped it would be okay. I added the peaches, popping up the half one and heaved a huge sigh of relief after looking at the timer and seeing I had made the time frame. The sentiment looks okay and I’m lucky my hands allowed the pen work and the fussy cutting. Some days they do not. Inks used are Dried Marigold and Ripe Persimmon and Ground Expresso Distress Oxides.

Although this card has some rough edges due to how quickly I put it together, I’m not unhappy with it. It is usable and my friends love anything handmade. I really appreciate you stopping by to take a look and I hope that you are enjoying some fun family time. Summer is close to ending which is always bittersweet. We are getting some lovely sunshine and warmth during the day, but it is cooling at night making sleeping much easier.

mermaid thoughts

Just Add Ink #717…Sketch! This is how I interpreted the sketch for the current challenge. I used a section of a photo to die cut the ovals using Infinity dies from HeroArts. The PP is from, both, a very old pad and StampinUp and I attached them as you see with a strip across the join. Then I attached the ovals. I didn’t plan this card other than getting it to the ovals. I realized too late, that the photo of a local pebbled beach was a bit busy and a couple of things I tried weren’t working. In the end I chose the mermaid ephemera piece and a stamp from a GKD incentive set for the sentiment. Fussy cut this, as it looked better. Pearl embellishments from my stash, and I just noticed that one has fallen off before I took the photograph. There were three stacked in the bottom corner. I’ve had these for a long time, so I shall have to fix the adhesive before giving this to someone.

I really appreciate you stopping by and thanks in advance for any comments you leave me.

fall is coming

The main summer heat is over and we see signs of fall everywhere we look at the moment. Nights are cooler although sunshine is back after a week of much needed rain. We also have guests again this week, so it has been very busy around our home. The challenge at CAS is: Challenge #543 – Sketch and I created this card. Stamp and die set is from YNS, sadly now closed, and the heat embossed sentiment is from Vertical Greetings by GKD. I used pencils to colour my tiny images and sprayed some sheer shimmer on top to give some shine. The foil circles were patiently hand cut from a Hunkydory collection that I have only just begun to pull apart. Got them as a freebie and I couldn’t waste the scraps so used them this way.

It is a very simple card, but thank you cards are always required so it will be used eventually.

We are planning a neighborhood BBQ again this year so I’ve done some prepping for that in between everything else.

Thanks for checking in and any comments you leave are always appreciated.

beep – clang!

AAA Card Challenge #272: Sketch here is my take on this challenge although I’m not sure I’ve gotten the sketch quite right. Stamp set used is a new to me set by Brutus Munroe, acquired in a recent sale at Scrapbook.com. I had been looking for something with a scientific aspect and this set seemed to fit the bill. It had been on my desk since purchase and I figured it was time to actually use it. My stencil is from Hero Arts.

Using my Misti I placed the stamps and using Versamark ink I stamped them and then heat embossed in black. Once dry I used a masking fluid over the top so I could add the stencil background. It was easier than using a sticky note and fussy cutting. After removing the mask I then coloured them with Inktense pencils and a bit of water. Once dry I added a little shine with a Sakura glitter pen. I think the card turned out better than I expected and the bots are certainly fun images.

Thanks for stopping by, I appreciate you and your time.

retro music style

Seize the Birthday #290-Retro is the current challenge and after some thought and a bit of online research, I came up with this. I took a leaf out of a stamping buddy’s book and used the Internet as I have nothing like this in my stash.

I found a site that has freebies of various designs and this cassette tape was one of them. It was designed to be a small opening card. Playing on the computer trying to resize or change something wasn’t in my horizon today, so I printed it up and then took it to my lightbox so I could trace it onto card stock. I coloured and fussy cut it out, did the same for the label and adhered it. a little hand printing and some silver for the tiny corner screws, along with a small sentiment from a very old SSS set and I had the cassette done. Using a small circle die from Hero Arts I die cut the 2 discs and added some silver lines before placing them onto the rectangle piece. After adding foam to the cassette I popped it on top. The music paper is from an old music book, cut to what I wanted in size, and then added some ink to age it a little more. My original intention was to put it all onto a black card front, but I accidentally put it on the wrong side of the folded card. Grrr! Anyway I cut the panel down a bit more and then added it as you see it in the photo. I guess you could say that my creativity today is all about doing it myself instead of stamping and/or die cutting.

One of the design team at Word Art Wednesday suggested that I enter this into their current anything goes challenge so here goes.

Thanks for checking in, it is appreciated.

shapes

The current challenge at DD is all about shapes and I came up with this card. Inkspirational has a CAS challenge with the optional twist of animal – twist not taken. The stamp set is an older one from GKD and I haven’t used it that much. It kind of called to me when I saw the title of the challenge. The sentiment strip is from MFT and the background layer is actually a piece of photography art canvas. I used a Spectrum marker close to the ink colour used on the rest to create a border. Inks used are Seedless Preserves and Peeled Paint Oxides.

A very simple card to put together and I am happy with the end result. I shall need to make an envelope for this one as it is a weird size.

Thanks for stopping by and I hope your Sunday is going well for you.

retro Christmas scene

The challenge at As You See It, is all about vintage or shabby chic. As well the current Peace on Earth challenge has an old time feel to the mood board so this card should fit nicely there as well. This stamp set from MFT reminds me of old style Christmas cards so I decided to use one of the stamps as shown. The image was stamped in Black Soot and heat embossed clear. I used a scrap piece of blue CS for my background layer, frame and the band across the bottom. Circle and frame cut using Hero Arts infinity dies. And my sentiment is from the same set as the image. My snowflakes are from an old GKD set and I used Blueprint sketch ink and a Sakura glitter pen. I used the pen on the image as well so when card is held a certain way you can see it sparkle.

After a very busy week with guests and meetings being back in my craft room is soothing. However, my hands are a bit shaky today so I had trouble with stamping properly and I got ink in places I didn’t want it. I quite like the card though and it is good to have another Christmas one done. I am very behind in making them and will have to get cracking soon else I will be scrambling last minute.

Thanks for stopping by, your time is appreciated as are any comments you may leave for me.

boo!

Color Hues #93 – Orange and Yellow is the challenge that inspired this card as well as one at one at the Alphabet Challenge – K is for Kittens or Cats. This challenge is a newer one for me to enter, but it appealed to me this week.

In my head I saw orange and yellow bubbles and I knew I wanted to use this little cat die cut that has been on my desk for months. It is from Kokorosa. I cut it using some orange toned marbled paper and it works beautifully here. I took a homemade stencil and brushed the colours through various circles moving the stencil around so I could fill in space. My original idea was to curve the circles in a wavy line, but it didn’t work. I also needed to fill in a bit more space so I took a stamp from a GKD Halloween set and randomly stamped the stars so they curved up to the top corner. I wanted my cat to drape over a bubble, but I’m not sure I achieved it exactly, as my bubble is small and it gets a bit lost. Using an alphabet die from Scrapbook.com I die cut my letters out of black scrap CS and using some tape to ensure they stayed in place I added glue to the back and positioned as you see. I did go over the letters and three of the stars with clear sparkle using a Sakura pen and before adding my cat I attached a small piece of black CS behind its head so the eyes and nose show better. Inks used were Distress Oxides in scattered straw, spiced marmalade and squeezed lemonade. The panel was cut down so I could add a black piece behind for a thin border.

As most of you know, I’m not a Halloween fan and don’t make many cards in this genre. I am, however, quite pleased with this one and hope you like it too. Thanks for stopping by, it is appreciated as are any comments you may leave.