Not Quite the floating technique

Pretty in Pink is the challenge at Cardz4galz this time around. I decided to use a technique I’ve done before, but silly me forgot a couple of things, so it isn’t exactly as I planned. I rarely waste things and figured that it is nice enough to use despite my error. It is funny how the photo distorts the colours a bit. My strips are a combination of pinks but look more purple than pink. The strips are from misprinted photos that are good enough to use this way, although not as a framed piece which is what they were intended for. As well I notice that the die cutting plates have left their own impression so the end result makes them look embossed. To me it makes them look more interesting. The die cut holly hocks are an unbranded die and the sentiment, stamped with Stazon is from a Kokorosa set. Circle die cuts are both Hero Arts.

We hope to see your creations in our gallery soon. The DT’s all have some great inspiration for you. Thanks for sharing your time with me, it is appreciated.

You’re the best

SSC342 Sketch Time is the current challenge at Sunday Stamps. My little heart was made ages ago and was in my ‘keep it for a while’ box. When I saw the sketch I realized that this heart would work beautifully for it. It also used up a couple of scraps I had sitting around one, conveniently, already a thin strip that I cut banner ends into. The photo has made the heart look blue, but it is actually more purple and works with the plum background which looks much darker than it really is. My PP is a cut up photo as is the strip used. I backed it with some gold CS so it tied in with the heart. I honestly can’t remember which company this die comes from and am too tired to go and search it out. I think it is most likely MFT and the sentiment is also MFT from an Itty Bitty basics set. Embellishments are from my stash but are by Studio g.

I wouldn’t call this my most inspired creation, but it isn’t a terrible one either. The doctor changed some medications recently and I am struggling with fatigue since. I shall have to discuss with him if it continues as I’m already fed up with dragging my **** around. Being tired means no inspiration in my head – SIGH! And my friend with cancer has experienced a bad reaction to chemo and spent a night in the hospital which certainly doesn’t help with my mood. I’m worried about her.

Thanks for taking a look, I appreciate your time.

i’m here for you

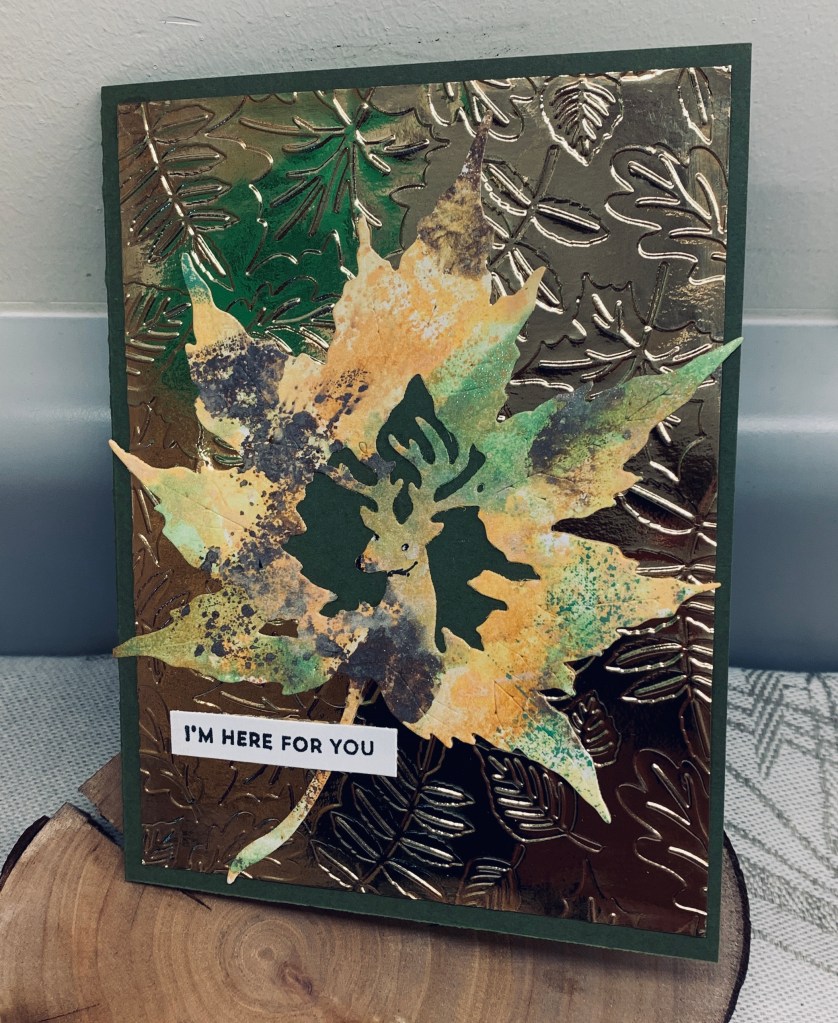
Although the weather is certainly turning more fall like, I am not yet ready for making fall style cards. The moodboard at DD is all about fall or harvest, but I was more inspired by the colours rather than the images. The die used here is new from Kokorosa and I had been wanting to try it out for a while.

To begin with I took some CS and using a plastic sheet, I added my first colour, spritzed it and then applied to the CS. I dried between each ink. I was puzzled at first because I couldn’t understand why the paper was showing shimmer. I thought perhaps it was some residue from the plastic sheet but by the final application of colour I realized that I had grabbed the shimmer spray instead of my water. I guess its what you would call a happy accident as it looks pretty good in RL, although the photo doesn’t show it much. I also hadn’t realized that the die had a deer image cut into the centre so I backed it with a small piece of CS so it shows up more. I used some shiny gold CS and a Spellbinders EF for the background piece. Another accident as I had the folder the wrong way so it is the debossed side that shows up. Once the layer was added to the card front I added the leaf on top. I think perhaps I should have chosen a more muted background as the gold shine overpowers the die cut image a bit, especially if held under strong lights. The photo shows some green on the gold piece. It isn’t there in reality, but I guess there was some shadow or reflection during the taking of the photo that affected it in some way. The sentiment is from an MFT set.

The card is intended for my friend as she goes through her cancer journey. Chemo began on Monday and I’m sending one card per week as she moves ahead with the treatments. Mistakes or not, she will love it and she also loves the fact that I am in constant contact. Fortunately her two adult sons are very much involved in the journey so she is not alone and is supported with love. We cannot do the journey for her, but we can be present along the way.

Thanks for stopping by, it is appreciated.

explore

AAA has an anything goes CAS challenge with a twist of travel. Seize the Birthday has a cute critter challenge. I decided to combine the two and came up with this card.

Using a negative circle as my mask I sponged some colour into the circle using Tumbled Glass and Bundled Sage inks. Because I wanted to use this cute little Panda image from AI, I used a very old wooden block stamp that has an oriental image. This gave me the look and idea of China for my Panda. I stamped through the mask to get a light impression over the sponging. Once I had my Panda stamped I added some bamboo along one side of the circle and the word explore comes from an old hot air balloon set from GKD. I coloured my Panda with pencils and some Sakura Glaze for nose eyes and ears. The inside carries the birthday message.

I’m happy with the end result and had fun making it. Thanks for stopping by, I appreciate it.

pawprints

CYHTP August 10th 2024 Anything Goes With A Twist of Wheels – Twist not taken with this creation.

My dragon boat team member had to put down her aged cat last week and is obviously very sad about it. I decided to make her a pet sympathy card, which I will give to her tomorrow when I see her. I used a paw print border die, as well as a cat die that are from Kokorosa. Taking some scraps of photo CS that I cut from pieces my hubby gave me I first cut the aperture and then ran it through with a Sizzix folder. I did the small strip at the window separately and added it with some tape. The cat was cut from a photo of water and added to the strip. I did the card front with the border die and then added the bricked piece as you see. Another scrap piece was cut using the everyday details die set and I stamped the sentiment from SSS on it before popping it up slightly. Photo paper like this holds onto the stamps so I used some tape at the corners to hold it in place so I could repeat stamp. I learned that photo paper cannot take any kind of tape without it pulling the surface and it is impossible to remove the residue. To hide the marks I added the stamped tiny paw print circles as embellishments.

The glossy photo paper is actually silver coated and it looks really pretty in reality. I also like how using a different printed photo can make the cat look quite real and no inking was required. I did use a pen to darken the eyes, nose and marks along its back.

Thanks for stopping by, I appreciate you and any comments you may leave.

Shake A Tail Feather

Lynda has chosen birds for her challenge theme here at https://cardz4galz.blogspot.com/ and she will also be choosing the winners. In a previous post I mentioned having the fallouts strips from the Blind die and I also had this banner negative space that I had inked, using a stamp from the Kokorosa set, for another project. I thought the fallout pieces would look good to fill this space so I added tape and proceeded to lay them down. As I had had trouble with the Kokorosa die, trying several times, the inked pieces are actually an art work panel that a friend gave me. The bendy portion of the blinds didn’t cut but the straight parts did. I thought adding them alternately would look nice and I am happy I thought of doing this. The sentiment and 2 chickens are also Kokorosa and I coloured them with pencils and water. The smaller of the two was fussy cut because I wanted the chicken to face the other so I mirror stamped it. I haven’t figured out how to die cut a mirror image although most likely there is a way to do it. I kept to the pink theme and added the panel to a pink card front.

I’m quite happy with how this ended up and like the fun of the images. As I often rush around like a chicken with her head cut off, it amuses me to make a card like this one. Thanks for stopping by, I appreciate your time and any comments you leave for me.

stripes and a balloon

The other day I was fooling around with some leftover CS that was mostly just colour strips. I added quite a few to some paper as a backing and this small piece is part of one of them. There was no rhyme or reason to how I put them together and I wasn’t too worried about size or matching everything either.

The challenge at Seize the Birthday is a Tic Tac Toe choice and I chose the diagonal of stripes, CAS and sentiment without the word birthday. Using an older SSS die set I cut a couple of balloons from the piece but decided to only use one of them here. Kind of like an eclipse only I didn’t add the usual black background when I put the balloon back in place. I added the tiny striped bow leaving one end as a wavy piece and then curved the sentiment slightly to add in the downward curve. Sentiment is from an MFT set and twine is from my stash.

Thanks for stopping by and I hope that you have enjoyed an excellent weekend wherever you may be.

The Recipe …

Challenge #329 – Forest Bathing at As You See It is a recipe style challenge. To make sure I got all the ingredients I made a list and checked off each one as I achieved it. The easiest part was the shades of green and embossing as I had made this background sometime ago and pulled it from my stash. The folder is one from Tim Holtz. I also had the dark green frame on hand so I added it to the card front and after adding the twine to the background layer I glued the leaf piece inside the frame. The sentiment stamp is from Joy Clair and I fussy cut around it. The tree is from a die by Penny Black and it is cut using silvery photo paper so has shine. I added a bit of colour using a sponge and then glued it to the sparkly layer before adding it to the rest. I ensured that the twine grounds the tree and then added the sentiment as you see.

Perhaps the tree is a bit busy over the embossed layer, but I still like the end result. It is interesting to see how colour sits on this photo paper and it stays put too. As this card fits the challenge at CYHTP but without the twist I am also adding it as a 2nd entry there.

Thanks for stopping by, it is appreciated and wherever you are in the world I hope your weekend is a good one.

love you my friend

These colours are not my favourites by any stretch of the imagination and creating with them isn’t something I would normally do. I guess that is why challenges are good for us. They get us out of our comfort zones.

Color Hues #92 – Pink and Brown is the latest challenge and this card is what I came up with. It started with the water coloured piece that I had played with some time ago. I used a Spellbinders die set that is for creating envelopes to get the two pieces shown here. I used another die in the set to emboss the water colour piece. Then I took another scrap piece that is from an actual painting and did the 2nd one. The PP is from an old pad I’ve had forever and I cut it down, added a ribbon and then added the foam backed shaped layers. Using more scrap CS I stamped the leaves twice using a leaf clusters stamp and die set from Altenew. Sentiment from that set too. I stamped using Gathered Twigs ink and added the leaves as you see attaching them together at the stems. Using a Memory box daisy die I cut the flower twice added some pink ink by swiping and put them together before adding the pink center petals and the flower center. To soften the stark edges of the leaves I took a gold glitter pen and lightly went around some of them.

My hubby likes the end result, I’m on the fence about it. Thanks for stopping by, it is appreciated.

foiled balloons

I purchased these Paper Rose foiled cut apart sheets, I thinking I would use them much more than I have. When I saw the challenge at Shopping our Stash, I decided to pull them out and use a few pieces. At the same time making this card allowed me to use a few more of my scraps. The blue banner has been in a tray on my desk for a while and the marbled PP is another small left over. Once I had added it to the card front I shortened the banner slightly so it would fit across and then I went around it with a marker wheel to which I added some pen lines, so there is subtle stitching along the edges. Foam tape popped it up nicely. I then added thread to the balloons and placed them as you see. A small bow and a few stars added some additional interest and the sentiment is another item from the Paper Rose sheets.

Thanks for spending time with me today.