make it merry

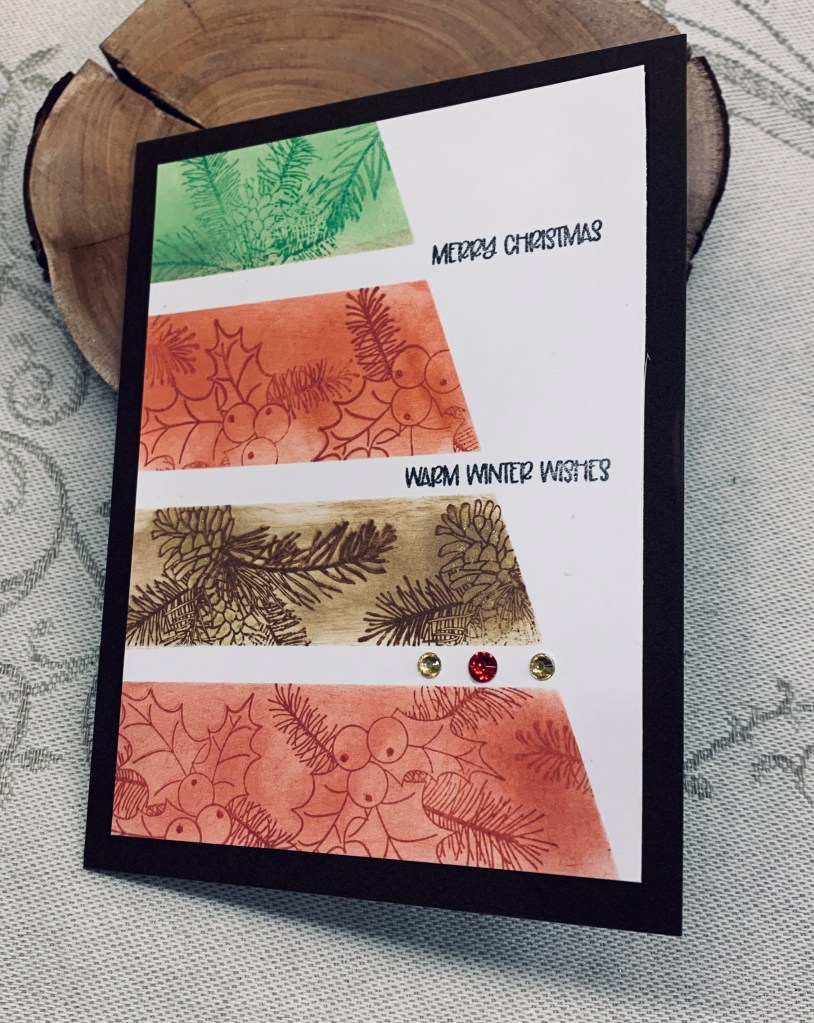
The challenge at Cardz4galz #213 is to make a cityscape. For my example I decided to create a small Christmas scene using some small dies from an unbranded set. Firstly I used a piece of vellum which I inked slightly with Tumbled Glass and Chipped Sapphire. I added a frame using dies from another unbranded set and some mirror CS and added the vellum and a shimmer snow piece in behind leaving it just loose enough to tuck the houses and a tree underneath. The church fit nicely on the hill and I used some fall out bits to add the illusion of snow which I sparkled using a pen. There is gold holographic paper behind the windows of the buildings. I die cut a lot of leaves from a Sizzix set that I’ve had for ages and added them around the frame as you see. There are a few punched branches in copper from an old Martha Stewart punch. The sentiment is from a new set purchased yesterday and is by Spellbinders. I like how it looks and there is no stamping required.

This card was a fun one to make, but took a lot of time due to the design and the fiddly bits of the tiny scene. I am really pleased with the result, but in the future I won’t use vellum as it is too transparent. Thanks for stopping by, it is appreciated as are any comments you make.

I am adding this card into the https://peaceonearthchristmas.blogspot.com/.

jolly snowman

Using the easy layout that I found on Natasha Footes channel, I created the paper layout you see here. This layout is a great way to use PP and because I’m using 2 sided paper it all matches well. I recently purchased some Taperology transfers with a Christmas theme and along with them some vintage images printed on clear plastic. The little snowman you see on the star is one of these images. Star was cut with HeroArts infinity dies. The sentiment banner is from Spellbinders. I added some glitter to the centers of the snowflakes and on some of the stars on the PP. The note card is a white shimmer CS. I’ve done a few cards with this layout today as it is a quick way to create multiple cards.

Thanks for stopping by, it is appreciated.

warm winter wishes

After watching a Natasha Foote tutorial I had the thought that it would work for a colour challenge. This one at Sunday Stamps is what I created my card for. Basically I followed the tutorial using my chosen colours for each rectangle. My card base is a dark brown and I used Distress inks for my sections. The sentiments come from a set by Divinity Designs and the embellishments are from my stash. The greenery stamps are a very old set for which I have no name and most likely were purchased in Winners or Homesense.

I’m happy with how this card turned out and it was quite a quick card to make. I shall no doubt do more in a similar style. Thanks for stopping by, it is appreciated, as are any comments you leave me.

clink

For this card I used a new stamp set from YNS and an EB folder from SSS. I coloured it using some new metallic pencils and think they will work better on darker CS, but they look okay here. I added a bit of sparkle in a few places and die cut with an infinity die set from HeroArts. Went around the edges of both pieces with a black pen and added to a silver card front. The challenge at Just Add Ink is to add alcohol so this stamp was perfect for the challenge.

Thanks for stopping by, it is appreciated.

Gold, Black and white

AAA cards is asking for CAS in black, white and gold while JUG’s wants something in a circle. I figured making one card for these 2 challenges was doable and this is what I came up with. My card uses a stamp set from YNS and I stamped the background onto black CS and then heat embossed it with gold. I die cut the aperture into white shimmer CS and added the black panel behind it. I also heat embossed the sentiment. I felt it still needed something so I took a scrap piece of shimmer gold CS and die cut a frame using 2 close in size dies. Once this was added I felt it was more complete.

I’ve mailed all my international Christmas cards last week and now can concentrate on the Canadian ones with less pressure. I still need approximately 50 cards, but I have several designs on the go so I can get them done relatively easily and I hope to have them finished by the end of the week.

Our friends are coming for a few days next week and once again they are going to assist with the Christmas decorations. I am so spoiled by this particular friend and feel very lucky that she wants to help me with the decor again.

Thanks for stopping by, it is appreciated. I hope all of my American friends had a good thanksgiving and fun family events.

let’s chill

Yesterday I was fooling around with stencils and I created a few different panels. I cut one down and used the smaller piece for this card. It is a snowflake stencil, but I’ve forgotten by whom. I used some glitter glaze by Brutus Munroe through the stencil and when dry added a bit of ink very lightly over the raised portions. After adding it to the blue card front I added a small piece at the bottom to give the illusion of a rink and added the little penguin from a new YNS set. Sentiment part of that set too. I used some of the colours from the Moodboard to colour in the penguin. Decided to keep it totally CAS so no other embellishments.

I am adding it to the challenge at JUG’s. Thanks for stopping by, it is appreciated, as are comments you leave.

Starry, starry wreath

Welcome to the new challenge here at Make My Monday. Debbie has chosen the theme Wreath. I have just purchased some Holographic paper and I thought it would make a great wreath when paired with this unbranded star wreath die. I pulled out the paper that has tiny stars all over it and proceeded to die cutting. Having decided on a black card front I placed it down trying to figure out my next step. I decided to use some vintage printed music sheet paper and some soft peach shimmer CS and a word die from Scrapbook.com. It is a two part die so I glued the music bits to the base before adding it to the center of the wreath. I had a couple of small stars left over so I added one doubled up star to the center of the O and one on the same peach with music on top to the side. I also cut some strips of both the peach and holographic paper and added them to the side of the card as you see. Basically this card is almost a one layer so mailing it will be a breeze.

I’m glad I made this purchase as it will be fun to do other designs using the papers. I shall be sharing this card at: https://peaceonearthchristmas.blogspot.com/ – anything goes Christmas challenge.

Thanks for spending time with me today, it is appreciated.

Christmas stocking

This die cut stocking is from a set by Marianne Design. It had the snowflake and a tiny heart as part of the set. I cut it in copper and added the snowflake along with the little bow as you see. I also added a small gem and the Spellbinders banner. I set it aside and did some other cards that were part way finished while I let ideas gel in my head. Because I’ve been lazy at putting things away, the stamp I’ve used – also by Spellbinders – was on my desk so I stamped it onto a card front using Versamark and heat set it with gold. I took the stocking and played with it for a minute decided that it would look okay and added it using foam tape for dimension. Then I added a few more gems before calling it finished. I am adding it to the challenge at As You See It. I really like the stamp and did another card in a similar fashion but with a snowman instead, but I like this version the best.

I’ve spent most of this afternoon, playing with alcohol inks so now my craft room smells of rubbing alcohol. I made such a mess I had to use the alcohol to clean my hands and my glass mat, but it was fun to play.

Thanks for stopping by, it is appreciated.

As mentioned in my last post, I’m in full blown Christmas crafting mode and I was playing yesterday and the day before with my new 3D folder from Sizzix. I cut 4 panels out of the red CS and put them through the machine and then took metallic inks in both silver and as in this one, gold. My inks are from Scrapbook.com and are metallic pigment inks. I swiped carefully over the raised sections allowing the ink to highlight those areas. Then I took some gold foil CS and using an ornament die front section I cut the filigree ornament. My first thought was to use both parts of the die, but it covered up too much of the layer so using just the part here worked best. Using a new set from Spellbinders I die cut the sentiment in a silver CS so it would stand out more over the gold.

At the time of creation, I wasn’t thinking of challenges, just of getting a few more cards done. I ended up with 4 like this and 2 of a completely different design. This morning I was out at my yoga and a birthday celebration lunch for a friend and hadn’t even thought about card making so on my return to my craft room, I was surprised to find the challenge at Color Hues was up and in the colours I had already used. What’s that word for when this happens, serendipity, I believe. All I had to do was create the post. So easy and such fun.

Thanks for stopping by, it is appreciated.

garnish your margarita

The new challenge at Cardz4galz begins today and Helen has chosen embossing (wet or dry) for the theme this session. For my example I chose a StampinUp/Sizzix folder called Scattered Sequins and gently ran a gold metallic ink pad over them for some colour and shine. My stamp set is from Your Next Stamp called Crafty cocktails and the sentiment comes from that set too. I stamped and coloured my chosen images using Prisma Color pencils and I added Nuvo Crystal drops to the drink for some shine and so it looks more like glass. I decided to add a small half oval Holographic piece behind my images for more sparkle and shine. I went around the edge of the panel with an ink pad before adding it to a shimmer note card. The ink gave it just enough definition to stand out from the card front. For once my camera captured colours in the holographic piece.

Anything Goes With A Twist of Turkey/Thanksgiving is the challenge it is being entered into but twist not taken.

I’m quite happy with how this one turned out and like the cuteness of the stamps. I also think the sentiment is perfect for someone who may need a lift in spirits, pun not intended. Thanks for stopping by, it is appreciated.