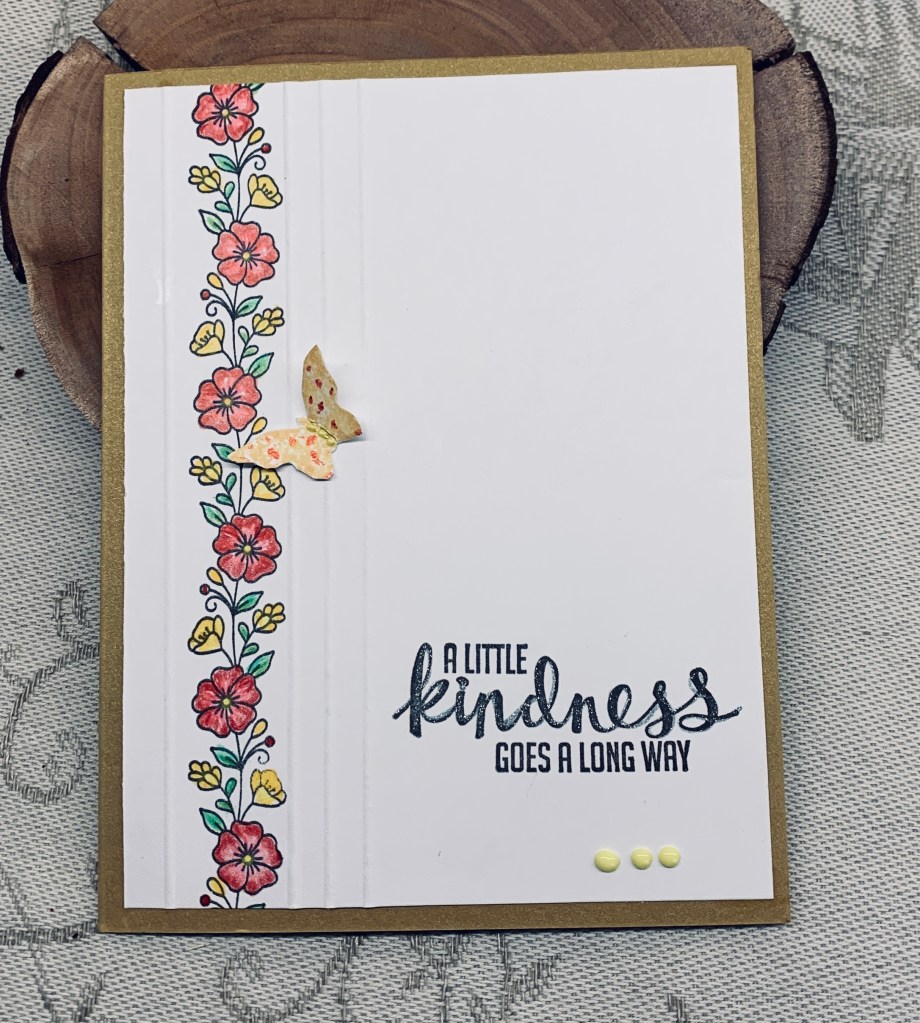
Recently I’ve seen someone show how to use colour pencils on some colouring pages and I decided to give the technique a try. I used a new border stamp found in a dollar store by Forever in Time and proceeded to use Prisma colour pencils with the result as you see here. I am really pleased with how this turned out and as my preference is to use pencils I shall be doing more colouring this way for sure. For some added interest I scored a few lines down the sides of the image. I added the sentiment which is from an old StampinUp set, and I also used the smallest butterfly from this set which was fussy cut. I added some red sparkle to the butterfly and some glitter to one word in the sentiment. Some Pops of Color on the body and underneath the sentiment and the card was done.
An easy card kept simple and just in time for the challenge at Color Hues. Thanks for popping in to look.
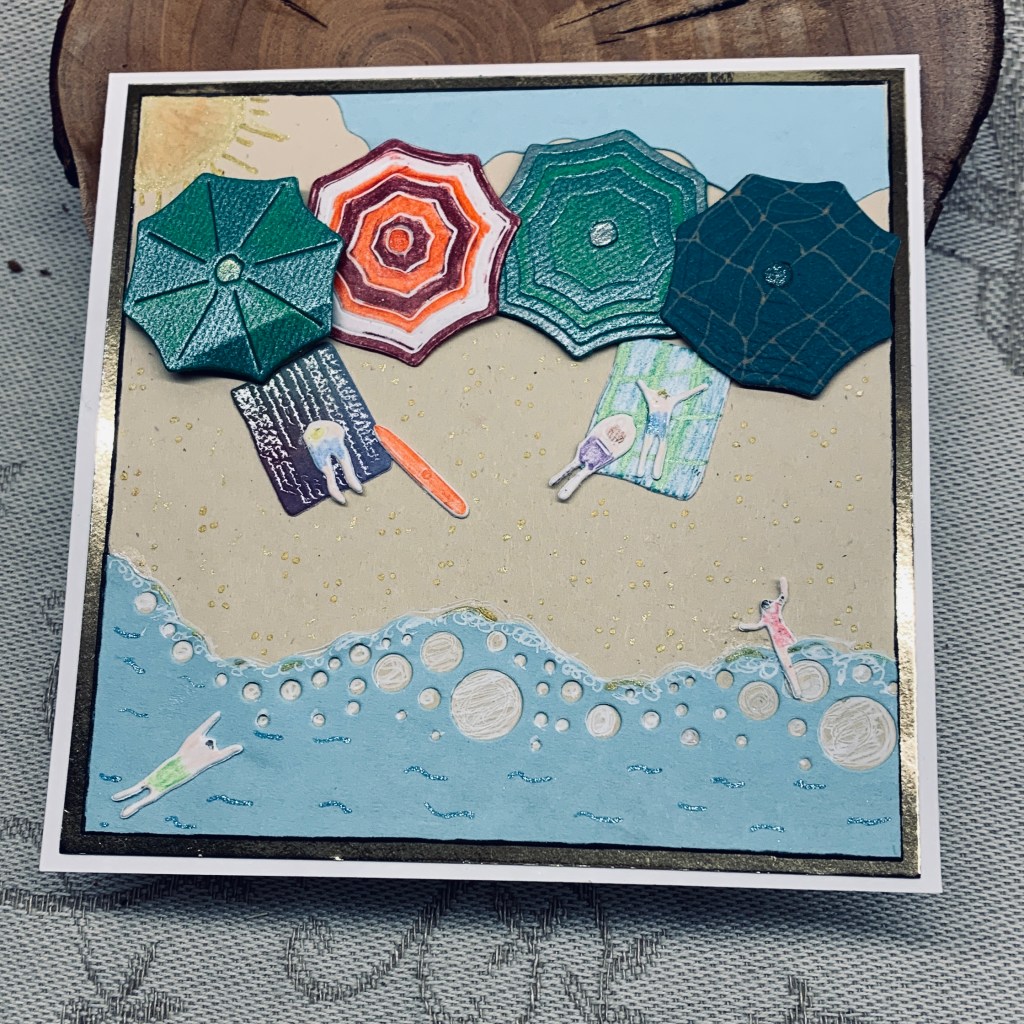
Last night I was having trouble sleeping and gave up rather than toss and turn continually. Normally I take a book and read for a while but occasionally head into my craft room. The die set is from Kokorosa and with the challenge at As You See It being a beach theme I thought I would use it to make a card. I die cut several umbrellas and added more colour to them here and there. Added foam tape so I could get a bit of dimension. The towel and people are all part of the set, but the wave is from a different set. I had a square piece of kraft CS in my scraps so I built the scene on that. I added the sun in the corner by hand and used the cut edge of the wave die cut scrap to add a bit of sky. Added the people to the towels, with a couple in the water and then the umbrellas in a row. I touched up the wave with a white gel pen to look like froth and a bit of sparkle to denote wave action. Used a black pen around the edges of this scene and then added it to the gold layer for a border. From there to the white card.
Crafting in the middle of the night is not perhaps the wisest thing to do as I didn’t measure the white card front correctly and when folded the back is shorter than the front. I’ll fix it before sending but for the purposes of the photo it didn’t matter. As an expat Aussie, my hubby loves to sit on a beach in the sun, me not so much. I burn so easily and as a cancer survivor am not willing to risk sunburn if I can avoid it. As we live near the ocean a scene such as this one is found all along the coast. If we are boating I can stay out of direct sunlight most of the time, but sitting on a beach even in the shade, isn’t something I enjoy. Decided to hold off on a sentiment for now as I’m not sure yet how this card will be used.
Thanks for stopping by and I hope your weekend is going great.
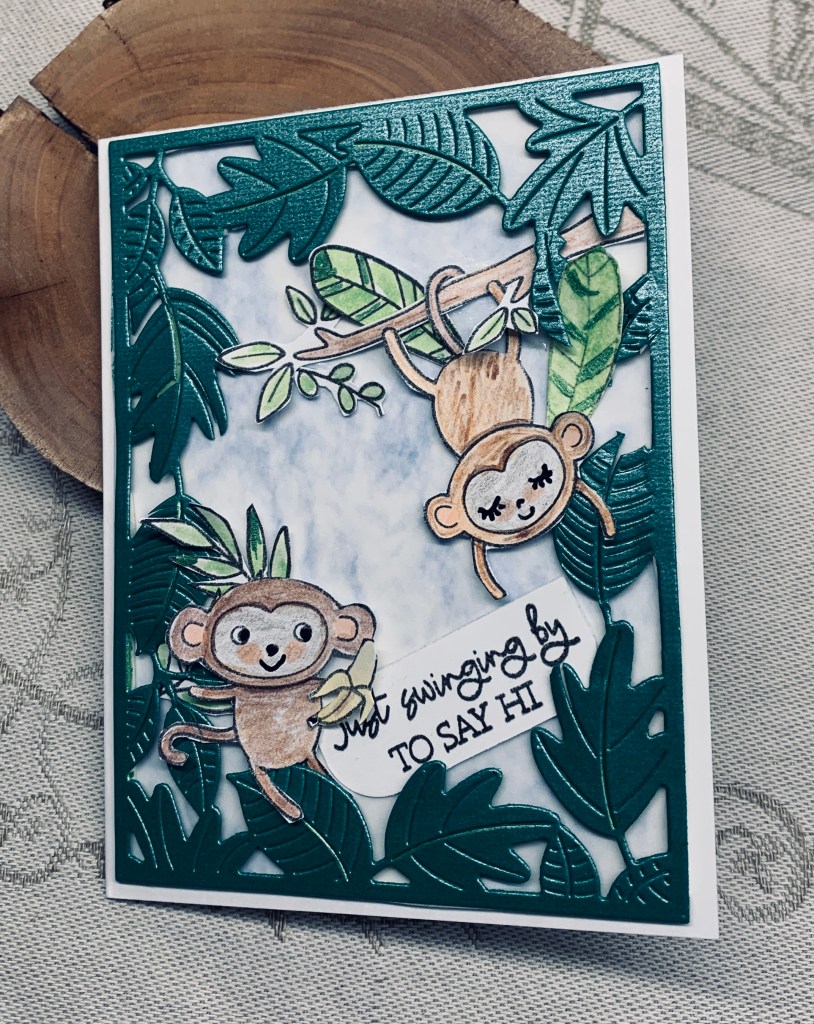
Our current challenge at cardz 4 galz is to use cute animals or insects and I chose these monkeys from a new StampinUp set that I won recently. The frame die is from MFT and uses some shimmery green CS from SSS. I popped this up with foam tape. The background is a piece of Vellum made to look like a sky, which was glued to card front first. Once the images were stamped I fussy cut everything, but the smaller items were a bit challenging to cut this way. I may look for the matching dies to this set. The monkeys were coloured with Inktense pencils, Sakura pens and Ohuhu pens. Then I assembled the card until I liked the placement using glue/foam tape to do so.
Although I really like the shimmer CS it is quite soft and the die made it a bit fragile. I disguised the broken bits as best as I could but must remember this when I use more of the CS. I think this turned out reasonably well, but it did take some time to create.
Thanks for stopping by, it is appreciated. I look forward to seeing your creations in the gallery.
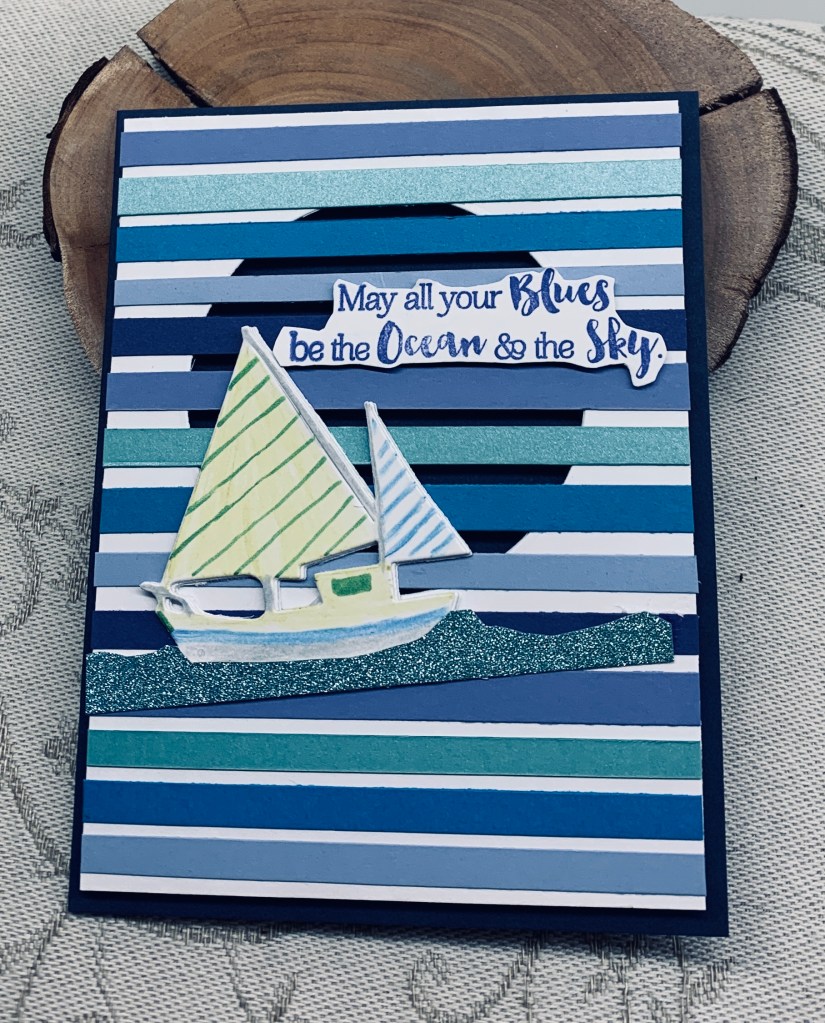
In a way this card is a bit like the floating technique because the stripes all float over the aperture. To prevent them from bending all have been backed with foam tape and the whole panel is popped up. After studying the inspiration photo I decided on a nautical theme using stripes so I pulled out my scraps that were already kind of like stripes but cut them thinner. After deciding on the sequence of blues I added them as you see to the white card layer. then I turned it over, cut off the excess and added the foam tape. This layer was added to the navy card front. The sailboat is a new to me die – came with 2 boats – from Kokorosa and I cut several to give it some definition and strength when all glued together. I coloured this with pencils. and a Sakura pen. I found a thin strip of glitter paper that was in the same colour family and made it look like water (I hope) so the boat was grounded. The sentiment is from an old set by Inspired by Stamping and this card will go to a sailing friend for his birthday which is coming up soon.
This turned out better than I expected and I know our friend is going to like it. Thanks for stopping by, it is appreciated.
To make this card I used a free digital stamp found on the Internet. I resized the images then printed 4 of them onto some CS. I then used Spectrum Noir markers to give colour and fussy cut each one. The green die cut is from GKD, the sentiment is from Hampton Arts and the embellishments are YNR Gumdrops. The PP is from an old paper pad that is almost finished. Using alcohol markers is not my go to normally but they seemed best for this particular image. I decided that a square card worked best for this design and this one is 5X5″.
Thanks for stopping by and I hope you are having a wonderful day.
I almost missed this challenge due to being busy with some home stuff. As well, I don’t have any cute bee stamps and the one stamp I do have is MIA, so I made my own. They say get creative so I did. The sentiment is computer generated and is probably something I’ve seen somewhere but cannot credit to anyone at the moment. I did have the honeycomb die which I cut in black to add over the yellow card front. I built the bees by using an ornament stencil, which I traced for the body, fussy cutting and colouring it with Spectrum Noir markers, some vellum for the wings, a small circle stamp for the head and some thread for the antenna and arms. I hand drew the nose and mouth and added googly eyes. My bees are weird but somehow fun and perfection on a handmade card isn’t totally necessary, although it has taken me a long time to realize that.
The heat continues and my laundry dried outside in 2 hours so now it is folding time. Supper first and then finish the chores is the order of my evening. All the news is showing is wildfires everywhere and I’m trying not to think about it because it makes me nervous. Thanks for stopping by and please stay safe everyone.
Having seen an oval shaped layered card, I wanted to try one for myself. Recently I purchased these oval infinity dies from Hero Arts (love infinity dies) so I pulled out the largest one and cut 4. Then I chose two other sizes and cut one of each. I wanted to put the ovals together without having a weird edge at the top of the card so I made a hinge inside them and then to cover up the hinge I added the other 2 over the top making it look tidy inside. The next size oval was added using foam tape and the final one was glued after I had finished the stamping etc. I don’t know who made the rubber stamp and it is one I’ve had for quite a while. I stamped the image twice using my Misti and then again on another piece of scrap CS. This was coloured using Inktense pencils and water. I coloured two additional flowers on the scrap piece and fussy cut them so I could pop them on top of the original image. The sentiment is from a Joy Clair set and I rounded the ends before adhering. A few Trinity Stamp embellishments to finish it and I was happy.
The card will be entered into the Seize the birthday challenge. Thanks for stopping by it is appreciated.
The recipe challenge at As You See It required 6 items and I think I’ve managed to incorporate them all. I have 3 different patterned papers, all in shades of yellow, several die cuts, a vellum circle, the sentiment and enamel dots. It also fits the summer challenge at Four Seasons, partly due to the colour in the upper left corner along with a slightly tropical look reflected in the sunglasses. I began by die cutting several layers of the words and sunglasses and glued the layers together for more depth and stability. Setting these aside I searched for another patterned piece that wouldn’t detract from the MFT die cuts and found a piece in my stash that has faint sunrays on it. Unfortunately even the vellum hides that pattern more than I wanted but it is there. I used a tiny stamp from a Stampendous set to get the palm tree reflection and went over that with Nuvo Crystal drops. The thank you is from Hampton Arts and the enamel dots are Gum Drops from YNS. I also added a few extra dots in gold using Nuvo Crystal drops, but I think they are a mistake. Too late to change it now but a lesson learned.
All in all I’m pleased with the result and happy it works for two challenges. We are back in a heat wave this week and it is already very hot outside. The house painters are finding the paint dries as soon as applied even working in the shade. We had a good boating trip and met up with close friends who wined and dined us a few times. There was a day of heavy much needed rain but it cleared up and was nice without being too hot. Right now even on the water it would be too hot.
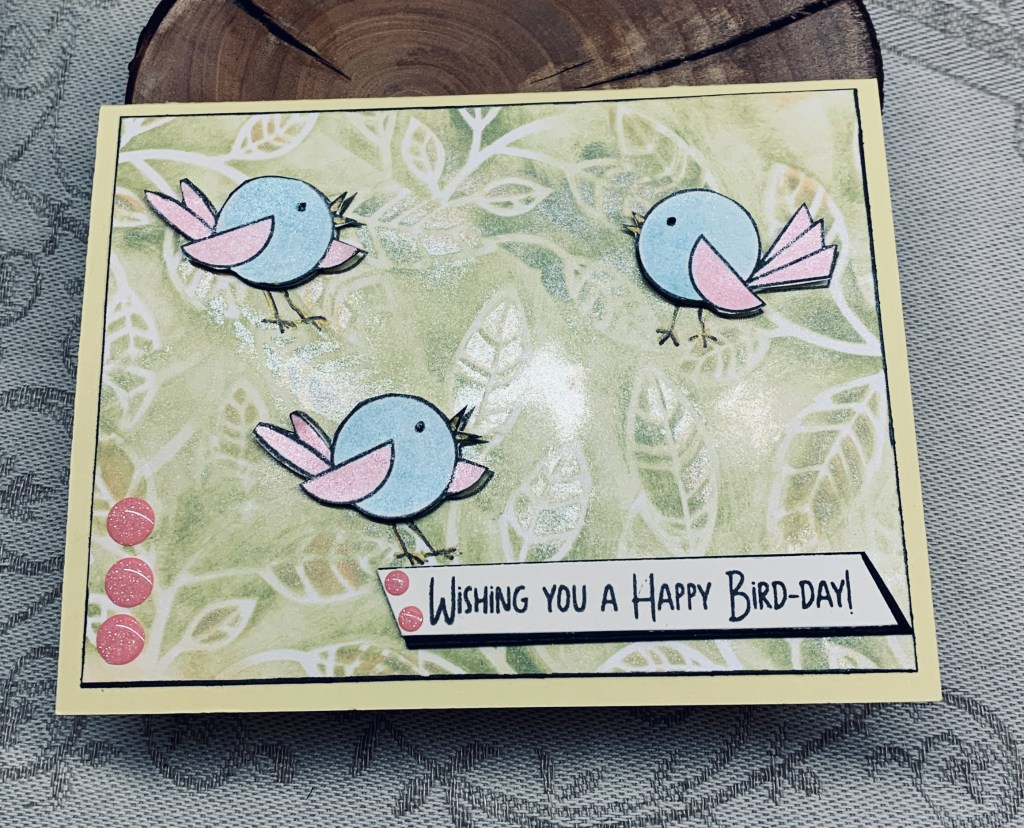
This is my first post as a new design team member at Make My Monday and the challenge is for 3 of anything. As you can see I chose these little birds. The stamp set is from Your Next Stamp, sadly an online store that has since closed, and I stamped, coloured then fussy cut each one. The bird legs were too difficult to cut so I stamped the birds onto the background and popped up the fussy cut bodies on top. Sentiment is part of the same set. They were coloured with metallic watercolours. The background was done using part of a flower stencil. I just kept moving the leaves around adding the ink as I did so. Ink used was Peeled Paint Distress Oxide and a dab of Dried Marigold here and there. I went over the piece with some Perfect Pearl powder to get some shimmer. Once I cut it down to the right size I used a black pen around the edges and added it to the yellow card front. Using a scrap piece of black behind the sentiment so only 2 edges show I added it at the bottom and then placed the YNS Gumdrops as you see.
A very uncomplicated card, but it is quite pretty in real life. As often happens the photograph doesn’t do it justice and for once the camera has caught all the shimmer which washes out some of the colour behind.
Thanks for stopping by and we look forward to seeing your entries in the gallery.
Our challenge theme at Cardz 4 Galz is A Summer Day, which for many of you is an extremely hot one this year. What better way to spend a summer day than to be on a beach with water close by?
For my card I used a new stamp set found on Amazon made by a company called Mvchifay Clear stamps and it had matching dies with it. I added stamps from other sets, Kitchen Sink stamps for the water, clouds from an MFT set, and a StampinUp set for my sunshine. For my sandy beach I used some real sandpaper, an idea I got from a stamping buddy recently. I stamped the water and added a few scrap pieces near the sand to give some curves to the edges. The images were coloured with pencils and Sakura glaze pens. I also added Nuvo Crystal drops to the ball and life rings. As well I stacked several die cuts together to get more dimension.
I quite like the result which is not always the case, as you know. Thanks for stopping by and I look forward to seeing your cards in the gallery.