Christmas cheers

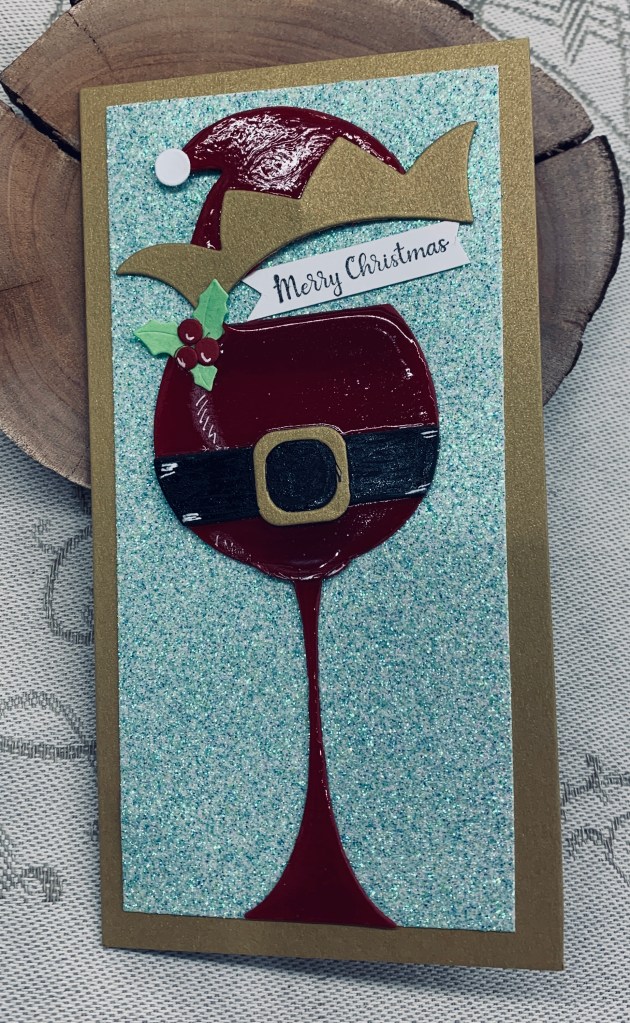
The dies for this card came from Kokorosa and the sentiment stamp is from Divinity Designs. Card stock and glitter CS are from my stash. Due to the size of the die I decided a mini slimline would work best for this design.

I began by cutting all the pieces for the card using a red CS for the glass and hat and an old gold CS for the hat trim and the card base along with some scrap pieces for the belt etc. Once I had it all cut I assembled the glass and then added Nuvo Crystal to the entire piece including the hat. I left it to dry and while drying I put together the holly and berries and the belt to which I also added Sakura glaze to give it some texture. When everything was fully dry I added some white glaze here and there for definition and shading. Added the glass and hat to the glitter CS and then to the card front. It is quite sparkly in reality and very shiny too.

I’m quite pleased with the end result and am adding it the most magical time of year anything goes challenge.

Thanks for stopping by, it is appreciated.

Alignment of the stars

The background die used here is unbranded and a gift to me from a friend. I hadn’t used it yet as I wasn’t sure what I might do with it, but this challenge at AAA seemed like a good time to play with it. I angled it onto the card front and put it through my Spellbinder machine, then I backed it with a very thin piece of foil so that gold shows through the planets.

When I was trying to make an Aurora Borealis background for a card a few weeks ago I wasn’t happy with the results of two panels, but thought I may be able to use them somehow. Today I decided to die cut a star outline from part of one and while I was at it I also cut a few circles for use later. The sentiment is from a cut apart set that I got from SSS and I tucked it under the star as you see. The card fits the challenge nicely and I believe I’ve followed the rules properly and not misread something as I’ve done once or twice in the past.

Thanks for stopping by, it is appreciated.

a frosty look

It has been a while since I entered a challenge at Sunday Stamps, so I decided to give this sketch challenge a go. Life has been quite busy recently and I’ve spent a lot of time on ensuring I’m up to date with designs for the two blogs I’m a design team member of. I’m enjoying it but it is more work than I expected. I’m not sure where the idea for this card came from although I know I’ve seen something that gave me the idea. It could be from my hubby’s photo magazine as some of the images there are spectacular. Anyway I wanted to try making an icy moon so I searched for some shimmer CS and die cut a circle and then went on to cut snowflakes using a tiny die from Marianne Designs. I also cut some out of white CS that I covered with a Spectrum glitter pen and out of a small scrap piece. I added a fine silver line around the edge of the circle/moon and then added the snowflakes on about half of it. Using more scraps and unbranded banner dies I made the banners and used a foil CS from Recollections in the colour I needed to make the layer for the card front. I added each piece as you see and then added the die cut sentiment which I’ve had in a box on my desk since spring. I’m not in Christmas mode yet, but every once in a while I get one ready for my stash.

I’m quite pleased with the end result and appreciate your stopping by to take a look. Hope the week ahead is a good one for all of you.

This card also works for the Peace on Earth challenge so I’m adding it there as well.

outrageous orange

The background piece here, started out as something totally different. I had the idea of stamping small sunflowers in Oxide ink and then clear heat embossing, but I messed it up and didn’t like it at all. I tried covering it all with the Carved Pumpkin ink and hated it. After a small thinking session, I wondered what would happen if I covered the piece with scrunched up tissue paper and that worked great. Once it was dry I added more ink using Rusty Hinge to deepen the colour that was showing through the tissue. Dried that and added some Inkagold in places. Loved how this turned out and decided to use it the way you see here. I added a die cut from a very old Sizzix die to which I also added a little gold. Glued it in places and added the die cut panel with foam tape for dimension. Panel was cut with a an old Spellbinders Distressed edge die. The angle of the photo makes the orange look much lighter than it actually is and in reality this is a lovely rich background. Added the butterflies to finish the look and the sentiment is from a Joy Clair set that I use a lot.

Thanks for stopping by, it is appreciated. Hope you are having a great day.

Thanksgiving

My initial desire was to create my own plaid using a stencil set, but I have loaned it to a friend who is currently away on her boat so I looked through my PP stash and found this one. It is from an old paper pad, as is the other piece, but I have no idea which company produced it. I also decided to use the layout that I used the other day as I like how it looks, so I now have a twofer as these papers are one sided. I don’t have much in the way of thanksgiving stamps and pumpkins and what I do have is on the smaller side which I felt wasn’t right for this card. I decided to make my own pumpkins (I did two) out of scrap CS and PP using a few small dies. I die cut two small circles from the orange CS and glued them together to give me a base and then I used two oval dies to cut the next layers. I glued these together as you see and added a small strip in the back which I cut into a stalk shape at one end. Then I added some curled ribbon and a leaf at the top. The tiny green leaves are fallouts from a background plate and I used them as embellishments. The sentiment is computer generated and then added to the background piece. I also dabbed it with some leftover sponge ink to soften the glare from the white. The gumdrops are from Your Next Stamp. It’s fun to get really creative and make my own stuff using what I have and I could make much larger pumpkins using larger dies if I feel I needed them.

Thanks for stopping by, it is appreciated.

going fishing

Yesterday I began a card that I thought would work for the challenge here, but then I realized that I hadn’t paid enough attention to the theme and consequently couldn’t use it. I decided to be amused by my error and put my thinking cap back on. However I had run out of time for my craft room, so although I came up with the idea for this card I had to wait until today to execute it. My morning was spent in the kitchen and hopefully my afternoon will be here in my craft room.

Having seen a tutorial called the easiest layout ever, I thought it would work really well for a speed challenge and I was right as I put this together in 6 minutes. It would have been less than that if I hadn’t had issues with my glue bottle, but there you go life happens and sometimes things don’t go smoothly.

After gathering up the necessary items to make the card, I set my timer and off I went. First step was cutting the DSP which is from Stamping up. Second step was to die cut the fisherman out of black card stock and I used a new die from Kokorosa to do this. Once this was done I glued each piece of DSP down as you see, stamped the sentiment from GKD at the bottom and glued the fisherman so he appears to be standing on the letters. He wouldn’t stay glued – honestly this new glue has to be the worst I’ve ever purchased and I am at the point of chucking it because it is so bad. I shall empty the bottle and refill it with my usual brand as the nozzle on this bad one is the only thing good about it.

Because there is no real measuring required for this card, it was very simple to create and really quick too. Yet even though quick it is an effective layout and it uses the DSP beautifully. Thanks for stopping by, it is appreciated.

movie night in the city

The Make My Monday challenge theme is ‘In the City’ and I guess this can be interpreted in many different ways. I struggled a little trying to come up with something that would be different to a city scape and decided to use a new kit from MFT that I’ve had sitting around for a while and not yet used. It is a little intimidating to use as there are so many tiny pieces to deal with. I now know why I admire some of my stamping friends who do a lot of building with tiny die cuts. It requires a lot of patience which in my case is sometimes in short supply.

I began by die cutting everything and keeping it together in a small box. After I had decided on the orientation of the card I began to build the scene, initially just placing pieces to see how to fit everything. Once I had that sorted it was simply a matter of adding each element. The first layer of seating was glued flat but the 2nd set was popped up with foam tape leaving me enough room to add the people. I built those separately using pencils to colour in the various bits. They were then added to the seats. I made an error and ended up with glue where I didn’t want it so had to add a few more people to hide the mess. Once they were in place I added the movie screen and curtains. I did cut the curtains shorter so they would fit nicely. The words were computer generated as I didn’t have anything suitable in the kit. I will use one of the sentiments from the kit for the inside.

spooky

When I was making a card for a colour challenge recently I messed up the first attempt. Setting it aside I went on to do another one and this piece sat on my desk for the next few days. I was thinking about how to rescue it and use it when the challenge at JUG’s showed up. That gave me an idea of how to rescue my poorly done piece. I traced the ghost onto some card stock from a image found on line and then fussy cut him so I could cover up the really messed up part and this worked well. Now to add the moon without destroying anything else. As it was inked with Distress Oxides I wondered if I could fade out the ink using a mask so that the moon would appear through the tree. Up to a point this worked well, but because this layer wasn’t done on watercolour paper, I couldn’t fade it enough without damaging the CS. I wondered if adding some Perfect Pearls would make a difference and gave this a try. I was at the point of, if it works great and if not then trash it. As you can see it did work reasonably well and any shadows look as the moon looks sometimes in reality. The little bat is another fussy cut computer image as I didn’t have a small enough stamp in my stash. The sentiment is from GKD.

As I’m not a Halloween fan, I don’t make many cards in this theme, but this year I’ve done several and surprised myself. I’m adding this to another challenge, first time ever, as it fits the theme there as well.

Challenge #12 Most Magical Anything “Halloween and Christmas” Goes – sponsored by Pattie’s Creations

oh happy day!

In my head I was planning a different card, and dare I say it, for a different challenge too. Because I didn’t read the instructions correctly I realized that this card simply wouldn’t work as planned and instead this evolved. It works perfectly for the Anything Goes at Less is More and is a simple CAS card. I used an A.I. set that has fun sheep images and pun sentiments. I used this image but my sentiment comes from a cut apart set, which at the moment, I’m unable to remember who by. I used pencils to colour the sheep along with an alcohol pen for the face and legs. I added some tiny hearts as embellishments and am quite happy with how it turned out.

Thanks for stopping by and I hope your day is going well.

autumn leaves

Our current challenge here at Cardz 4 Galz, is to use leaves as your theme. My card is using a new stamp set from Your Next Stamp and I paired the images with a few sprays and leaves from an MFT set, along with a sentiment from a Joy Clair set. Using some CS that has a grain that looks like subtle embossing I created a slimline card base and stamped the various images after marking where the circles would be cut. After I had coloured everything with watercolour pencils I used an MFT slimline stitched circle die to create the openings. Setting the die cuts aside temporarily, on the inside of card front I added foam tape, to which I added an additional piece of CS. Then I paper pieced the die cuts into the openings ensuring they lined up properly but were slightly set back due to the popped up card front. In retrospect I should have doubled up on the foam tape so it would have lifted a little more but I still got the look I was going for. I curved the sentiment slightly so it fit around the circle edge in two places.

I did see somewhere that a card creator named this as a reverse eclipse technique. So far I haven’t tried the original eclipse technique although I plan to. I am quite pleased with how this turned out and it was a fun way to make a card.

Thanks for stopping by and a Happy Fall to everyone. In our case we hope for some rain as we really need it.