Using Ovals in Black, White and Silver

Anything Goes Embossing With a Twist of THANKS

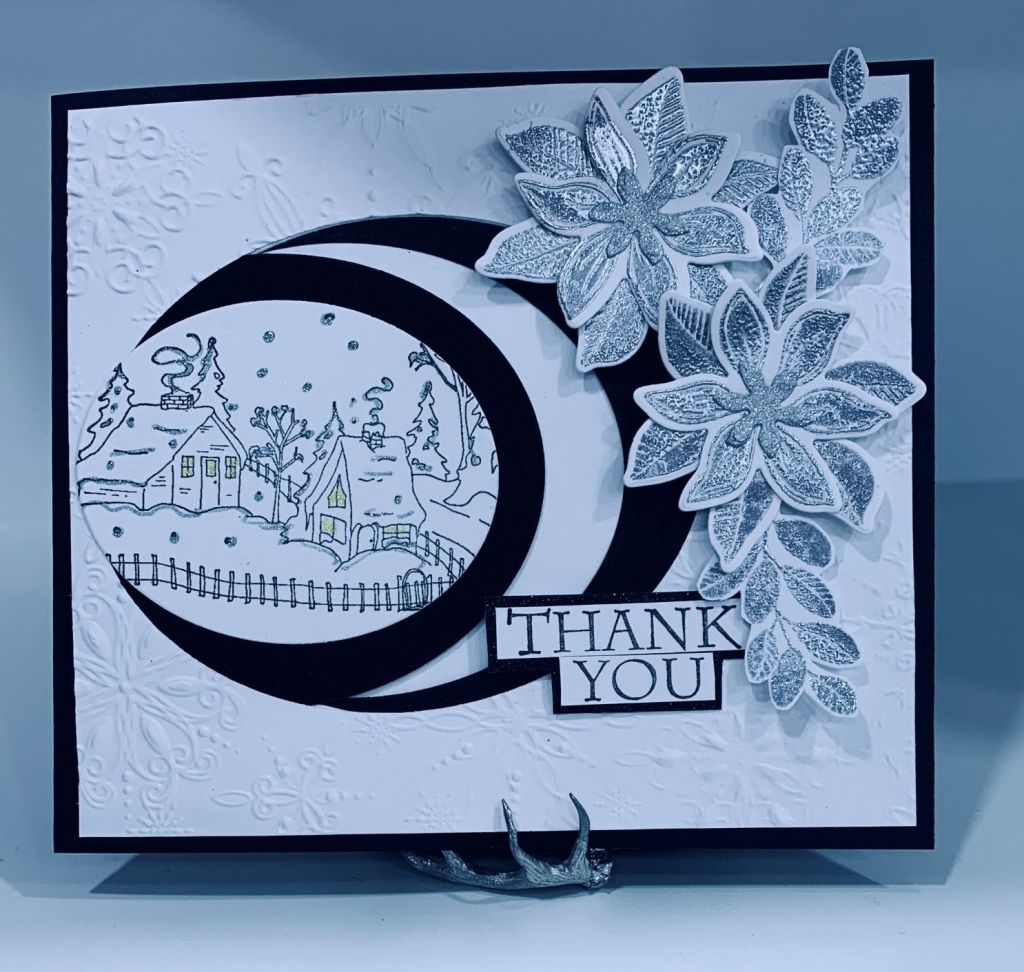
Having seen a post on Pinterest featuring a card similar to this one, I was intrigued to see if I could make my own version. The challenge was in figuring out how it was done, because the post is not attributed to anything in particular so no instructions or guidance. I thought about it for a while and decided to try die cutting and layering. I used the die negative sections and layered from there. I tried paper piecing but couldn’t get the look I wanted that way. Anyway the card base is black and is a funny size because I did the layers first and then cut the card to fit the finished part. The final oval is one of the die cuts that I stamped in black and added a bit sparkle to using Sakura glitter pens. The embossed layer uses a new SSS snowflake folder that I really like. Before I embossed it I had die cut the center and I added this layer before adding the image oval. The poinsettias are stamped and heat embossed in silver then die cut and glued together with a sparkly silver center to each. I also curved some of the leaves a bit for a more realistic look. The leaves were stamped and fussy cut as there is no die for them in the set, which is a last year’s StampinUp Christmas set. I’m really pleased with how this turned out and it am entering it into the CYHTP challenge. I hope you’ve all recovered from your Thanksgiving festivities and that you are enjoying a nice weekend. Thanks for stopping by.

Clean and Simple

https://peaceonearthchristmas.blogspot.com/

I’ve been on a clean and simple kick using a lot of white recently and this is one of the ideas I came up with. It works nicely for this challenge as there is a lot of white in the mood board and I added a pop of red with a poinsettia. I got the inspiration for this style from something seen on Pinterest and this is my take on what I’ve seen. Using Hero Arts infinity star dies I cut two shapes on a 4″ x4″ piece of card stock. After adding foam tape to the back I pulled the gold thread through where the star shapes connected. I then added some corrugated (made by me) CS behind the die cut layer before adding it to the card front, which is a 1/4″ larger. As well I added the sentiment, which is from a Divinity Design set, prior to adding it to the card front. Using a Sizzix set of foliage dies I cut the holly piece in white, cutting it down slightly and tied it on using the thread and a bit of glue to hold it firm. The poinsettia is from Dee’s Distinctively and I had cut and put together quite a few ready for use. Once I had the little bow the way I wanted it I pulled the longer threads out so it gives more lengths. I did several variations of this style, all of them slightly different, and am happy with how they turned out. I think these cards are my favourites this year. Because these cards are all small squares and I didn’t have the right size envelope for them, I handmade envelopes using my board and some thin CS.

Thanks for taking a look and have a great upcoming weekend everyone.

A Different Kind of Tree

Color Hues #53 Scarlet and Green

I have an unbranded banner die set that I’ve been using a bit lately and it has one tiny thin banner that I couldn’t see how I might use. It is too small for a sentiment, or at least any that I own and in general I don’t use banners very often. When I saw the colours for this challenge I was thinking about what kind of design I would use and had the idea of cutting a few of these very thin banners in different greens and a bit of scarlet. Two of the banners look blue in the photo, but they are actually a dark teal. I wondered what they would look like if I attached them at the top section and spread them out, decided it would give a kind of tree effect and using a small hole punch and a brad I attached them together. My original idea was to have the tree sitting on a border and I played with some new Heffy Doodle border dies to see what would happen. I added the border to the embossed background (SSS Filigree Folder) and made a black frame (Hero Arts Infinity dies) for that layer. I wasn’t sure I liked the result but after I added a bit more of the black above the border it worked. I set the ‘tree’ above and added some die cut stars (Hero Arts Infinity dies) from mirror CS and foam tape to the top. The sentiment is from a Divinity Design set and I added a black border to that as well. In the end I quite like how this turned out. The border grounds the tree nicely and my hubby thought it looks good so I’m posting it. I hope you are enjoying your weekend. We make the most of a couple more dry days before the predicted week of rain starts on Monday. Thanks for stopping by.

Toasty Chicks

Make the Cards Challenge #68

The main panel was cut using an MFT die and then I stamped the dots using a StampinUP tree stamp and Speckled Egg Ink. The image and sentiment stamps are from Divinity Designs and the DSP is from StampingUp. Once I had added foam to the back and sentiment to the front of the die cut panel I added it to the DSP and from there to the card front. I stamped and coloured the birds using various pencils and a bit of water. Added a touch of sparkle here and there and once dry I die cut them and added into the circles. I’m not really into the slimline cards, but do make them once in a while and I quite like how this one turned out.

We have a bit of sunshine today although there is a sea fog lower down so no view because of that. At least it is dry enough that my hubby can deal with the winter canvas on the boat with out worrying about slipping off the deck. Have a great day everyone and thanks for stopping by.

Winter Bears

SSC296 ROUND AND ROUND

It is a sketch challenge at Sunday Stamps and I had these circles left from a die frame as well as a test piece of mica stained CS. I decided to use the circles and some cuts from my test piece along with a leftover section of an embossed piece. I added the circles and then the panel to a mirror piece to give a small frame. The trees are from a StampinUp set from last year and once die cut I added them to the circles. Then I used a Divinity Design set from a couple of years ago called Beary Christmas and I stamped the 3 smallest images, coloured them with pencils, die cut, added a tiny bit of sparkle and then on to the circles. Using an unbranded banner die I cut the sentiment piece and added it underneath the center bear. The two panels were added to a small slimline piece. I added a few sticker stars as embellishments and called it finished. I have quite a few cards done for Christmas but still have a number to go. At least most of the international ones are done as well as all the ones for the USA. Hopefully you are all catching up on your own Christmas cards and thanks for taking a look here.

Warm Hugs

Caffeinated Christmas Card Challenge

For this card I used a little Trinity Stamp die that came as a thank you for shopping with them in an order I made. I used some StampingUp DSP to cut out the cup and paper pieced the the design back into the cup. The little bird is from an SSS set and was left over from a previous card and the background piece was something I stenciled ages ago and didn’t like much so it was pushed aside. It works as the frame for the rest so I’m glad I didn’t toss it. The holly is from a Sizzix die set and the berries are from CTMH, also so old that they were forgotten about. I used a negative from an MFT die for the word and tried something that Gina K did with foil. I coloured it and then placed it behind the negative piece. I punched the corners of the panels before adding to the card front. This is my last card for today. My shoulder is hurting from a pulled muscle and I think a rest is in order else I’ll not be able to sleep later. Thanks for stopping by.

Christmas Village

Peace On Earth Christmas Challenge #27

The die cut is from Paper Rose and I got it recently in a sale so had to use it. The stamp is from a set by StampinUp. I started with some Navy CS and I added some additional colour to it using inks. I had the idea of using stars across the sky, but couldn’t find the stamp I needed so used a couple from different sets (StampinUp, GKD and SSS) that look like snow along with a tiny star that I stamped individually. I did the stamping with Versamark but completely forgot to use my magic bag and to check the ink was dry so it was a shock when I added the gold embossing powder. Using a brush I got some of it off and then heated it. I thought I had ruined the card front, but night skies often look full of stars and I decided that the extra gold just filled the sky more. After die cutting the village I added it to the card front and then added some Cosmic Shimmer fluffy stuff so it looks snowy. I don’t think I’ll forget to check that ink is dry again as it was a good lesson to learn and makes me think I need more patience.

In the meantime I spent a few hours cleaning up my space and putting away my new items. It had gotten so I couldn’t see my desk for all the stuff that was on it. I’ve reorganized some of my stamps so hopefully I will be able to find the ones I need more easily.

Have a fun day all, and thanks for stopping by.

Snowy Village

Just Us Girls Challenge #657 – Word Week

This little stamp is an oldie, from Great Impressions, but I still like it so I pull it out each year and do at least one card using it. As I had used the metallic piece to cut a frame for another project I had the negative left over. I stamped the image on white CS and only added some glitter to it using both a silver and a gold Sakura pen. The sentiment word comes from last years StampinUp Xmas set and I added some tiny stars to it after stamping. Once the image was finished I added the negative oval on top and then added a mirror piece behind to give some additional shine along with 2 strips of PP also from StampinUp at the sides. I’m not sure the company the stamp came from is even in business these days, so that shows how long I’ve had it. I like that there is barely any colour on this card except for the shine.

We have gone from heat to cold with no transition between the seasons. For a few days it was wind and rain, but now we have some snow and the higher mountains have lots on top. I guess people will be skiing soon. I hope you are all enjoying your fall, or summer, as the case may be depending on where you live. Have a great day and thanks for taking a look.

Fall Colours and/or Christmas Wishes

November Stencil Fun

Sadly this photo doesn’t really show how nice this card actually is because it looks so busy in the picture. It isn’t as busy looking in reality and I am reasonably happy with how it turned out. It began as a square card and I stenciled the ferns in the fall colours and got stuck with what I should do next. I was moving something on my desk when one of the extra poinsettia pieces fell onto the inked piece. It kind of looked good so I added a few more and left it overnight. I still wasn’t sure about it, but thought I would like it better if I folded the card from a square into what you see here. Then I decided that I could make it into a Christmas card with the fall colours in the background and this is what I ended up with. When making a different card the other day I experimented with stamping some music notes onto some shimmer CS and then die cutting it out using a Sizzix leafy sprig die. Although it worked in one way I didn’t really like it for the card I was making at the time. Yesterday I experimented with spraying the left over bit (already cut up into smaller pieces) with the new Mica Stain I had just gotten. I quite liked the effect so left them to dry. I had cut several white layers of the words and glued them together so today I added the silver over the top using Spectrum Noir Glitter brushes. Note to remember is that the glitter brush liquid doesn’t stick well to any left over bits of glue at the edges. Once the sentiment pieces were added it still didn’t feel finished so I added an additional Poinsettia with the leaf sprig bits around it and this hangs off the edge of the fold. A few green and gold embellishments for more sparkle and it was complete. Our wooded area is filled with natural ferns and they are turning into these colours as fall progresses. Perhaps not my best card, but it certainly isn’t my worst and I hope it works for the stencil challenge. Have a good weekend everyone.

Grateful For You

Thankful~Blessings~Grateful Challenge & Anything Goes Embossing With A Twist of PUMPKINS

Fall weather has set in with a vengeance this week and today we are experiencing our 3rd Atmospheric river so it is wet and windy right now. Thankfully our new generator is installed and functioning so if the power goes out we will not have to worry. I guess this card is particularly apropos considering the conditions as we have leaves everywhere. The embossed piece is left over from a previous project and I backed it with some coppery coloured sparkle before adding it to the chocolate card front. The leaf sprig is die cut using an old Sizzix set and some soft metallic PP. The other leaves use some stick on outlines in gold which I added to an inked watercolour piece and then fussy cut. I used some gold thread to make a small bow on the leaves and used an MFT stamp for the sentiment which I also backed with the coppery PP. I didn’t have a specific idea in mind when I started this and just let it evolve, which sometimes works really well. In this case I can say I’m quite happy with the result. As this card uses embossing I am adding it to 2 challenges, one at DD- Fall Grateful and one at CYHTP- without the twist. Thanks for taking a look.