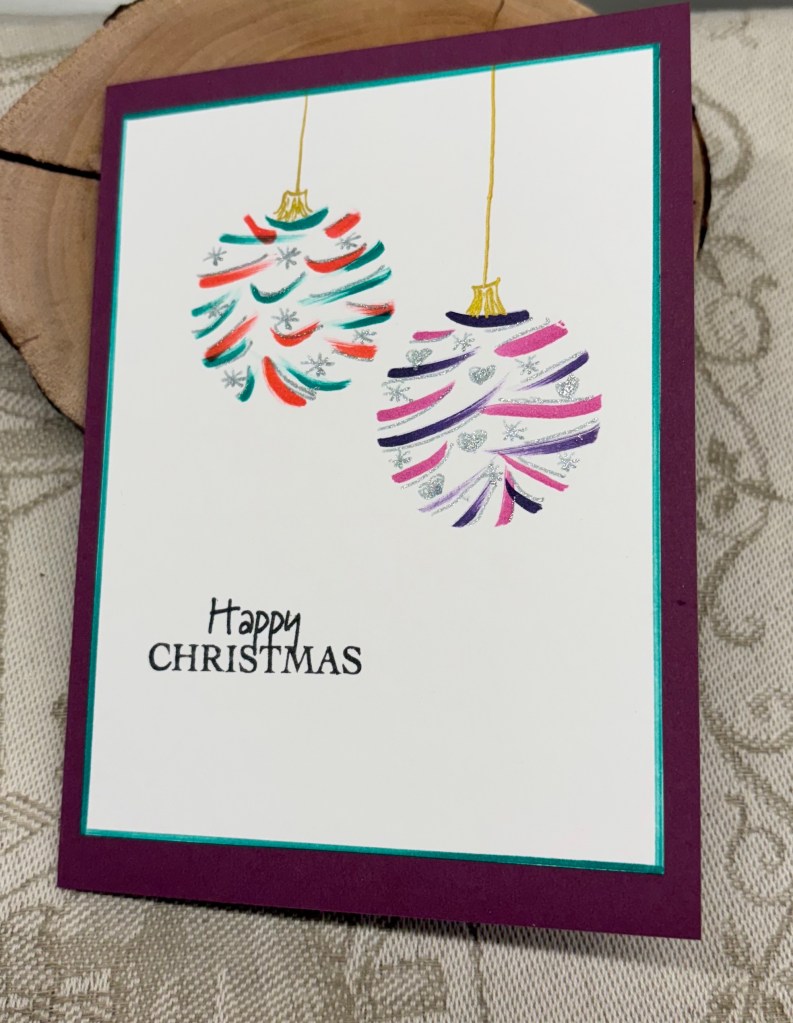
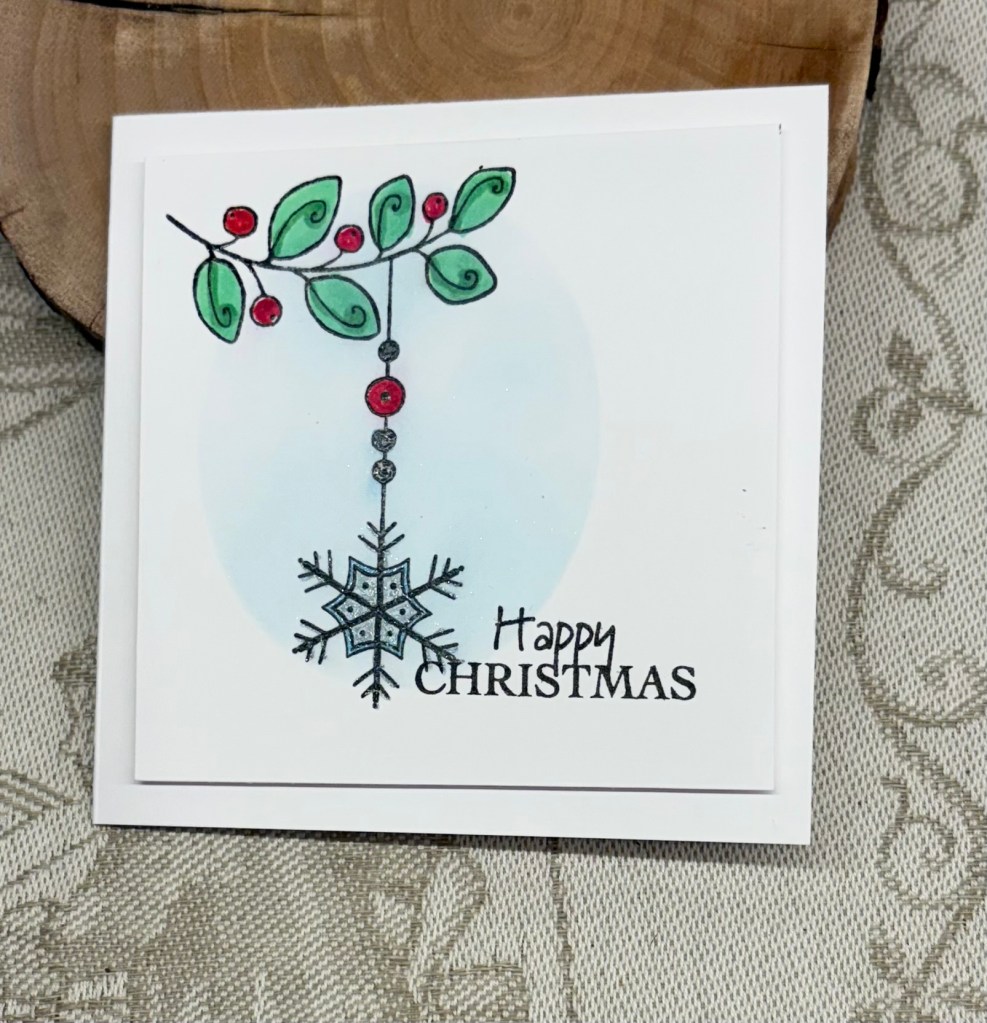
Having seen something similar to this on Pinterest, I wanted to try a version of my own, but I’m no painter. In the end I created a stencil, pulled out my trusty TomBow markers and came up with these. They were so easy to do that I made about five of them. I added some sparkle elements with a Sakura pen and filled in a few areas, then I took a gold pen and free handed the top of the ornament and the cord.
With another marker I went around the edge of the white CS before adding it to the card front. My sentiment is from a Woodware set. I never would have thought I’d be free handing this kind of thing, and I’m pleased with how they turned out. CAS and pretty at the same time.
I don’t believe I’ve entered into the Holly and Ivy Christmas challenge before, so this is being added to their current challenge.
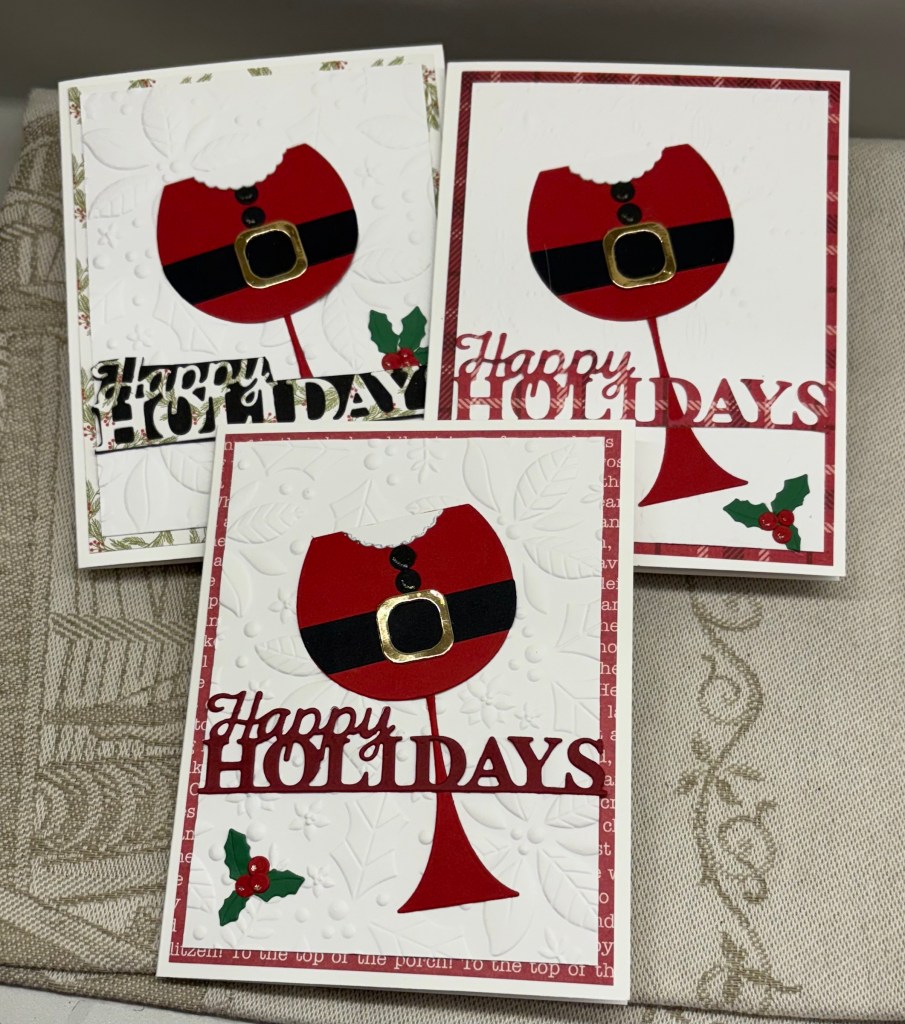
Using a Kokorosa die, I created a series of these cards, all similar but not exactly the same. They are intended for the ladies in my yoga group.
Using a SSS EF I dry embossed some white CS and backed it with some PP before adding it to the card base. Once I had the pieces in place on the wine glass I glued it all together and added it on top. The sentiment comes from a GKD set I think, but as it was stamped a long time ago and stored, I can’t quite remember which set. I added a tiny amount of sparkle on the buttons and some small red gems.
Once I had all the pieces cut, the series was pretty easy to put together, and I created 8 in total. On some I used different EF but all were 3D folders. I really wish companies would standardize their folders as it would make things a lot easier to work out which plates to use to get the look we need. Some of the 3D ones are really hard to get through the machine.
a few of the others.
Thanks for spending time with me today, I really appreciate you and your time.
I’ve been wanting to make one of these folds for a while, and finally I’ve achieved it. My yoga group likes to purchase a gift for our teacher and this year there are a few more participating, so we need a card that can accommodate everyone’s signature. This design fits the bill and the bonus for our teacher is that she can remove the ornament and hang it on the tree if she wants.
Using a new unbranded die from Amazon I die cut the ornament several times with the top piece using a glitter CS. Once cut I glued them together for strength. The sentiment on the front is from a Woodware set and the one on the inside is from an old GKD set. I can’t remember where the small snowflake came from but I added fall out dot to the center and some silvery sparkle to the rest. The larger snowflake in the back is from Spellbinders I think. Using some blue CS and a stencil from Kaiser with gold stencil butter from TCW I created the angled piece and when dry I cut it to get the angle and edges right. The inside back has a piece from some Xmas CS that is from 2 years ago and I added a white piece on top which has the sentiment. I also added another white piece on the inside angle side to allow for everyone to write when the time comes.
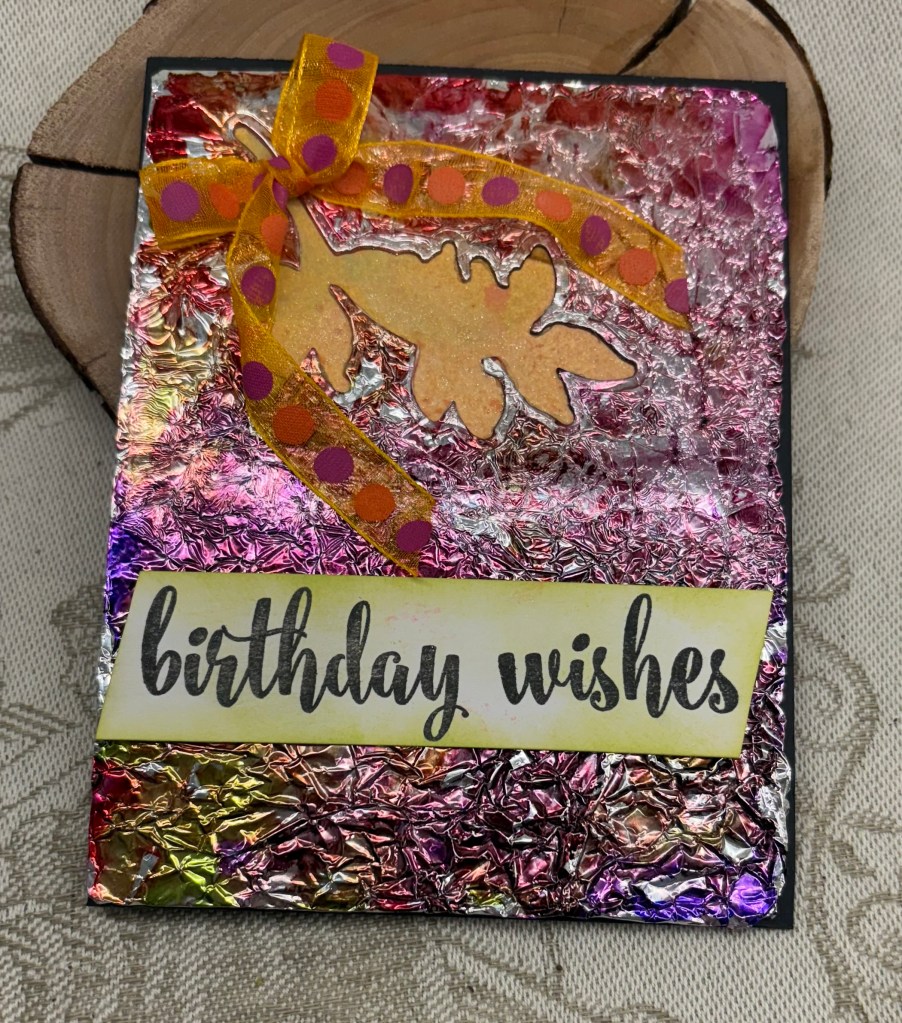
Our Cards4galz challenge has been chosen by Pamela, and she has a theme of colouring. Lots of scope with this challenge so I’m sure you will all enjoy playing.
In my case I decided to play with alcohol inks and crumpled kitchen foil. I adhered the foil to some heavyweight CS but I didn’t try to smooth it out as I wanted the texture. Then I picked out my colours and dropped them on top with some additional alcohol to move them around. This is what I ended up with. I wanted to die cut a leaf shape from this, which I used on an earlier post. The process of die cutting meant that the top part flattened somewhat, but I still liked it. I had a piece of schmoosed ink CS that I added behind the opening and then I attached the entire piece to a black note card. The sentiment is from GKD and the ribbon is from my stash. I added some colour to the sentiment piece to soften it as the white was too white.
A messy, but fun process and I liked the end result as the colours blended quite well. We hope to see your creations in our gallery and enjoy the creating process. Thanks for stopping by, I appreciate you and your time.
With my mojo mostly absent in recent weeks, I was so fed up that I headed to a craft store in the hopes of reviving it. While there I discovered this set of Spellbinder dies, promptly purchased it and made this card almost as soon as I got home.
My papers are from StampinUp and I added sparkle to the stars in the background. After cutting the pieces I attached them as you see and then added the snow people as you see. It was a bit fiddly putting them together but I was smart enough to keep the pieces in little cups so I didn’t lose any. Spellbinders thought of everything here, as they even had dies that work to cover the holes from the back. I would have added black paper anyway, but having them die cut made it so much easier. They also thought of adding a small mark where the noses should go.
I’ve managed to get quite a few cards done this past week, so I must count them to see where I am at. My aim today is to get all the labels done and the cards signed and into envelopes. Our mail is working (kind of) as they are back to doing rotational strikes so some items are getting through. I shall likely mail most of my cards as soon as they are ready in the hopes that they get through the system. Better too early than awfully late and people can put them aside until they are ready to deal with Christmas décor if they wish.
Thanks for stopping by to take a look. I appreciate your time and any comments you may leave.
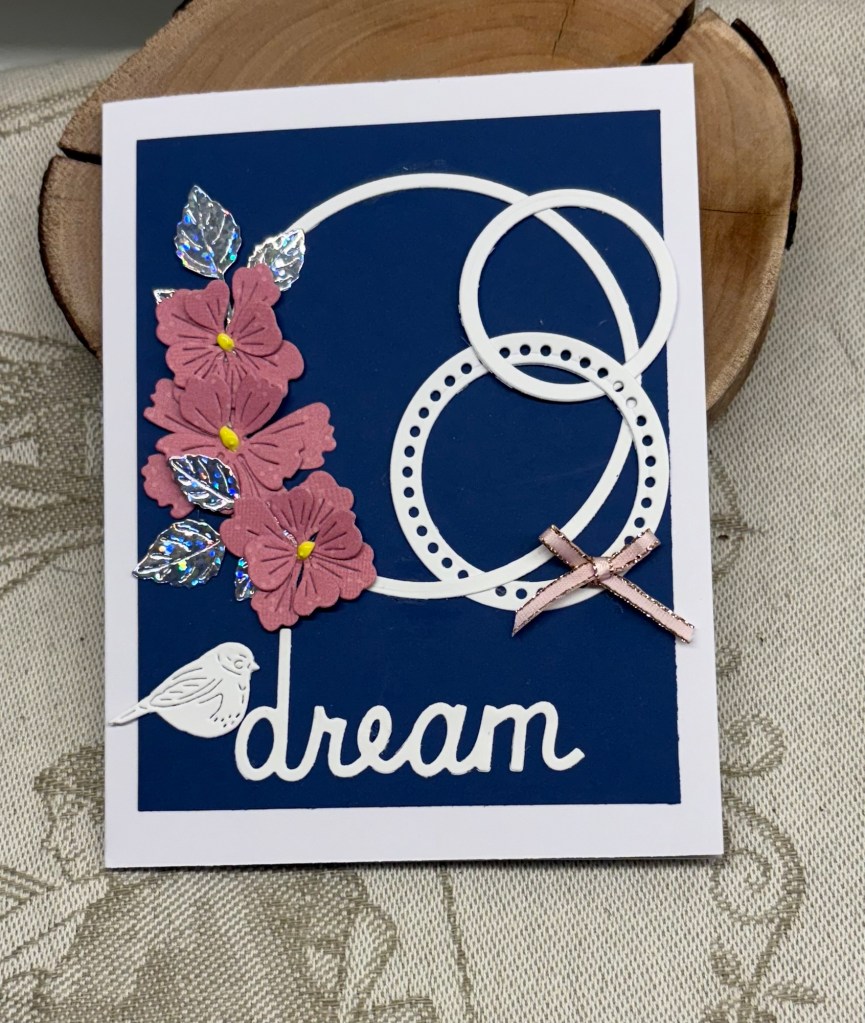
Welcome to our latest challenge here at Double Trouble. Our recipe this time is a 3, 2, 1 recipe round and round. 3 circles, 2 images, 1 ribbon twine or cord. Twisted sister thing 3 is to include at least one bird. And of course playing in the TSOT Sketch #682 is another fun part of the challenge. It is optional though and you need to be aware of backlinking.
This is probably one of the easiest cards I’ve made recently because it was all in my bits and pieces box and all I really had to do was figure out placement. The only items that weren’t prepared was the background layer and the little bird, which is a die from Gummiapan. The floral images and leaves are from Memory box and I built the flowers and added them to the largest circle as you see. Then the other circles were added twisting them over and under the largest one. My circles are cut using Hero Arts Infinity dies with the dotted one from StampinUp. The word die is from a dollar store set and the little bow is something I tied using some leftover ribbon. When my hands are working properly I sometimes spend some time preparing small bows to have them ready for days when I can’t tie one.
The team looks forward to seeing your creations, using this recipe, in our gallery. Have fun creating, and thanks for joining me today.
This is the second card using the Woodware stamp set mentioned in a previous post. AAA have a challenge: AAA Card Challenge #302: Follow my Lead, (Follow Karen) and this one seemed to suit the challenge so I’m adding it there.
To help it fit into the challenge I added the oval background in Tumbled Glass ink. It was coloured using Copics and glitter pens after it had been heat set clear. The fact that it was heat embossed and coloured with Alcohol inks allowed me to add the oval without using a mask. My card is 4 inch square, which is slightly smaller than the examples on the blog so I hope it still qualifies.
I quite like the simplicity of this one and may do one or two more in a similar style. Thanks for joining me today. I appreciate you and any comments you may leave for me.
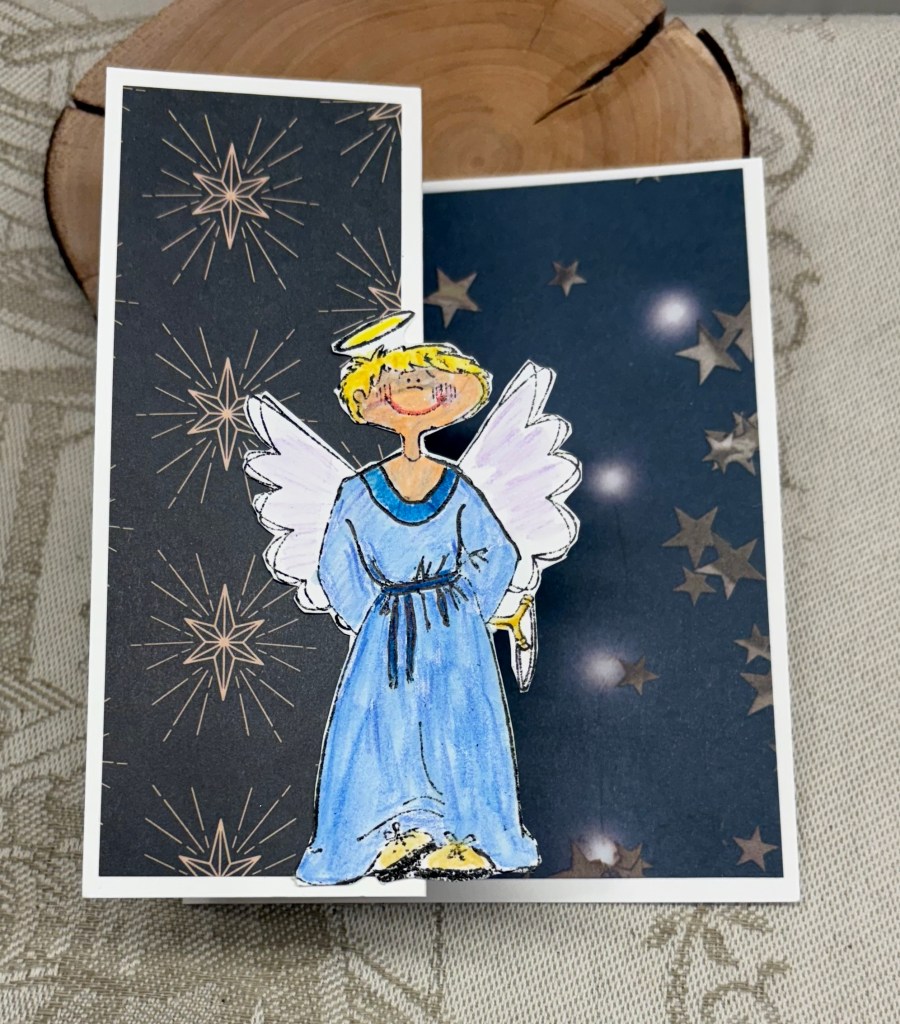
This card is part of a few I’ve made and uses paper from a CraftSmith paper pad and a very old wooden block stamp by Eureka Stamps. I’m quite sure they no longer exist, but the stamp was gifted to me and I find the image cute so I’ve kept it. An Angel with a slingshot is an amusing thought to my weird mind.
I wanted to try this style of fold as it works well for using PP and enabled me to make a few at the same time. I coloured the image using watercolour pencils and added some shine using Sakura pens. When it was dry I fussy cut the image and added it as you see. Behind the image fold is where I have my sentiment and a place to write a personal message.
Thanks for taking a look, I appreciate your time and any comments you may leave.
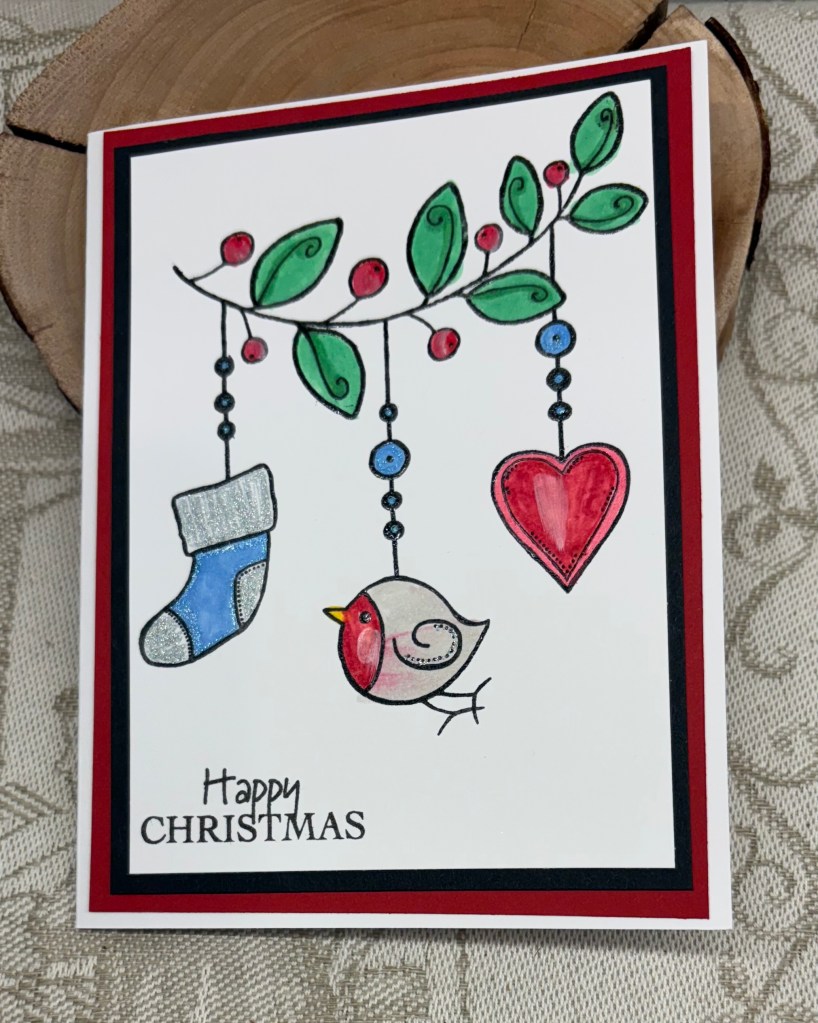
Whether my mojo is back or not, Christmas cards are my must do at the moment, so I’ve been busy creating at least 3 or more per day. This card was designed with the challenge at https://sundaystamps.blogspot.com/ in mind and I’ve used their colours as best I can. I had this Woodware stamp set on my desk so I stamped both ornament branches and clear heat set them, keeping this one for the challenge, while the other will be used elsewhere. I then coloured using mostly Copics and Sakura glitter pens. Alcohol pens are not my go to, so my skills leave a lot to be desired, but I am reasonably happy with how this one turned out.
I used some black and red CS to back my image before attaching to the card front.
Thanks for stopping by, I appreciate you, your time and any comments you leave for me.
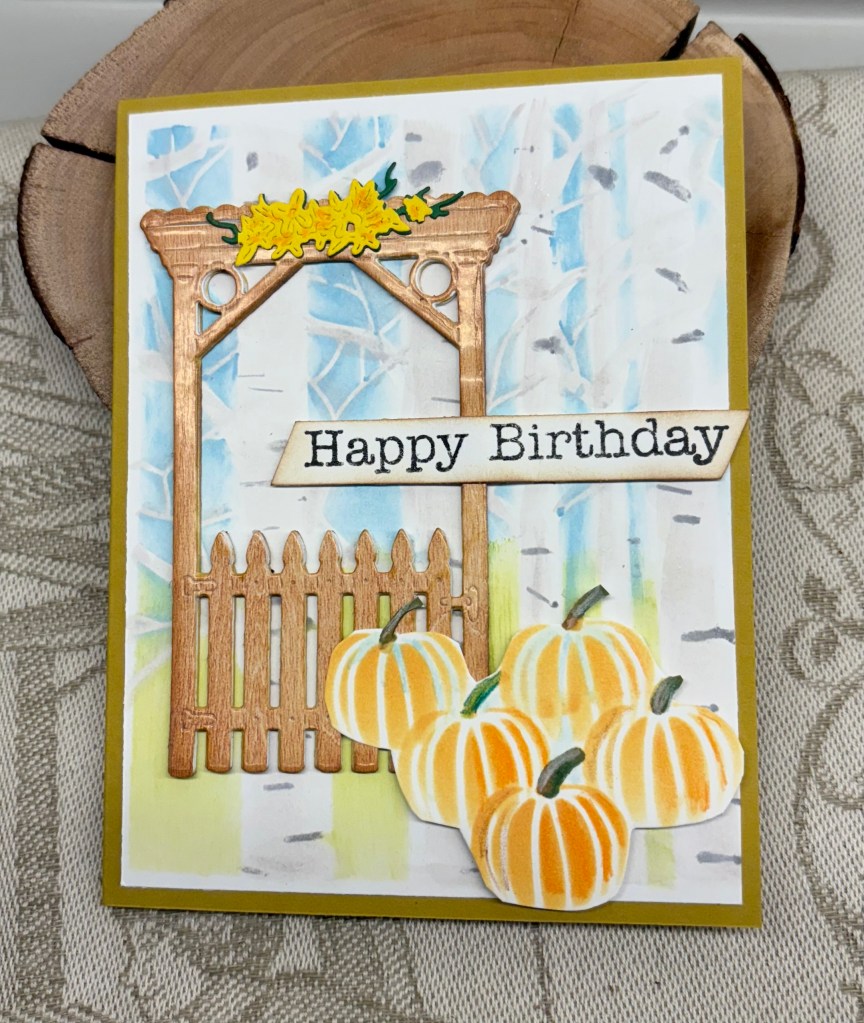
Seize The Birthday is asking for Favourite fall treats which leaves quite a lot of scope for your designs. As an invited guest DT I came up with this card.
As an Ex-Pat Brit, we didn’t have all the hoopla that is part of living here and I’ve never quite gotten used to the N. American way of celebrating it. Asking me what my favourite treat is, is a hard question for me to answer. I’m kind of boring, as I only like regular coffee, so all the flavours available aren’t something I would go for, and although I enjoy pumpkin pie, I can’t say I’m mad for it. Likely because of this I don’t have a lot in my stash that pertains to this theme. I do however enjoy the fall colours and seeing pumpkins stacked up in a store, or watching kids at a pumpkin patch, choosing the one they want to carve up as part of the upcoming Halloween fun.
All that to say making a card for this challenge was somewhat of a real challenge for me. In the end I chose to do a fall scene. I pulled out a Birch/Aspen tree stencil and added the blue sky and some grass to show between the trees. Then using a fine brush and some ink I shaded the actual trees with Lost Shadow and some Hickory smoke to give them some definition. My gate and the small topper are dies from Gummiapan and I stacked a bunch together to give the gate some dimension. I cut the topper in green as well as yellow and stacked them so that there was some green showing after I cut off some of the yellow bits I didn’t need. I also went around the wood edges with some ink, but the actual wood grain is from a dollar store paper pad. A Tim Holtz stencil was used for the pumpkins and I moved the stencil around to try to get a stack. Once it was dry I added some additional colour for definition and then fussy cut. After adding the main layer to the card base I placed the gate and the pumpkin stack where I felt they looked best and glued them down. The sentiment came from Hampton Arts and I used foam tape to get it to sit over the edge of the gate frame.
I’ve had a lot of fun being the guest designer here and there is one more to go before my stint is finished. I sure hope you have fun creating your own favourite fall treat cards. Thanks for stopping by, your time and any comments you leave are highly appreciated.