Leaf Wishes

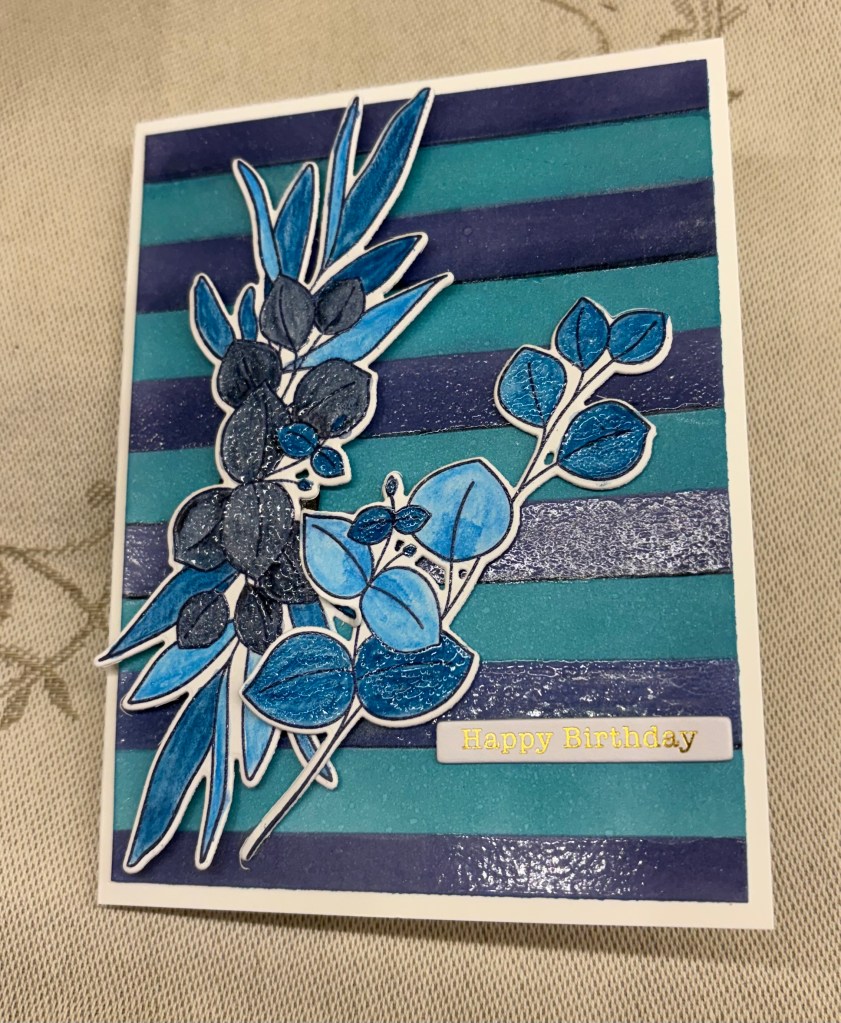
The challenge at Color Hues is #138-Navy and Teal and I wasn’t sure if I had any ideas for it. However, a book I’ve been reading, had a very interesting and pretty cover and it set off an idea for something with stripes. This is what I ended up with.

My first step was to create the stripes and this is my second attempt as the first one was not what I wanted. I used Gina’s masking magic strips and my glass mat for getting them onto the card stock straight. Then I used Chipped Sapphire and a sponge to do the navy stripes. When they were done and dry I moved the masks so I could add the Peacock Feathers ink. While this was drying I looked through my stamps and found this set by SSS that includes dies as I wasn’t in the mood to fussy cut anything. I stamped them using Chipped Sapphire and then used clear heat embossing to set it. Using a several water colour pencils, I added colour using a darker teal and a lighter one, along with navy. While they were drying I added VersaMark ink using a fine tip brush and the liquid and doing 2 stripes at a time added clear heat embossing to give it the shine I wanted. This took enough time that the stamped pieces dried well so I die cut them and then added VersaMark onto a few leaves and clear heat embossed those as well. The teal stripes have a subtle shine as I used some Perfect Pearls powder on those. The sentiment is from Open Studio.

In thinking about the process I took to get this result, I’ve realized that I could have added VersaMark using the ink pad before I moved the masking strips, but as with so many things hind sight is always 20/20.

We’ve actually had some rain earlier today which is a relief because it is scary to see how dry things are. The fires in the Okanagan are very bad and so many communities are affected. In my thoughts I tried to send the rain to them, but we don’t have control over the weather unfortunately. It is depressing to see how many people have lost everything, but there are also stories of hope and heroes too. Other countries have sent crews to help which allows some of ours to get some rest and recharge their batteries.

My I-phone is giving me some issues since a recent update and the photo is way darker than the card looks in real life. It is a very strong card, but I like it and my hubby liked it too.

I’m off to finish some laundry now that the painters have moved to another section of the house. We are having some areas redone with the hallway to the laundry room being one section. It looks nice but I couldn’t get to my machines easily. Many thanks for stopping by, I really appreciate it.

Sympathy Blooms

Sadly, I was in need of a sympathy card as a sick friend passed away on Friday. She was a part of my yoga group and will be sorely missed. I figured that if I must make one why not add it to a challenge while I was at it. It will be entered into the Triple B TB August 2026 Challenge.

I took an A2 panel and die cut a label aperture through it. Before doing anything else I ensured where to adhere the sentiment so it shows through because I knew I was going to use foam tape to lift it up from the main card. The actual sentiment comes from a book of essential inserts by HunkyDory Crafts and I used a larger label die to glue it behind. Dies are by Spellbinders Nestabilities. Once the layer was added to the main card front I proceeded with the rest.

Using an older die set from GKD, I die cut 9 flowers, placed them on a sticky mat, pounced colour, then using a Sakura gel pen I made the lines darker for more definition. With a paper styler and some foam I added a curve to all of them and then added the silver flat backs to their centers. These were then glued to the layer as you see in the photo.

I made an envelope for this card to ensure the flowers would have more space as the regular envelopes don’t allow for this much dimension. I will, however, be delivering this in person sometime later this week. We don’t have yoga for a few weeks as our teacher is on vacation, but we shall be having a coffee together on Thursday in Fern’s honour. A couple of us will miss her for more than just her personality as she also took care of our dogs once in a while.

Thanks for joining me today, you and your time is appreciated.

Pinecone Bough

In my testing out some new dies, I ended up with extra pieces that were good enough to use elsewhere so I created this card for CYHTP. Their challenge is: Anything Goes With A Twist of Tie It Up. The die set used is from Karen Burniston and is called Pine cone. It also fits with the theme at The Card Concept too. The Card Concept #228a {Summer By The Sea} or #228b {Christmas in July}

My embossed background is from a folder by SSS and was a test piece made some time ago. While it wasn’t bad, I did set it aside for future use and used another one for the card I was making at that time. This one works perfectly here and I played around with the foliage and pinecones until I liked the placement before finally gluing it all. The sentiment strip is from an MFT stamp set and I edged it with the same ink used in the embossed layer. Taking two colours and lengths of twine I folded them together and in half before tying the bow and placing it as you see.

After adding the layers to the teal card front and a couple of extra berries to the sentiment I called the card complete. I’m trying to do a few Christmas cards a month to ensure I am not panicking later.

We are back in a hot dry spell and with what is happening in the Okanagan, everyone is slightly nervous. Things are tinder dry and one mistake would be a costly one. Everyone is sad for those in Summerland who are evacuating due to the wildfires nearby. It is awful to see how bad it is. I pray for them as I also pray we don’t get a fire here. The only upside for us, is that the wind has changed direction so any smoke is moving out and to the east. We were getting smoke from several places including the USA.

Thanks for stopping to take a look. I appreciate that you do and thanks in advance for any comments you may leave.

Blue Sky

Welcome to the latest challenge at Cardz4galz, where Lynda has chosen blue sky as the challenge theme. It can be anything you choose within the theme. She will also be choosing the winners.

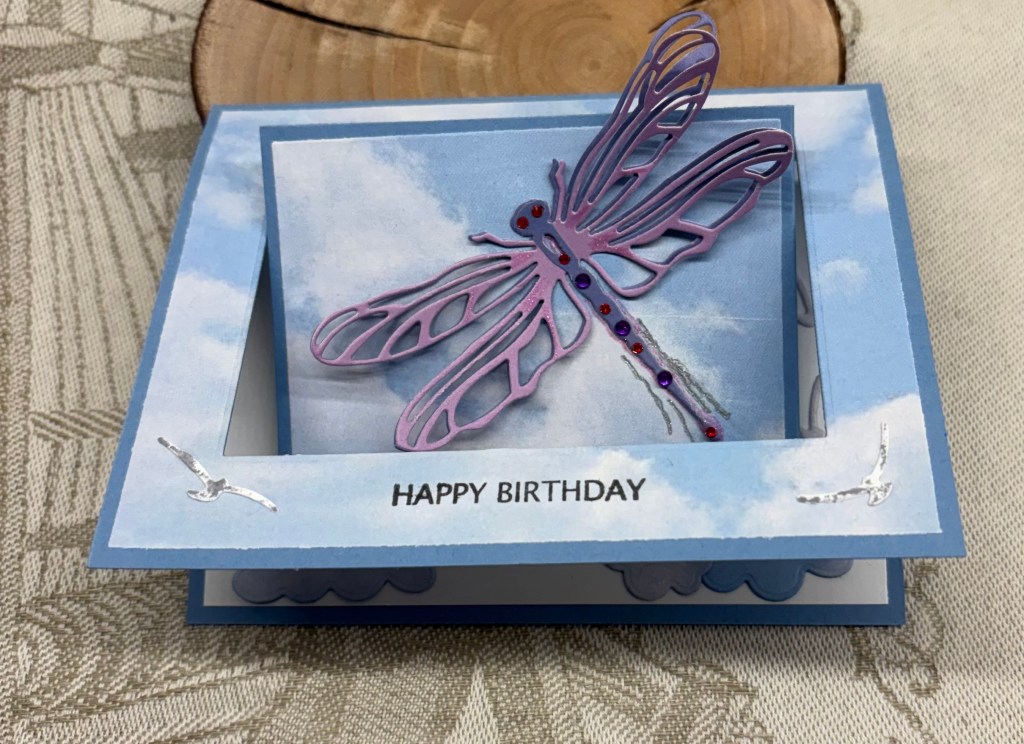
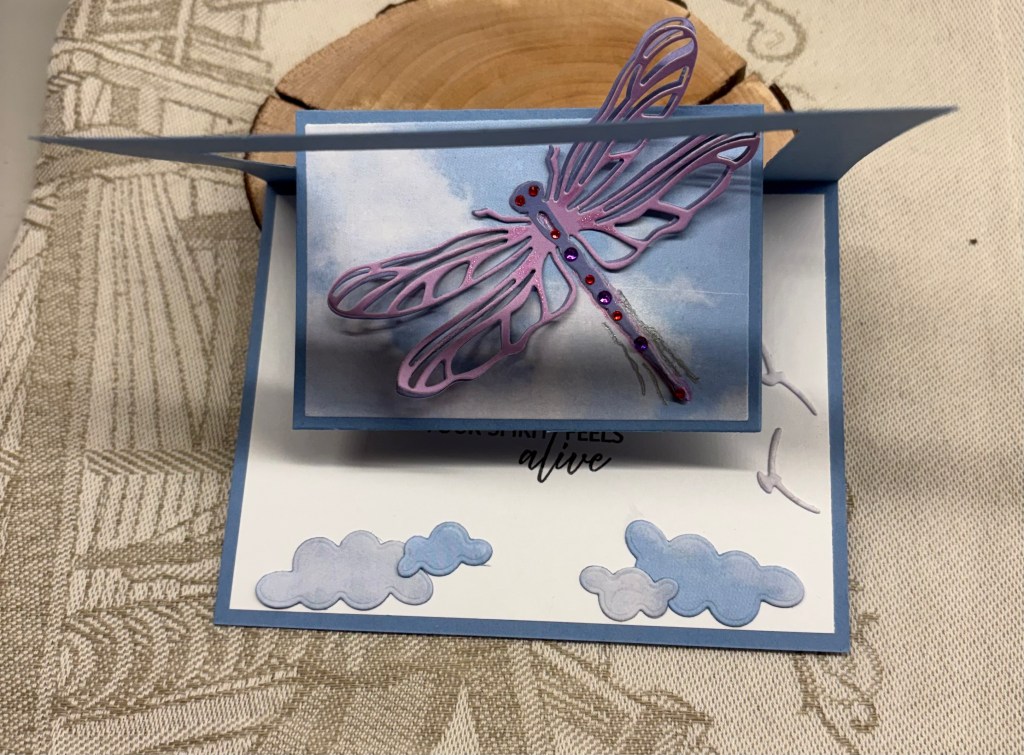
As you can see I went quite literal with the challenge and chose some paper showing a blue sky with clouds. Having seen a Swing card on Pinterest, I followed the link to Frenchie Stamps and then basically followed her tutorial. I had done one in a circle some time ago, but had forgotten some of the steps and I find that this demonstrator explains things very well. She used a plane in her tutorial but I chose to use a dragonfly for mine.

My dragonfly was cut three times with a Paper Rose die using scrap paper that was different colours on both sides. By gluing 2 at the body only, I was able to offset slightly so both colours show up as well as adding a bit more strength to the die cut. The third one I only used the body. As you can see I added a few gems along the body, as well as a bit of sparkle pen here and there. The seagulls and small clouds are from an unbranded set, and my sentiment stamps are from Spellbinders.

I did find my mechanism isn’t 100% perfect and I think it is because I need a stronger card stock for it – I’ve made notes for the next one I may do. As well, I somehow managed to get glue along the side of the dragonfly tail and I couldn’t remove it properly without destroying the card. I used a silver and a sparkle pen along the sides that I hope denotes movement rather than a mess. Other than this, I am reasonably happy with the card.

We look forward to seeing your interpretations of the challenge in our gallery and hope that you have fun creating. Many thanks for stopping by, it is appreciated.

Never Stop Dreaming

I’ve had this dollar store dream catcher stamp set for a while and have only used it once until today. The current Double D Feathers Challenge 2026 seemed like the perfect time to use it and this card is the result.

It was stamped in black ink and then clear heat embossed. Then I took some Perfect Pearls powders and proceeded to colour it. I used a gold pen to fill in the edges of the catchers and some Sakura pens to fill in the little bead strings which all give the card a subtle shimmer.

I managed to drop a bit of powder in the wrong place and it wouldn’t completely come off, so I used some tiny gems to hide the faint smudge. As well, I burned the edge of the card with my heat tool, first time I’ve ever done this. Instead of a white base card I chose this coloured one from Spellbinders and by trimming the edges of the burned piece I made it fit nicely.

I’m actually pleased with how this looks and as I’m going to donate some cards to a good cause this one is likely to be added to my donation. With the sentiment being a generic type it can be used for any occasion.

Many thanks for stopping by, I really appreciate that you do.


Jigsaw Puzzle

Card front
actual picture and pack of pieces

Welcome to another Double Trouble recipe challenge #222.

The recipe is as follows: Thing 1 – 3 Layers (card base doesn’t count) 2 colours from the Roy G Biv Colour wheel, 1 sentiment, Thing 3 Twisted Sister gives you the option of increasing one of the ingredients and/or add an ingredient of your choice and Thing 2 is the Double Dare Opt: Choose TSOT #701 sketch and enter at TSOT.

My card fits the sketch, but cannot be entered due to the backlinking rule. I had to really think about this card and it took several days to figure out the best way to create it so it could be used as an actual puzzle for the recipient to put together. I used an unbranded die set to give me the different layers which follow the colour requirement. The background layer slipped slightly when being cut so one edge was off. Rather than throw away the layer I just cut the other edges to match. All layers are scrap CS from my stash. My puzzle was cut using a die from Hero Arts, as is my additional shaped gold ingredient, and my sentiment is from Spellbinders. To make the picture I initially tried to create my own scene using various stamps, but I wasn’t happy with any of it. After some thought I decided to look at some saved store bought cards to see if anything might work and I came across one that seemed perfect. Before I separated all the cut pieces I took a photocopy of the puzzle so the recipient can see what to follow if they want to make it. On the back I will explain that the pieces on the card front can be easily removed as I used repositionable glue dots. This was part of my dilemma when thinking about the card; as it took time for me to figure out how to use pieces of the die and still be added to the completed puzzle later. I added the cut pieces to a small bag so they won’t get lost. My additional ingredient is, not only my choice, but it also increases the layer requirement from 3 to 4. I stamped the sentiment with VersaMark and heat set with black powder. I wasn’t sure it would work directly on the gold layer, but it did, although I noticed that the heat changes the texture of the gold slightly.

I have to say that this turned out way better than I expected after the trial and error initially. It will probably go to one of my masculine friends at some point. Now it is your turn to create and we look forward to seeing your additions to our gallery. Above all, have fun! Thanks for stopping by, I appreciate you, your time and your comments.

A Penguin Tree

My version
Where the idea came from.

At Christmas last year, we received the displayed Santa card from a friend in Japan. Japan often has amazing mass produced 3D style cards. I often keep cards like this and put them on display each year, but I kept this one to hand as I knew I wanted to try to make one.

The challenge for me was I had to stamp, colour and die cut 19 penguins to build a card, whereas the original was printed and then laser cut one section at a time making it easy to build. I had to figure out how to attach them together and be strong enough to stand up, as well as getting the box size and scoring correct. As anything to do with arithmetic or math is always an issue, it took 3 tries and help from my hubby before I got the box size and scoring right. I deliberately went with a larger base as I knew my penguins would be heavier than the original card is. I added a center piece to the box ready for the middle layer to be attached. The penguin and die come from a Divinity Design set. I stamped with VersaMark and heat set in black. Each were coloured with pencils, then die cut, then I divided them into the stacks required for each section. During the colouring process I had been thinking of how I could attach them knowing that the tallest stack would need some support. I ended up using some fairly stiff packaging plastic cut into strips, long enough to attach inside the back part of the box and provide support for the next row of penguins. The image was chosen for the light string they are holding and I glued each light string to the next one in rows while also adding some glue to the feet. Each layer was built the same way, although I only needed the stiff plastic strips for the back layer. When I looked a the back of each layer it looked messy so I cut another lot of shapes to glue behind each one making it look tidy and clean. My gluing ended up slightly crooked, but the basic shape was there and no real tree is uniform, and I decided it didn’t matter. The box base was covered in some scrap PP before I attached any of the layers and it all folds flat quite easily. My sentiment is also a Divinity Design stamp but from a different set.

Making this box card was a long process, but I enjoyed the experience and actually making it from scratch without any tutorials to follow helps me realize just how far I have come since I started making cards all those year ago. I probably won’t make another, due to how time consuming it was, but it was fun to try.

Thanks for stopping by, you and your time are appreciated.

The card will be entered into the following three challenges all relating to Christmas:

https://lilredwagon.blogspot.com

Peace on Earth Challenge #116

MLCCB #69 Anything Christmas Goes

My Heart is Full

Not having spent a lot of time in my craft room recently, I am pleased in that I have managed to make a card that fits two challenges. The first one is – Challenge #377 – Recipe for Happy Yellow Flowers and the second – Seize the Birthday #331-Square Card & Non White Base.

The recipe at AYSI required a set of ingredients which I’ve achieved here and because I made it square with a yellow card base it works for Seize the Birthday quite easily. After cutting my base at 5.5″ square, I then cut a white piece at 4.5″ square and built the other coloured layers around it. The die cut used a Hero Arts infinity die and the actual sentiment is a circle freebie from Natasha Foote. I added some gold to the tiny hearts and used a thin foam tape behind.

For my main piece I used a homemade stencil, gifted to me by a stamping friend and added some yellow polka dots in two corners. While it was drying I searched for a floral piece that I liked and found a stamp set by GKD. I’m sure this is long discontinued and it was also before die cutting became popular so I had to resort to hand cutting, however I used a self healing board and a knife to do it after I had heat set and coloured it. I used pencils to colour and even chose a yellow green to add to the leaves. Using a thicker foam and before adhering the flowers, I played with it until I liked the placement. I added some enamel dots from YNS and from Waffle Flower in a few places.

As in many locations it has been quite hot and although we can keep our home fairly cool without an A/C it has been slightly uncomfortable at times. Today it is cooler although still nice and sunny. So far, Vancouver Island is coping with wildfires although there are several burning at the moment. The terrain in many places makes it almost impossible to get crews into and lightening has been the cause of at least four of them. My dragon boat team had a festival last weekend and although I didn’t take part in the racing, I was very involved in making the decor to follow the wild west theme of the festival. Without my hubby and our artist friend things wouldn’t have gone as well as they did so the decor worked well. My hubby even came to help with the set up. Because of this and also due to some small day trips we’ve done, crafting, except for the essentials, was ignored. I made sure to keep up with my DT commenting and also to create the next round of cards for the upcoming challenges, but anything else had to wait. I try hard to stay at least a month in advance creating sample cards for the challenges, but they are scheduled posts and only show up as the dates arrive.

I appreciate you stopping by. Stay cool if you can.

Full of Colour

The new challenge here at Cardz4galz, has been chosen by Pamela and she uses word inspiration RAINBOW as her theme. She will also choose the winners.

I had been playing with a scrap piece of water colour card stock and inked it with most of the colours from the rainbow. It was set aside for several days before I decided how I wanted to use it. My initial thoughts were to make an actual rainbow from it, but I wanted something slightly different and this is what I came up with. I used a border curved die from Spellbinders and cut the piece up. Then I put it back together by gluing it onto the white layer but dropping down as a portrait style. My edges were a bit challenging to match perfectly so I used a gold pen to cover up any tiny gaps.

I’ve had a new Lavinia stamp sitting in a box of new, but as yet unused items and decided that it would be good to have at the bottom. I stamped it several times to get good coverage particularly in the gap created by the rainbow layer and then heat set it black. The gap was bothering me a bit so I added a little extra ink with a brush and heat set a second time which worked well. Then I took the Lavinia rabbit stamp, added it to a scrap piece, heat embossed him a few times and fussy cut. Before adding the fussy cut layer I also stamped him onto the rainbow layer, which meant I could keep the wispy hair along his shape. They would have been impossible to fussy cut. The sentiment is from a CYNS stamp and die set I’ve had for a while.

In the end, I am happy with how this turned out and I am looking forward to seeing your creations in our gallery. Have fun with your designs. Thanks for stopping by, your time is appreciated as are any comments you may leave.

Three Wishes

It always interests me to see where inspiration, especially my own, comes from. We were getting coffee at a local coffee shop and they had some thank you cards from customers displayed. One of them made me look twice and this is my idea based on that design. Seize the Birthday #330-One or More Numbers is the challenge it is intended for.

I have several new and unused products laying around and the trees on this card was one of them. It is an MFT die set that I got on sale. The cloud die is from a new unbranded set and the faces on the trees are from a MayMay Made It set, which I’ve had for ages and only used once or twice. I tried several ways to stamp a sentiment using a combination of different stamps and disliked them all. In the end I created it on my computer. All the paper and card stock is from my stash and I tried to keep the same colour tones in the shaded part of the trees as is on the gingham paper. I added two Waffle Flower, similar in tone green, enamel dots to the sentiment.

While searching for ideas on the Internet regarding wishes and trees I came across a book, intended for children, and it is a Traditional Folklore story about three trees. I tried to incorporate this into my sentiment but it would have been too long and too big, so I opted for what you see here. There are times when I wonder how we managed without the Internet?

Considering that I figured this design out without resorting to tutorials, I’m quite pleased with myself and I also like the end result. Thanks so much for stopping by, I appreciate you, your time and your comments.