Roses are pink

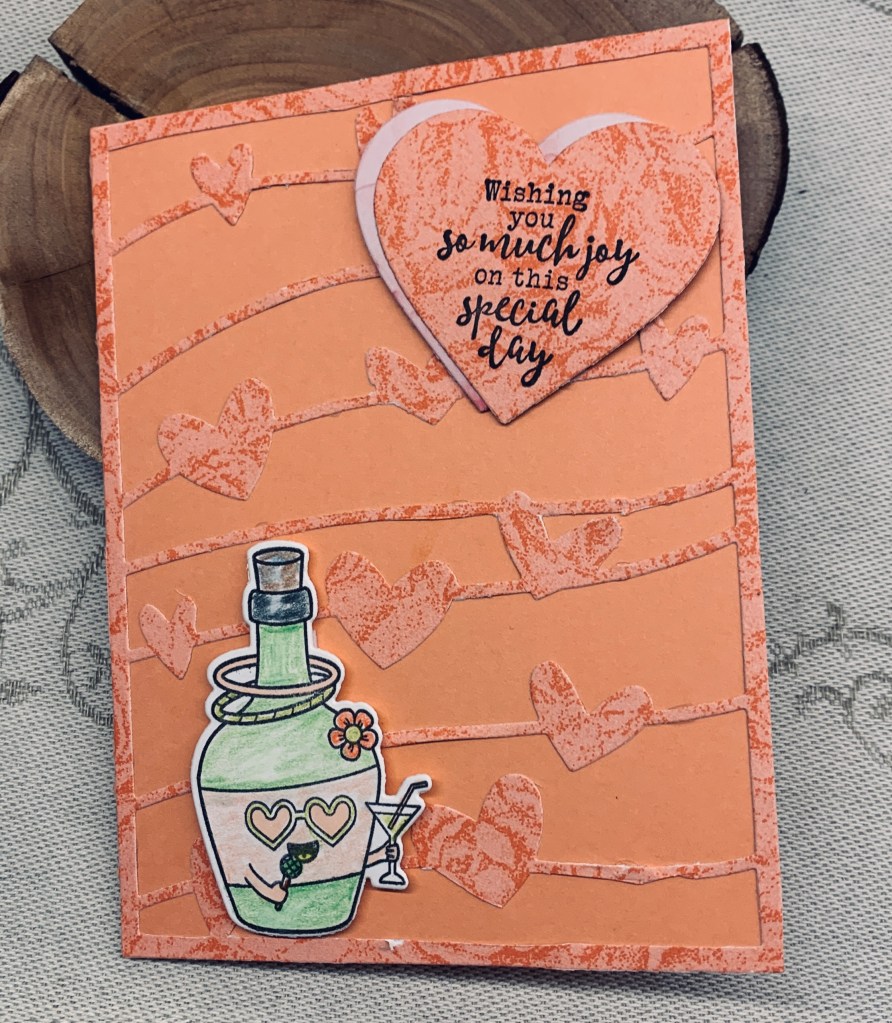
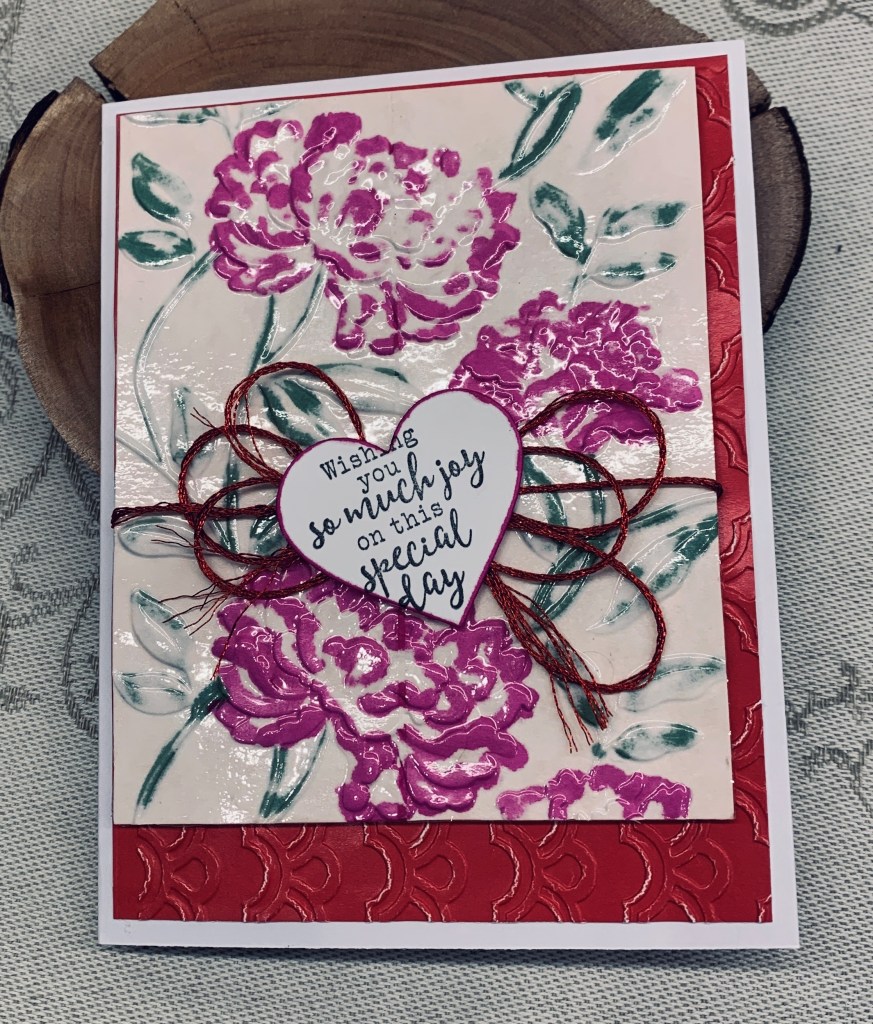
There was a technique shown on Pinterest that intrigued me enough to take a closer look so I followed it to this URL – https://www.youtube.com/watch?app=desktop&v=h5RjkDo_eOA The demonstrator uses packing tape with an embossing folder. I thought it was interesting so did my own take on the technique. Initially I followed her instructions but I added to them. I found a small very pale pink piece of scrap CS that I covered with the tape and then placed into an unbranded EF. I love the 3D effect this folder gives. I found it was a bit too pale although I really liked the shine from the tape. I didn’t think I could colour over the tape so I decided to let a couple of alcohol ink pens bleed through from the back. This only worked because the CS is very thin but it sure made a difference to the image and I really like the effect. Using another piece of scrap this time in red I put that through a regular EF allowing the slight white cracks that resulted. I added foam tape to the focal piece and a red twine. I couldn’t tie a bow for love nor money today so I scrunched it over some tape and then added the heart sentiment on top. I used one of the pens around the edge of the heart. Once I was happy with the focal piece I added it to the red layer deliberately setting it from the upper left corner and then it was added to the note card.

The card fits three challenges so I am entering it into the following:

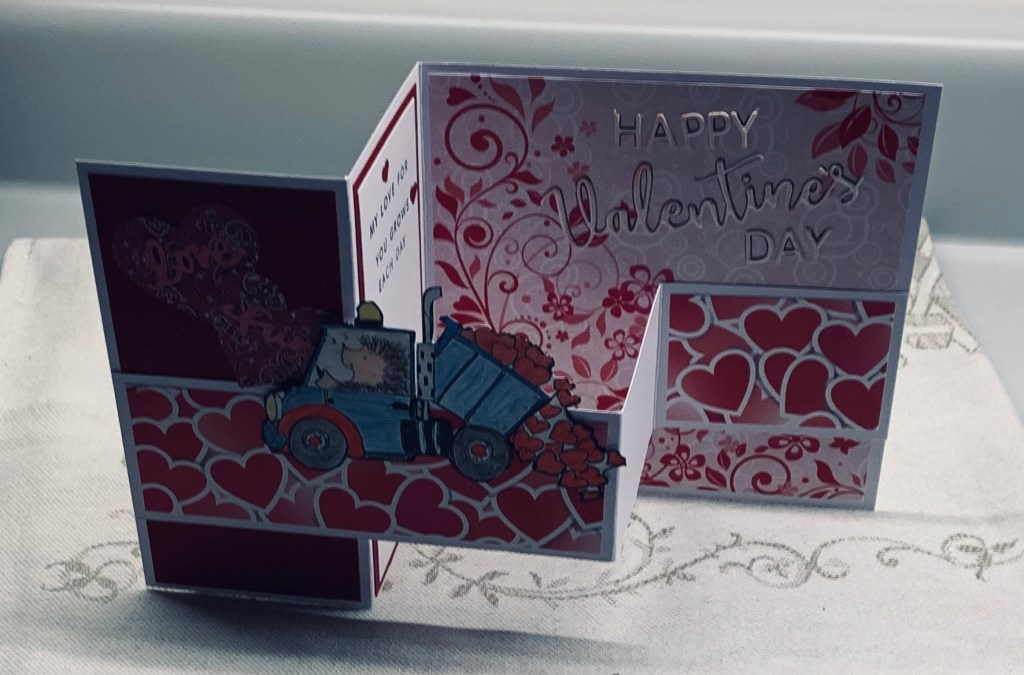
February 10th 2024 Anything Goes With A Twist of Reds and/or Pinks

https://colorhuesthecolorchallenge.blogspot.com/
W is for Weddings

Thanks for stopping by, I really appreciate it.

the love truck

showing Z-fold open

Heather has chosen the theme of Love for our new challenge here at Make My Monday and she will also be choosing the winner. I have made a Valentine’s card for my hairdresser who wanted one for her husband. My PP is from an older pack from Divinity Designs and also from a dollar store mini pack. Word dies are from a store in Texas, stamp is from Penny Black. I stamped the image first and coloured it before fussy cutting. Then I created a square Z-fold and added the papers as you see. I die cut an inside sentiment in white, also from Divinity Designs as is the stamped sentiment. I went around the die cut words with a black pen to make them stand out a little more but the aim was for subtle with those. Used a couple of die cut hearts on the inside panel around the stamped sentiment and left a white space on the fold strip for writing a personal message. My hairdresser was thrilled when I dropped it off earlier today.

I look forward to seeing your creations in the gallery and wish you all a Happy Valentine’s Day. Thanks for stopping by, and all comments are greatly appreciated.

a Winter scene

Yesterday I was messing about with my new Elegant Writer pens and this is what happened. I had seen several examples of using the pens and one used the pen to stamp technique which is what I tried here. The stamp is from Nellie’s Choice and I added the pen several times to the stamp huffing each time before stamping until a decent image showed up on the watercolour CS. Then I used a water brush pulling out carefully until I liked how it looked. I went over the rowboat with a regular fine tip pen as some of the detail got a bit lost and I also added a few white highlights for the same reason. I was pleasantly surprised at the end result so I added it to a black card front. Then I added one of my all time favourite sentiment stamps from CTMH at the top and decided it was wintery enough for the challenge at the Fourseasons. The bottom right photo has that same wintery look to my mind.

We are off to brunch with some friends so I have to hurry. Thanks for stopping by and for any comments you may leave. I do appreciate them a lot.

this could be my front yard

The Sisterhood of Crafters has a challenge encouraging the use of blues. I chose a Penny Black stamp that reminds me of my current front garden and stamped it in Blueprint Sketch. I then heat embossed it clear so I could add other inks into the background. As we always have a few deer around I decided to use an old die (no idea who made it) and cut out my deer. I used a sponge and some brown inks to add colour along with a black glaze pen for eye nose and hooves. I wanted it to appear as if coming from the trees so I cut a slit beside one tree and tucked the backend of the deer into the slit. I edged the panel with a black pen for some definition and attached it to a white card base. My intention was to add a specific sentiment, but I didn’t like it so for now I’m leaving it as is. I may find the right one to add when I send it, but I may keep this one as a future Christmas card. Sentiments can be added when I decide.

I quite like how it turned out which is a change from my usual response to something. Thanks for stopping by, I appreciate it and any comments you may leave.

festive season

A friend drew this image for me and I added the colour and decoration. I adhered it slightly angled onto a red note card and to fit with the moodboard at Peace On Earth Challenge #57 I added some tiny die cut hearts and a few stars. Dies are from Hero Arts. Sentiment is from an old Paper Wishes set.

I’ve been helping my hubby, by creating some props for a photograph he is working on. Took forever to cut out the pieces he needed but he is pleased to have them so it was worth it. It is time for dinner so I’m off to the kitchen to throw something together. I’m not in a cooking mood so I shall get creative with some leftovers.

Thanks for stopping by it is appreciated.

coffee and cake

https://aaacards.blogspot.com has a CAS sketch challenge and this is what I came up with for my card. It was also inspired by a magazine cover that I liked and thought would make a good background for a card. I may do a full background one of these days, but for the purpose of this challenge I kept it as a vertical stamped section. I masked off both sides of the card and sponged Tea Dye ink first. When it was mostly dry I added all the little images using stamps from an older Claire Brennan/GKD set in BluePrint Sketch, Peeled Paint and Ground Expresso. Once the two sentiments were added I cut the panel down just a bit and added it to the note card.

I quite like the end result and for once I managed to get my masking done correctly. Thanks for stopping by and I hope you have a great weekend.

Splatter and a sketch

I rarely do splatter although I like it when I see it on cards created by others. When I look at this one I see why I don’t do it often. To me this looks like a hot mess, but knowing others may not agree is the only reason I’m posting it. To make the card I used my new StampinUp every day details stamp set and dies. I like how the dies create the little border holes on the circles. I decided to cut first and then stamp but it may have been better to do it the other way around. I stamped the birds nest with eggs and used another set by YNS to stamp the little bird on the branch which came from a GKD set. Colouring is mix of ink and watercolour pencils. The sentiment came from a set by the Cats Pajama’s. I added everything flat except for the sentiment circle which is popped up on foam tape. Then I tried to add the splatter. First attempt the ink didn’t show enough so I added a darker colour along with a bit of sparkle spray and tried again. As you can see I got ink everywhere some in large blotches. I shall have to practice this technique before I add it to another card.

The card is made for two challenges:

https://seizethebirthday.blogspot.com and https://sundaystamps.blogspot.com/

Thanks for taking a look and thanks too for any comments you may leave. They are appreciated more than you know.

wishing you so much joy …

The mood board at Double D has a colour in the bokeh that inspired me to use this new StampinUp Paper I have just received. I decided to keep my background almost monochromatic and the card base is a similar tone. The sentiment stamp is also StampinUp and a new set to me as of Monday. The little image is from a YNS set and I can now say I’ve used all the images and most of the sentiments from this set. I coloured the image mostly with Prisma pencils and added some Sakura sparkle to the rings, flower center, heart border and martini. The photo makes the gold on the rings look green. The background heart plate is from SSS, and the larger heart used for the sentiment is from Hero Arts.

I’ve decided to add this card to the following challenges:

Heartfelt Challengehttps://daranddiane.blogspot.com/

Challenge #159 “Love Is in the Air” partnering with Color Dare 586 dare not taken.

Thanks for stopping by and I hope you all have a great day.

sequins

The new challenge here at cardz4galz and chosen by Dawn is all about sequins and she will also be choosing the winners. After some thought and initially wondering whether a shaker card would be the way to go, I decided to try something different. I had seen a crafter using sequins behind a die cut shape and I took my card somewhat in that direction. In my case I already had the heart on my desk as it came from a different project and I decided to try covering it with the sequins. Believe it or not this work was done in the middle of a night where I couldn’t sleep and it actually helped me to calm my brain enough to get to sleep when I returned to my bed. Not having a huge selection of sequins in different colours I used just the pink ones on my heart. When I looked at it again the next morning I realized there were a few white gaps, which I didn’t care for, so anyone having a go at this style should make a note to pre colour their shape or use coloured CS. What I did to improve mine was to spray it with a Distress Mica spray. It wasn’t the same colour but I tested it beforehand and decided it would still work. My sequins did hold some of the spray so a few look a bit more red than pink, but on the whole it was a good solution. The heart was adhered to a small panel that I had covered with a scrap piece of very dark pink mulberry paper, which looks much darker in the photo than it does on my desk. It needed something more so I went through my stash and found some small keys I had purchased and then never used. I chose the one with the pink to keep the colours together and carefully glued it. As I don’t have many sentiments in this vein, I composed my own on my computer and printed it. Backed it with a piece of the pink CS used behind the main panel before adding it as you see. It took me a few minutes to decide how I wanted to use the pink piece and eventually I found I preferred the slight angle orientation for both the background and main panel. The card front is a shimmer white CS that adds another layer of shine.

I’m adding this card to the following challenge: https://colorfuloptions.blogspot.com/ PINK.

I’m looking forward to seeing your creations in our gallery. Thanks for stopping by and thanks too for any comments you leave me. They are always appreciated.

Daisy, Daisy ….

I shall start my post by saying I’ve made several new purchases lately and the die used here is one of them. It came from Kokorosa Dies. Some of my other newbies will get used but not today. As to my craft room size, my hubby had my space customized for me not that long ago and already I am out of space. Fortunately he is also artistic and has a studio of his own and I am able to store a few larger items there.

I kept my card very simple and without a sentiment for the time being. I may add one when I decide to use the card but most likely will just add something on the inside. I love the simplicity of black and white cards so basically the die cut was just added to the black note card. I added a couple of clear Trinity Stamp gems to the larger flower centers and used a glitter pen on the smaller ones for some added interest. I’m never sure if a card like this would be considered CAS although to me it is fairly clean and simple.

Thanks for stopping by. Your comments are welcomed and appreciated. Have a great day everyone.