cupcakes anyone

Just Add Ink #696…Inspiration!

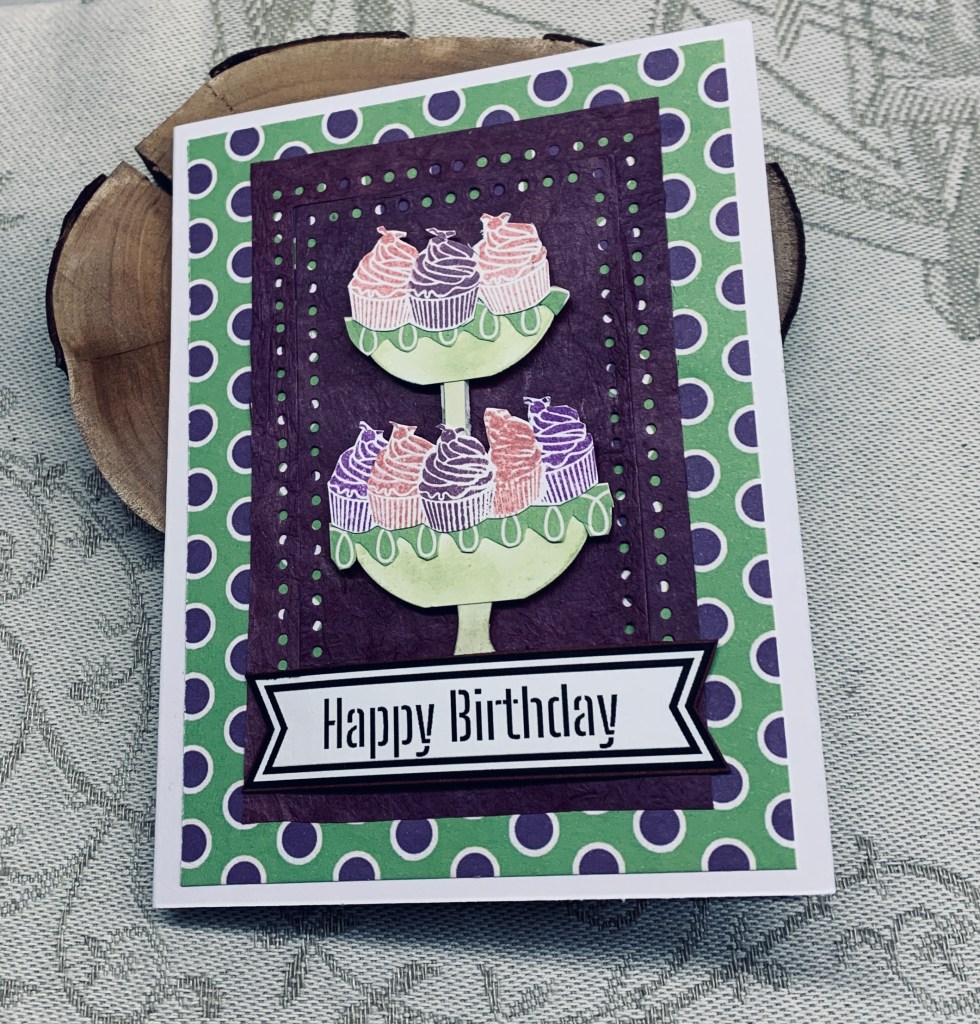
The photo shows a luscious cake and while the challenge is all about using the photo as inspiration, I really wanted to have a cake. The problem was that I have no stamps of any cakes except cupcakes. I went searching and found a couple of digi stamps that I could use, but I wasn’t totally sold on them. In the end I used one of the images as a guide and built my own using a small cupcake stamp from GKD and inks similar in colour to the photo. I built my own tiered stand by die cutting a couple of ovals and then cutting them in half after which I fussy cut some PP to give a border to the stand and also a base. I brushed on ink to make them green. The cupcakes were done on a separate scrap piece and I made a mask so I could stamp them in different colours and get the shape I desired. Then I fussy cut them. I built the bottom section then added another tier after which I added some foam tape to pop them up. Using some Mulberry paper and the Everyday Detail dies I cut the background rectangles and added them to the patterned piece. The sentiment is another of my freebies from Natasha Foote. These are a nice gift as all I have to do is print them onto CS and cut them out.

It took a while and more than a little creativity but I’m pleased with the result. Its kind of fun to build my own image as I used to do before I learned about stamping and long before dies and Embossing Folders were around. Thanks for stopping by, your time is appreciated as are any comments you may leave.

It’s exhausting …

Helen has chosen the theme of cute animals for the current challenge here at cardz 4 galz and I’ve chosen a fashionista digital chick for my focal image. I won these digital images a long time ago and they’ve come in handy for several cards. My sentiment is from a Kokorosa set, the pearls are from my stash and the background PP is from StampinUp. The chick was coloured using a combination of pencils and Sakura Glaze pens and then fussy cut. I popped her up on foam tape.

The sentiment amuses me and I have another stamp that it can be used with too. A very simple card and relatively easy to make.

Thanks for stopping by, it is appreciated. I hope your day is a fun one and I look forward to seeing your creations in our gallery soon.

sweet pea

The stamp set used here was received as a small prize from JUG’s and is by one of the design team, Lisa Elton. I had been wanting to use it more fully and the challenge at CAS seemed just right as it is a colour challenge. I used Distress Oxides in Shabby Shutters, Mowed Lawn and Pink Lipstick which are as close as I can get to StampinUp inks. There is one small stamp used from another set by Hampton Arts as it allowed me to add a few longer stems. Basically I randomly stamped the stems and then added the peas in pods and the flowers all on watercolour paper. I added a some additional colour to the peas using an Inktense pencil. The panel was edged using a Spectrum Noir pen in a similar green as Shabby shutters, then added to the note card.

Two CAS cards in one day is a kind of miracle for me. Although my skill has improved it isn’t my go to for card making although I love what others do in this style.

I think this card may make a nice welcome baby card down the road. For now it will be added to my stash. I really appreciate your stopping by and thanks in advance for any comments you may leave. They are enjoyed.

happy bark day

This card was made for two challenges, one at Double D asking for cute animals and the other is AAA which is a CAS sketch.

My image and sentiment are from a YNS set and the two florishes are from a Hampton Arts set. After placing the note card into my Misti I proceeded to stamp both the pooch and the sentiment. I made a mask for the dog and then stamped the florishes. To colour the image I used Prisma pencils, some Sakura Glaze and a gold pen. To smooth out the pencil lines I used an old blender pen as I find it easier than using Gamsol. In fact I am considering refilling this pen with Gamsol for ease of use.

The clean and simple theme made it an easy and fairly fast card to make.

Thanks for stopping by, it is appreciated.

Challenge links:

Cute Little Animals Challenge & AAA Card Challenges #262: Sketch

pretty pinks

I received a very pretty store bought birthday card last year and I simply couldn’t throw it away. Instead I die cut various sections from it, some circles and some ovals. This card is the result using some of those die cuts. The background paper is from my stash and came as part of a magazine so I have a few pieces that are double sided. I had forgotten about them until my recent clean up. I dry embossed the background piece using a Craft Concepts folder before adding it to the card front. Then I added the circles using foam tape. The sentiment circle is a freebie from Natasha Foote and I used a pink pencil on the leaves before die cutting.

It was fun to use the card in this way and it certainly brings spring to mind.

This works for 2 challenges, links below.

April 2024 – Anything Goes SPRING Challenge

Anything Goes Embossing with a Twist of BIRDS – twist not taken.

Thanks for stopping by, it is appreciated.

Hope you have …

You would think that after cleaning up my work space I would be smart enough to put a stamp back after using it, but somehow I didn’t. Now I have to spend some time determining which stamp set it came from so I can put it away properly. Anyway because it was still in my Misti I used it as my sentiment for this challenge.

Mostly this is made up of the found scraps that came after my initial tidying up. I had already added the background butterfly section to the gold oval and after fussy cutting the little dragonfly was already there to0. I stamped the top part of the butterfly in Picked Raspberry and clear heat embossed before fussy cutting. I added it to the black piece but only attached it at the middle so the additional wings will float up if I bend them. The two strips underneath it all were also scraps from my desk and all I did was cut them down and attach them as you see. The sentiment was added but I have no idea which set at the moment so cannot attribute it. The butterfly is from an MFT set and the tiny dragonfly was found online.

I’m slowing using up all the bits and pieces I unearthed in my clean up, but my stamp/die organizing is an ongoing process. I’ve signed up for a free organization summit in late April and hope that it will help me figure a few things out.

We’ve enjoyed some lovely sunny weather since yesterday afternoon, so dog walking was really pleasant and after some exercise I won’t feel guilty eating supper. Thanks for stopping by, it is appreciated.

luck

In looking at the mood board at Double D, my card is obviously inspired by the greens, the heart, and the word Luck. It started with leftover pieces that were in my tidy up scraps. The larger heart die cut (Hero Arts Infinity dies) was swiped with Distress Oxide ink in Mowed Lawn and while still wet I heat embossed clear. The coverage was left spotty on purpose. The shamrock heart die cut is something that I’m pretty sure came off a damaged (I spilled something, if I remember correctly) card received from one of my stamping buddies. I’m pretty sure she won’t mind my repurposing it. The word was die cut using a Scrappers.com alphabet die and the smaller sentiment is from a very old Simon Says set. I’m confident I saw Jen McGuire demonstrating this set some years ago and consequently bought it. My background can be attributed to something I’ve recently seen Natasha Foote demonstrate. She was showing different ways to use an EF and the one I’ve used here is from Sizzix, Tim Holtz and is 3D. I first added some sponged colour to the CS not worrying about blending and then I ran it through the machine. Colours used were Twisted Citron and Lucky Clover. Using a dark ink – in this case Forest Moss – I swiped ink over the top it which gave the darker lines. I did two panels and used this one first. Using a Spectrum Noir pen I went around the edges of the two hearts and the embossed panel so they would stand out a bit more. After adding foam tape I glued the hearts to the panel. The die cut letters were placed in a line to which I added some tape to hold them in place. I then added ink and heat embossed the bottom half leaving the top half white. After adding it to a white note card, I declared it finished and I’m reasonably satisfied with the end result. If I were to change anything it would be using a different colour on the bottom part of the letters.

Thanks for stopping by, it is appreciated as are any comments you leave for me.

Here’s to you

It isn’t so often that I use my stencils and I really should use them more. My skill level would improve if I did. That said I used a Creative Expressions stencil to do this background last week. I set it aside, as at the time, I didn’t have an idea in my head. I’m adding it to the challenge although unless you count the colours it isn’t really a spring theme.

In the meantime, I spent some time searching for a pair of scissors and a tiny die that I seemed to have lost. This entailed actually cleaning my craft room properly instead of the usual lip service I’d been giving. Most of my weekend was spent doing this in between some gardening and grocery shopping. In the clean up process, I found both the scissors and die along with a lot of bits and pieces that needed to be used or thrown out. As sometimes occurs, the bottle, which was cut from a Tattered Lace die and the flower, unbranded, fell on top of this background. A card was born.

I edged the background piece with a Spectrum Noir glitter pen and added it to the card front. The bottle was popped up on foam tape with the sentiment across it and the flower was just added for embellishment as you see. The tiny bow was one I had tied a while back – on a good hand day – and was added to the neck of the bottle. I had the sentiment left from another project but now I can’t remember which stamp set it comes from.

I’m still working on my craft room in that I need to do something about all the paper scraps etc., but I took a break to get this card posted. It is nice to have a clean work surface although it won’t take long before its a mess again.

Thanks for stopping by, it is appreciated. I hope you all enjoyed a decent weekend. It was pretty wet here on Saturday but yesterday and today have been mostly dry.

going for a ride

The current challenge has been chosen by Dawn and the theme is transport. My original idea for this didn’t seem to be coming together so I decided to do this one instead. Perhaps the other idea will work later on? My PP is from a very old scrapbook pad that I had forgotten I had but seemed to be the right choice for my background. I added the black strip and then my little image as you see. The image is from Divinity Designs and was cut 3 times then glued them together. I coloured with Prisma pencils and a bit of silver ink on the wheels. The sentiment is from a GKD set and I added it to the die cut after going over it with a small amount of Vintage photo ink to cut the glare of the white. Gold piece was cut with dies from StampinUp.

We hope to see your creations using this theme in our gallery and that you have fun participating.

Thanks for stopping by it is appreciated.

Speed challenge

To start with, I gathered up the items I thought I would need including the Flower Field background stamp from MFT that I haven’t used in a long time. I used my larger platform for stamping and added several inks over the stamp, huffed on it to ensure it was still damp and then placed CS over the stamp and pressed down. Inks used were a little too light, but couldn’t fix it in the time limit. If there had been enough time I would have added more colour to the background flowers, but with the clock ticking it wasn’t possible. I cut the panel down to fit an A2 card front and added it. Then I stamped the bird directly over the top of the flowers. Stamped the sentiment on a separate piece and fussy cut to size. Prisma pencils were used to add come colour and definition to the bird. Like one of the DT members I don’t always plan my cards, but let them evolve so planning this one was a challenge all on its own. Add the clock and panic can set it if I let it. It was finished with 2 seconds to spare and my hands were shaking at the end.

I am aware that a speed challenge means that a card may be less than one’s usual standard so I’m not too disappointed with this one. It is clearly not one of my best efforts but I’ve made worse on occasion.

Thanks for stopping by, I do appreciate it as I also appreciate any comments you may leave for me.