green and copper

It has been quite crazy around my home for the past 3 days and I haven’t had much time in my craft room. Finally though, we have our heating issues sorted hopefully forever. Because of this although I managed to keep up with some commenting I hadn’t been checking challenges and I almost missed the deadline on this one. I was supposed to be doing a small typing job for my hubby, but instead I quickly assembled this card.

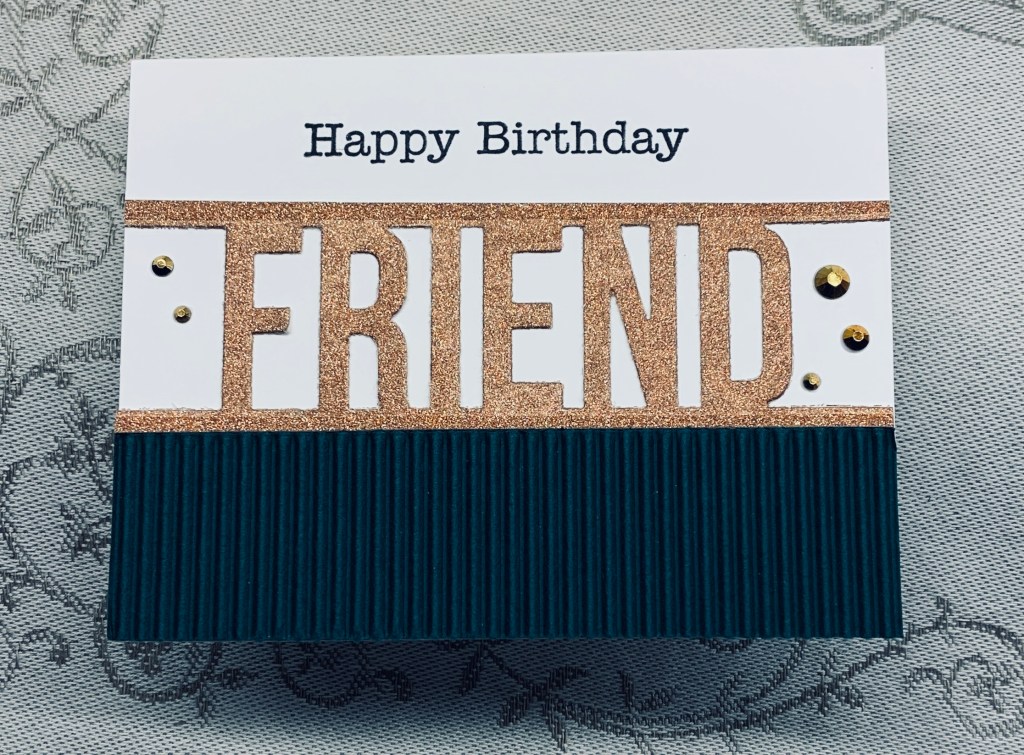
Using a copper sparkly CS I die cut the word using an older MFT die. Checking through my scraps I found this dark green corrugated piece which went nicely underneath the word. I glued it all and added a few coppery/gold coloured gems from Trinity Stamps and a sentiment above from Hampton Arts. It is a simple card but I think an effective one.

Thanks for stopping by and any comments you leave are always appreciated. I hope you have a nice weekend everyone.

hearts galore

Challenge #217 as chosen by Sue J, here at Cardz4galz, is all about Reds and/or pinks. My example uses mainly pink shades with a white panel. Although you can’t see it well the background PP behind the circle is a pale pink with a faint pattern. My hearts are all from an unbranded heart bouquet die and I added pink sparkle using a Nuvo glitter pen. Its so old I was surprised it worked. The sentiment stamp is from a Hampton Arts set and I added 2 additional hearts one each side. Circle die is from HeroArts infinity dies and I cut a frame for the circle in the same CS as the note card.

It was a bit fiddly gluing all the hearts around the edge of the circle but it worked out and I popped up the panel on foam tape so most of the hearts are only stuck on the edge of it.

Valentine’s Day is not too far away so having this ready is a bonus as I’m usually scrambling for these cards. Thanks for stopping by and all comments are appreciated.

Always …

The hearts used here were left over from a different project and were cut using Hero Arts Infinity dies. I saw a card on Facebook, but I can’t remember which group. I think it was GKD and I really liked the design so this card is inspired in 3 ways, firstly the challenge, secondly the mood board blues and then the card I saw. I cut a panel and then using an older Tim Holtz die set I cut the corner section. My first cut was not great, so I set that one aside and did another. I was thinking about how to continue when I had the idea of using the poorly cut piece as a stencil so I could add bits of colour in a few places. I pulled out some textured CS and cut a piece that would fit behind the white panel. Then I placed the temporary stencil and added some different inks in just a few spots. While I was doing that I thought maybe the stencil would work over the hearts so I proceeded to that too. I added the blue piece to the white layer and then took the hearts and sprayed them with sheer shimmer spray so they have a lovely sparkle and it actually shows on the photo. I added the sentiment and went over that with a sparkle pen then added it all to another layer of textured blue CS which I added to the card front. I popped up the hearts with foam tape and added a few sequins.

In thinking about it, I decided to also add the card to the challenge at January 2024 Stencil Fun. I’m not sure if a homemade stencil qualifies but nevertheless I think it is fun to add there as well. I wasn’t sure I would like this card, but I actually do and am happy with how it turned out.

Thanks for stopping by, your comments are much appreciated.

Birthday hearts

For the current challenge at Seize the Birthday they were asking for dry or wet embossing. And as always the challenge at CYHTP also requires the use of an embossing folder. In this case I’ve used a folder called Brocade by Craft Concepts and I didn’t use the twist of snow people in the CYHTP challenge. Initially I cut a piece of CS to 4″ by 5 1/4″ and then I cut it down so I could add it in 2 pieces as you see in the photo. I dry embossed them and added foam tape so they would be popped up from the Shimmer card front. Using a SSS die that I’ve had for a long time I die cut the heart piece and added it carefully to one of the embossed pieces so I could get the placement right. The PP in the background is an ancient scrap piece that I thought would look pretty behind the hearts so I cut it to fit. I think it came from HunkyDory but I’m not sure. The sentiment is from GKD and was stamped using Picked Raspberry. I also added a couple of extra hearts that I added Victorian Velvet ink to.

 Anything Goes With a Twist of Snow People

I’m reasonably happy with this card and already know to whom it will be given when the time is right.

Thanks for stopping by and all comments left are appreciated.

Birthday card for hubby

Well it took a bit of creativity but I succeeded in making a card for my Australian hubby. I took a leaf out of a stamping buddies book and searched online to find a free shape of Australia that I could resize and print onto CS. Then I looked for a PP that could also be printed. After deciding on a five and a half inch square card, I printed the continent onto the CS and then hand cut it. I didn’t do all the little islands that surround the coast but I did keep
Tasmania as you can see at the bottom. Then I glued the PP over the top, made a couple of slits to get scissors into and cut again so the shape shows up nicely. Using an older Hero Arts Kit I stamped various animals and the trees and die cut them. Then I took another piece of CS and inked the sunset background which I popped up behind with foam tape. After that it was just a matter of placement for the pieces I chose to use. Left over bits are in with the set for use another time. I made sure the Tasmanian Devil die cut was next to the island and I added the sentiment just underneath his tail. At first I wasn’t sure if I had made the right choices, but on reflection I do like the result. It was a bit challenging to do the continent without a die, but I managed reasonably well in the end.

I think my hubby will love the card but I’ve hidden it with his gift for the time being. He doesn’t follow my blog so I think I’m safe posting this before his birthday. I may need to make the envelope to fit as I think I’m out of the square ones at the moment.

Crafting Happiness has an alphabet challenge starting with A – is for all kinds of weather. I’m adding this card as it is an Australian summer card.

Thanks for stopping by, all comments are appreciated.

birthday wishes for you

It is birthday time for cards at Make My Monday, challenge #217, as chosen by Billie, who will also choose the winners.

For my card I inked up a newish stamp not yet used, by Penny Black, which I stamped, heat embossed and fussy cut after I had coloured in the image. I used pencils to colour the image. The back layer is a shimmer white CS that I dry embossed using an EF by Lifestyle Craft. The sentiment is from an old rubber stamp set by GKD and I used a Spellbinders die to cut the strip twice, once in white and once in a pale lilac.

A few purple embellishments for added interest were glued, but think I did too many as I got a bit carried away. All in all I think I like the card and hope that it gives you some ideas for your own creations. Looking forward to seeing you in our gallery. Thanks for stopping by and any comments you leave are always appreciated.

let’s party!

One card for three challenges doesn’t happen too often so achieving it makes me feel happy. Both Seize the Birthday and CYHTP require embossing using a folder so I pulled out a StampinUp party folder and managed a good impression for a change. These days I don’t always get the pressure exact so another reason to make me feel good. I wondered what it would look like if I added heat embossing so I went over the raised parts with Versamark and then added silver powder to heat set. It worked quite nicely although, even being careful, I still managed to get ink in the background which makes it a bit grungy. It wasn’t bad enough for me to scrap and I added this to a red glitter card front and that takes care of the sparkle requirement at JUG’s. For my image I pulled out a newish stamp I received as a gift from SSS last year and I stamped, coloured and die cut this and added it as you see. The sentiment is from the same set and I added it underneath after going around the edges with a sparkle pen. For a little bit of whimsey I used a MayMay stamp set and added a face to one of the balloons. There is also some sparkle on the confetti around the balloons as well as the ribbon bows, but the confetti is so small it only shows in R.L.

And I just received some good news as my sick friend is back home as of today. I’m sure there is still a way to go before she is fully recovered but knowing she is at home is a huge relief. Maybe I’ll be able to visit soon, but it will depend on where she is at because the risk of infection for her is high.

Thanks for stopping by, all comments are much appreciated. Stay warm and dry wherever you are. We still have cold temperatures but it is better than yesterday and looks as if it will begin to warm up a bit this week.

under the sea

I’ve not played in this challenge before, but decided to give it a go. You may remember I did some ink swiping last year and some attempts weren’t very good. That said, I don’t throw much away and figured I could use them at some point. When making a different card a few days ago I pulled out my Memory Box EF along with these ocean frame dies. In the end I only used the EF panel and these pieces were still on my desk. I decided to put them together using the swiped ink bits in the background. I also had some ocean related ephemera sitting on my desk so I added the whale and the shell over the panel after I had attached it to the card front. For now I’ve decided to leave off a sentiment as I’m not sure for which occasion I shall use it as yet. This is one of those cards that looks better in reality than on a photo. I quite like how it turned out considering it is using up items I had sitting around.

Thanks for stopping by. I hope you are warm and dry wherever you are. It is pretty cold around my home at the moment and we need to be quite bundled up when going out to walk the dog. Slippery too, but we managed.

ta da

The challenge at AAA seemed like the perfect opportunity to use a new stencil I bought a few weeks ago. It is by Julie Balzer and I used the top portion only. I inked through using a brush until I was happy with the coverage. I just realized that without doing it on purpose, I used a few of the colours from the sketch, funny how that happens. I let it dry and then used a stamp set from YNS for the image and sentiment. The image was coloured using pencils and Sakura pens. The nice thing about Distress Oxides is that you can colour over them to a certain extent and in this case I kept some of the background colour and just added some additional colour where I wanted it. I sized the panel and then added it to a blue card front so a small border would show.

I hope you are all somewhere warm if you live in places where winter storms are occurring. After a very mild start to winter, we have suddenly gotten some cold temperatures and a lot of snow. It looks pretty, but it is very cold outside and my hubby is bundled up tight so he can use the plow and clear some of the driveway.

Thanks for stopping by, any comments you leave a much appreciated.

let the adventure begin

Happy New Year everyone. I hope you all enjoyed a lovely festive season and that the year to come is full of pleasant surprises. Our challenge at cardz4galz is all about a safari for the next two weeks.

For my card I chose a jungle theme using Hero Arts stamps and dies from a card kit they put out a couple of years ago. I haven’t used it in a while but thought it the perfect choice for this challenge example. First I took a scrap piece of shimmer CS and dry embossed using a folder from Taylored Expressions. I then added some ink on the raised parts. Setting this aside I proceeded to stamp, colour and die cut various plants and the leopard. I cut a couple of layers for the cat so it would have dimension and strength. I arranged things until I liked how it looked and then glued it all in place popping up a few leaves here and there. The leafy vines were coloured using ink and shaving foam and then die cut and the background for the sentiment came from a bit left over. I have enough pieces left to begin another card and will likely do it pretty soon as I have another idea.

Thanks for stopping by, and thanks to for any comments you leave, they are appreciated.