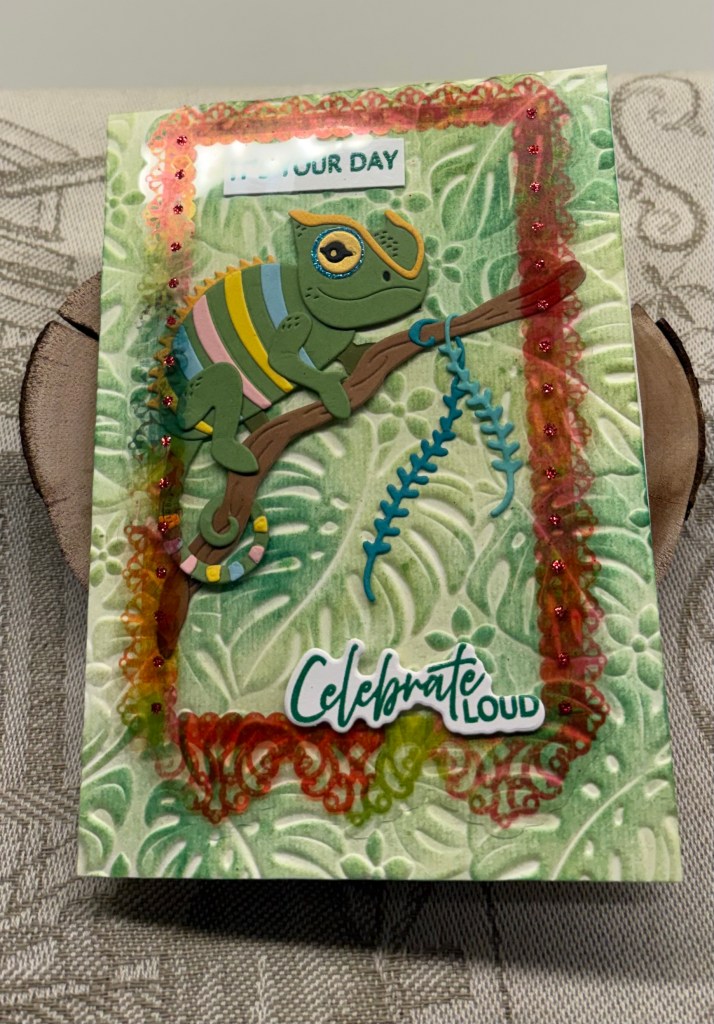
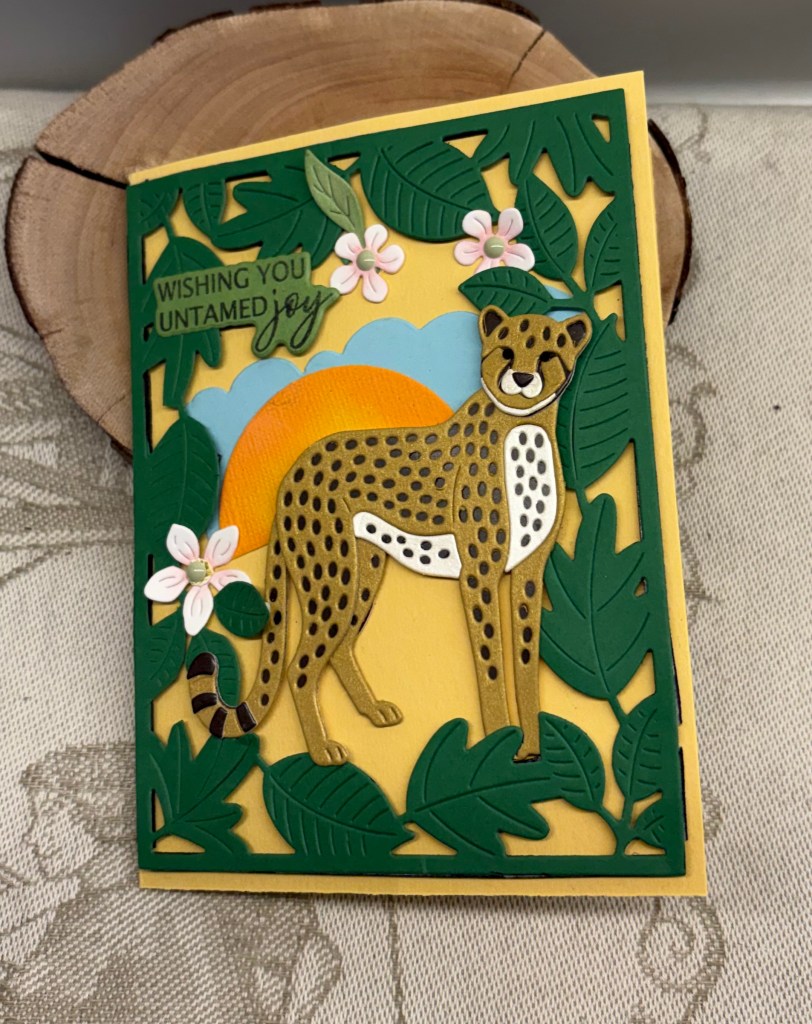
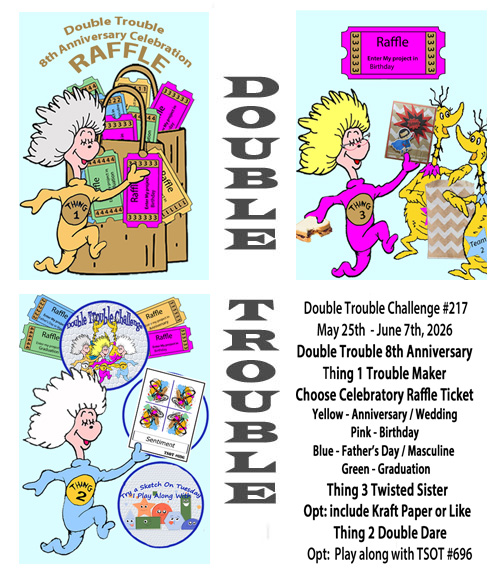
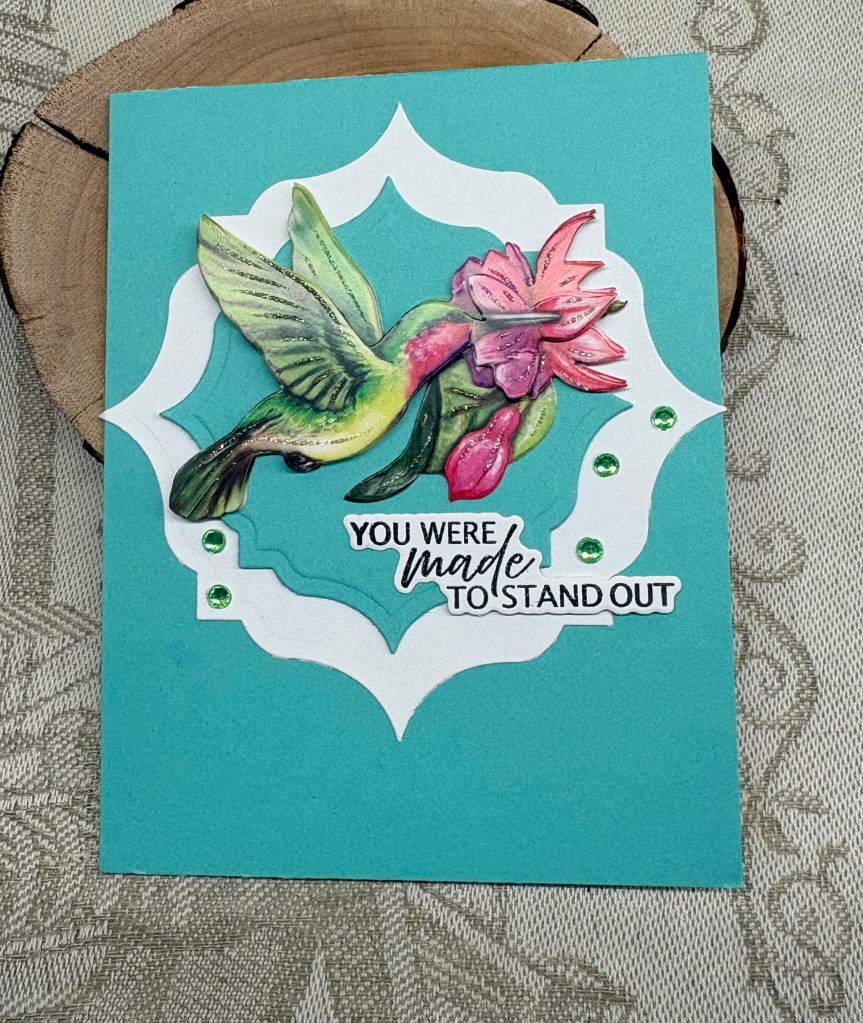
Upcycled Store Bought Card

Our lovely neighbors gave us a card at Christmas and I simply couldn’t throw it away. Instead I upcycled it to what you see here. I had seen Frenchie Stamps do a tutorial on making a card like this so I searched and followed the instructions.

Initially I had an issue as I couldn’t seem to get things to fit. I set it aside partially complete. Over time I have discovered that sometimes my brain needs to percolate, without my being aware of the thinking. A week later I took another look, realized what was wrong and hey presto my card was done. The foiled sentiment strip is from a package by Open Studio.

The last of the folds isn’t quite right as I glued it a bit too tight, but only I, and now you, know this. The recipient won’t realize unless I point it out. It folds flat and my hope is that the postage won’t be more than the usual fees. There is a line of sparkle in the snow so I didn’t have to add anything more to it.

Thanks for stopping by, I appreciate you and your time. I also appreciate any comments you may leave for me.

Seeing Double

A while back, one of my Dragonboat paddling friends arrived at practice with a box of pre assembled craft items as a thank you gift to me. Until today I hadn’t tried to use any of them, but the flowers you see here work well on the latest challenge from Sunday Stamps.

The background PP is from a new paper pad I simply couldn’t resist buying and is by Crafter’s Companion. The lattice look die cuts are from a Spellbinders set that makes plaid if all 3 dies are used and the background for these was cut using a set from StampinUP. The oval sentiment die is from YNS I think and the sentiment is from Spellbinders which I heat set, and added foam dimension before adhering. The little hearts were leftovers and these are from an unbranded die set.

My original intention was to use another product purchased recently, but I can’t find it at the moment. I’ve been trying to tidy up a few things, but I’ve not managed to complete the task and I’m sure what I was looking for is buried temporarily. And the mess isn’t helped by a new kit from Spellbinders for their upcoming Weekender sessions. Its an early birthday gift from my hubby and I’ve unboxed the kit but haven’t put it in any order yet.

I’m grateful to complete a card this afternoon as my eyes are not focussing well after an eye check earlier today. Thanks for stopping by, I appreciate you and your time.

Seize the Birthday #326-Feature an Animal

I sure hope my sheep image is front and center enough for this challenge. The image and sentiment came from Art Impressions and I used watercolour pencils after heat embossing it. I did stamp the image on water colour paper in order to be able to use water colour pencils.

The oval aperture was cut using a CraftAddictions die set and I added some watercolour to the die cut oval, but then decided to add a rub on transfer from 49 and Market on top. All the leaves came from an older Hero Arts kit and were water coloured as well. I couldn’t find the die set I originally planned on using, which would have been more in keeping with the transfer, but in the end I quite like the quirkiness of having jungle leaves with a sheep and pine branch image. Its ridiculous but amuses me. And the sheep image is in itself quirky and fun.

Foam tape was used on the top layer to lift it from the oval shape below and to allow room for adding the jungle leaves. The stitched oval was added flat, but I did add dimension behind the sheep so the card has a 3D look and feel.

The card will be added to Seize the Birthday for their current challenge. Thanks for stopping by, I appreciate you, your time and any comments you may leave for me. Hope you all have a great weekend. It is Victoria Day here in Canada, with many families enjoying an additional day with family.

Beside the Sea Vacation Time

It seems a couple of challenge blogs have a water or beach type scene as their challenges at the moment. When I first created my post for the As You See It challenge, my original intention was to do something similar to this post, but my brain went in a totally different direction that day. In the meantime the Card Concept came up with a new challenge that was nautical in nature and my brain went back to this idea. I think my card fits into their Clean and Layered definition. And because I used a stamp set from GKD that I’ve had forever and not used in recent years, I dragged it out to use here and that qualifies the card for the challenge at The Neglected Stuff. Believe it or not, the sentiment stamp had never seen ink until today.

The small gold squares were leftover pieces from a post I did a while ago and my new Memory Box nested squares arrived the other day, so I chose one slightly smaller than these and using some scraps I die cut the next layer. I added them together and set aside while I did the next few steps. Taking a wave folder from StampinUp I embossed the white layer and cut it down so it was slightly smaller than the card front. Then I carefully added the squares doing my best to keep them centered and straight. Once ready I added it to the card front. Then using a few stamps from the set, I stamped the fish and star fish using Black Soot ink and heat embossed clear, doing the same with the sentiment. I coloured these images with Prisma pencils using an alcohol blending pen to smooth out the colours. Once fussy cut I added them as you see. I felt the fish needed a bit extra so I die cut some seaweed using another Memory Box die set. I matched the sentiment piece to the others using a scrap piece of the same gold CS. The tiny embellishments were added and the card was complete.

When taking the photograph I had some issues with how the light was on the card and I can see here that the embossing isn’t as visible in the picture as it is in reality. This 3D folder has quite a visual impact usually.

Thanks for spending time with me today, I appreciate that you take the time to look and comment.

Happy Circles

Welcome to our latest challenge at Cardz 4 Galz, and the challenge theme has been chosen by me. I will also choose the winners when the time comes. The theme is anything with circles.

I’ve always loved purple and gold/yellow together and as I also wanted a feminine style card these are the colours I chose. Starting with Hero Arts infinity circle dies and a silver patterned scrap piece of Purple CS I die cut 5 circles. With another slightly smaller die and gold scrap I cut another 5. My Scrapbook.com alphabet dies were located and I die cut the letters from some silver CS.

I went on the hunt for an old die that had the tailors dummy outline with the corset piece in the middle. I don’t know which company, but based on how long I’ve had it, I’m sure it is one of three, Spellbinders, Sizzix or Memory Box. The birthday word is from another ancient set by Sizzix. As you can see I used some yellow CS to cut these pieces. The tailors dummy piece was a bit too large for my purpose so I cut it down and used only a portion of the stand, adding the corset on top. I also dry embossed the corset piece so it has dimension and interest. I lost the point for the i in the word so I used a small StampinUP enamel heart instead. I used a ruler to ensure the larger circles were properly aligned as I glued them down and deliberately offset the gold ones on top just a bit.

Not a difficult card to make thankfully and now it is your turn. We look forward to seeing your creations in our gallery and above all, hope you have fun making them. Many thanks for stopping by, you are appreciated.

“It’s a Wheelie Cool Day”

Welcome to challenge #216 here at Double Trouble and the recipe this time is as follows: Thing 1, 3-layers, 2 shapes and 1 image. Thing 3 is to include at least one wheel, Cam and/or gears. Thing 2 is a double dare to use the sketch at TSOT and to enter your card there. If you are entering into the TSOT challenge be careful not to back link.

To make my card, I pulled out a Spellbinders set that came in the Weekender kit last year and using various coloured bits of scrap card stock I die cut everything. Once the pieces were cut I assembled my sun. To give my sun some eyelids I cut the image twice and turned the other piece upside down and glued it behind. Then I added all the other pieces. It is fiddly work and needs tweezers but is fun nevertheless. I set my sun to the side and stenciled my background using an older stencil (can’t remember the brand) using 3 different inks. Initially I wasn’t sure what to pair it all with and then I remembered that I had some golfing images shared with me, from a stamping buddy. The golf cart and the sentiment seemed to fit the bill so these are the ones I chose. The sun is big and detailed so I didn’t want to add anything too much as I felt it would be way too busy to look at. The sentiment appeals to my weird sense of humour.

Due to the timing of our challenge my card cannot be entered at TSOT. We look forward to seeing your creations in our gallery and trust you have fun creating. Thanks for stopping by, I appreciate that you do as I know how busy people can get.

Under the Sea Birthday Greeting

Although the Inspo board is more about florals it is also about watercolouring at Double D Watercolor Challenge and I chose to make mine an underwater scene.

Firstly I took a piece of watercolour paper and some pretty ColourArt blue and green shimmer water colours and I added the colours in a kind of gradient. When it was dry I took a Memory Box 3D folder and ran it through my machine. I then took some different gold and silver pastes (no idea of the brand) and highlighted the little fish and the octopus to make them stand out more. I decided to use some gilding wax on the bubbles and on the octopus and heat set it. I felt it needed a bit more so I used a couple of mica sprays but I think I went overboard as I have more than I really wanted. The little turtles are on canvas and were already fussy cut so I added some foam dimension on the back and placed them. To my dismay, I realized I had added them both upside down and getting them off was quite the challenge. Luckily no serious damage to the card, but their placement isn’t quite what I envisioned as I was stuck with putting them back to cover up the original glue spots. As well, I had no idea that canvas frays in a similar way to fabric, so playing around with them more than necessary was going to ruin them altogether. Oh well, such is life on occasion. The foiled sentiment is from Open Studio. I kind of like the end result but what I imagined and what I got is quite different.

Thanks for stopping by, you, your time and any comments are appreciated.


Fun Fold – Looks like an M Shape when Upright

closed and flat

Earlier in the week I was testing out a 3D folder to ensure which was the raised side versus the debossed side before I used the coloured card stock for the specific card I was working on. As the embossing was quite pretty on the test piece I decide I would use it in a project and this is what I came up with. I had seen a card like this on Pinterest and I followed it to Suestampfield.com where I could see her create it. I figured out the measurements, because paying for a tutorial in US dollars makes no sense to me, and this is my version of one of her examples. The folder is an unbranded one, the papers are all StampinUP as is the circle die cut. The sentiment die was a gift and I don’t know the brand, and the florals are decoupage that came in a kit by Crafters Companion. I had them put together for a while and decided this card would be a good way to use them.

These cards look complicated but they are actually much easier than we imagine and I enjoyed making this one. The back of the card is okay for writing a personal sentiment, but one could enhance it with some stamping if desired. This card fits into the current challenge at CYHTP and includes the twist of flowers.

Thanks for stopping by, you, your time and any comments you may leave are always appreciated.

3-2-1 Recipe

Welcome to the new challenge here at Double Trouble recipe #215. The recipe is as follows: 3-Layers and card base counts here, 2 shapes or images, 1 stenciled and/or embossed element. Thing 3 by twisted sister is to include flowers if you wish, and Thing 2 is the double dare for you to add your creation to the TSOT Sketch #694 challenge. When you do this, be aware of the backlinking rule.

My card has the 3 layers, one of which is also a stenciled layer. I used a Color Box stencil and some TCW Stardust butter in champagne for this. I bought 2 containers of these butters earlier this year and when I opened the rose gold one, I discovered it was as hard as rock. I no longer have the receipt for the purchase so cannot take it back to the art store. Anyone with any ideas of how to soften it please share.

The PP was on my desk as I had used it recently for something else so I decided to put the two together and then add them to the card base. The image is from Wild Rose Studio and I stamped it then coloured with Prisma pencils. This was then fussy cut. I did two of the flowers and shaped a bit when I put them together. As well I used an alcohol blending pen to smooth out the colouring. The Scrapbook.com sentiment was another stamp I still had on my desk and I quite like it so decided to add it to a Hero Arts die cut heart giving me my second shape. The heart was coloured with the same pencil I used on the flower. It was at this point that I realized I hadn’t quite gotten the edges accurate when I added the layers and it bothered me. To fix it, I used a border die (can’t remember which company) and using a scrap piece I cut the hearts. Instead of using the actual border, I used only the tiny hearts and glued them down the side.

All in all I’m quite pleased with the end result. It is loosely based on the sketch, but I cannot enter there due to the backlinking rule. We look forward to seeing your creations in our gallery and above all hope you have fun creating. Thanks for joining me today, I appreciate you and your time.

Primarily Pink

After I had posted yesterdays pink card, I realized that it may have worked for this one here at Seize the Birthday #325-Primarily PINK! The challenge with that would have been trying to say Happy Birthday with only one word. So this morning I set about making one specific to this challenge and this is what I came up with.

In my searching for items yesterday, I came across this stenciled background piece that was left over from a long ago project. I remember using an unbranded die to make the stencil from some cardboard which was then discarded after use. I took some glitter CS and cut a layer for the base and added the heart layer on top. Using a new die from Uniquely Creative and some scrap pink CS I die cut the postage stamp layer. I found a floral stamped piece of vellum that I had left over from a while back and cut the vellum to fit the top and bottom spaces. The florals are from Crafters Companion. Then I took a die set from Altenew called Sunlit Butterflies and cut the base butterfly in a darker pink and a vellum topper. I added them together in the middle space leaving the vellum loose in the wing section.

The sentiment is from Hampton Arts and was stamped in Picked Raspberry ink and then heat embossed. I cut the sentiment into two pieces and stacked them as you see.

I spent 30 minutes outside weeding in my garden, which is sadly a bit of a mess. To avoid getting stupidly overtired and sore I actually took a timer along and when it beeped I stopped. This worked quite well so I may do this again throughout this week. Even if I only get a tiny section done it will be better than nothing at all and it is rather nice to be outside at the moment. We have beautiful weather. We are going with friends for Sushi later so I don’t have to be in my kitchen at all, Yay!

Thanks for stopping by, I appreciate you, your time and any comments.