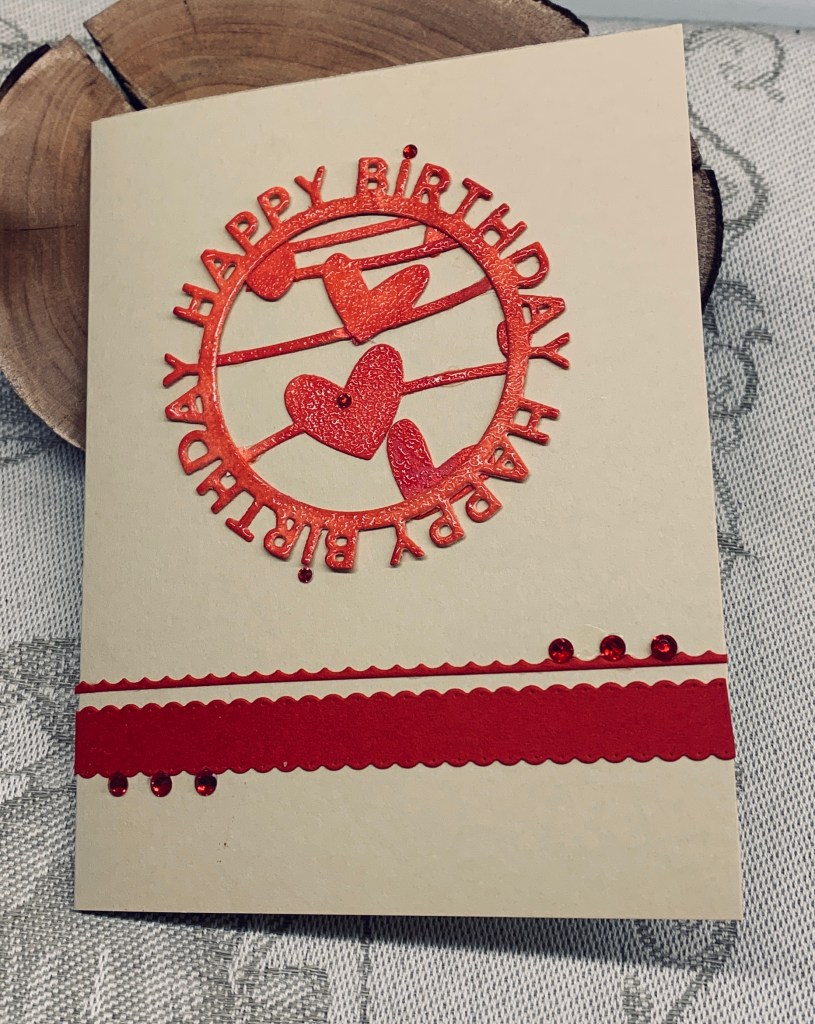
chess anyone?

As You See It, my favourite challenge, is asking for our crafting resolution for this year. I think mine is often the same thing as I always want to use as much of my current supplies as possible. This card also fits the challenge at Krafty Chicks Challenge #752 {Masculine} so I’m adding it there as well. Last year I was part of a Kit club as a store was offering kits over 3 months at a very reasonable price. My kits arrived, all Crafters Companion, were inspected, set aside and then nothing. So for sure, my resolution is to actually use them and soon. And I will also concentrate on using stamp sets and dies that don’t get used as often as they should.

One of my stamping friends gifted me with some printed images from her collection of stamps when I needed something specific and didn’t want to buy a set for a likely one time use. I picked a few images from her blog and then saw a card she had done using some game images, so I also requested the StampinUP chess pieces. This card features that image and I fussy cut it for using here. Using a small hexagon die, I think from Crafters Companion, I cut several in both white and black. These were then added to the beige background piece which is PP from an older paper pad. The sentiment is two different stamps from a SSS set and the raffia twine is from my stash. I added everything to the black card front and declared it finished.

I really appreciate you stopping in for a look. Wherever you are I hope that it isn’t too cold.

CAS hugs

AAA Cards Challenge #282: Follow the Leader is the current challenge and this is my take on it. I have often thought of doing a card in this design, but never got around to it until now. Using Hero Arts infinity circle dies I first cut the white layer at the edge then using the waste piece from that, I die cut the smaller circle. My red layer is from a Divinity Designs paper pack I’ve had forever and I added the white onto that. Using a new stamp set that was part of a kit from Crafters Companion I stamped the seed head onto the small die cut and heat embossed, after which I added it to the center of the white layer. With a sentiment stamp from the same set I initially stamped directly to the card front but somehow I managed to smudge it and it wasn’t good enough to use for anything let alone a challenge entry. I set it aside until a few minutes ago, as, while I was searching for something online, I realized that I could perhaps stamp it again on another scrap and then die cut it using a heart die, (another infinity die actually). It did the job perfectly and adding the heart was a good idea as most of the DT’s used a tiny heart in their samples. It always amazes me how our brains work, because I wasn’t even looking for a solution when the idea popped into my head.

This card will go to my friend who after 6 months of chemo, has just had major surgery (mastectomy) and it will cheer her up I’m sure. Thanks for stopping by, your time is always appreciated.

glitter butterfly

SOS539 – Glitter Me Happy is the current challenge at Shopping our Stash and then Seize the Birthday wants us to use something new. Reminder #297-Use Something New.

I’ve just received some new EF’s and dies from StampinUP so this card works for both challenges. I chose the butterfly 3D folder and the dies that go with it. After embossing the panel I sprayed some sparkle spray and set it to dry. Then I die cut the the butterfly base and embossed it and cut 2 of the top layer, one in white CS and one in the purple glitter paper. I glued these 2 together so there was more stability for the top layer. Using a silver Nuvo glitter pen I went over the bottom layer to get it glittery. I did this twice to ensure good coverage. When it was fully dry I added the purple top layer attaching only under the body section, then I added the black body on top. I stamped the sentiment using an MFT set, but used the die from StampinUP to cut it. Using 2 tiny heart stamps from a YNS set, I stamped them at the end. Initially I tried stamping directly to this strip, but messed it up so I stamped again on scrap and fussy cut one to cover it. I also went around the sentiment strip with the silver glitter pen. It is very subtle so hard to see on the photo. After backing the layers to a silver piece it was all added to a white card front.

My hubby really likes this card and I hope that you do too. Thanks for stopping by, your time is always appreciated.

postage style layout

It has been some time since I played in this particular challenge, but I liked this mood board and really wanted to try out my new die and stencil so I used the inspiration from there. The Card Concept #213 {Winter Solace}. I liked the colours in the mood board. I’ve never done anything like this before and am not 100% sure I like the result, but as with anything new, it takes time to figure out how things work best. It did give me an opportunity to use some small stamps that I’ve not used much in the past, all from different sets. Some are GKD, another is Kitchen sinks and another is MFT.

I guess I would categorize this as Mixed Media/Clean and Graphic based on the descriptions Card Concept uses. I sponged or brushed some colour through the stencil and when dry I began adding the images using Versamark ink and heat embossing as I went.

As this die and stencil are a U.K. brand (Woodware) they are slightly different to our sizes so I had to cut the panel down a bit to get it to fit onto the card front. I got them on sale at a Canadian online store called Scrap Chicks. It is fun to have a few new things to play with.

Many thanks for stopping by and also for any comments you may leave. I enjoy reading your thoughts. As I didn’t have time to finish this post yesterday I am looking at it with fresh eyes, which means I like it more now than I did.

special thanks

White-on-White Challenge at Double D and Just Add Ink #734…Something New Blog Hop! are two challenges that inspired this card. The folder is brand new and is by Memory Box, Open Studio and it came with two matching dies. I love white on white and am always fascinated with how different white can look on various card stocks. I started with the embossing and then die cut the two flowers which I also embossed. I added a tiny amount of green to the stems using a pencil. To give them some additional life I added some Versamark and heat embossed some white/glitter powder but the photo doesn’t really pick it up. It is very sparkly on my desk. I added a little more sparkle with some stickles.

Taking another piece of CS I roughed up the edges added some Versamark and heat embossed with the white/glitter powder. This piece was added to a card front and the embossed layer was added using a thick foam tape. The additional flowers were popped up on a thin foam tape. The sentiment and flourish were leftover from a previous project and I thought they worked well for this card so I added them. Finished it with some small Trinity Stamp embellishments. These particular ones pick up any colour around them which makes them an interesting addition.

Thanks for stopping by. I hope you are enjoying a nice day wherever you are.

bird-day greetings

Challenge #339 – Winter Frost is the latest challenge at As You See It and this one is a colour challenge. I thought about a design for a couple of days and then sawsomething in the group from GKD, by Karen Hightower, that was set out like this one and I went with that. My colours are as close as I can get with what I have using Distress inks and card stock from different sources. Card base is a darker basic gray with a slate gray background for the rest of the card. Ribbon is from my stash – no idea where I got these and I’ve had them for a long time. Stamp set is from YNS and the EF is another oldie that I have no name for but it definitely is a brand not a knock off. I did the birds and the balloon initially on some scrap CS and heat embossed them so I could add more colour. When they were dry I fussy cut each piece but took off the legs and the string. Then I added foam tape to the bodies and laid them on the top piece temporarily so I could lay out the stamps again. I re-stamped everything in Hickory Smoke and heat embossed for more definition. Then I added them fussy cut pieces on top so the birds now had their legs back as well as the balloon it’s string. I had cut the dry embossed piece to size, added foam tape and then added it to the lighter gray panel. Added the top portion the same way and left a small gap between the two. I wasn’t happy, so I had the idea of adding the ribbon which I liked much more. The sentiment was stamped and heat embossed but this stamp has a slight fault in it at one end and I tried several times to remove it. Nothing worked so in the end I angle cut the strip on both sides. It isn’t perfect, but better than the original. Too bad the company has gone as I would ask them for a replacement stamp if I could. I may try to cut the fault off, but it requires a very steady hand and I’m concerned I may ruin it completely. Overall I’m happy enough with the card that I am posting and entering it.

Thanks for stopping by, your time is appreciated as are any comments you may leave.

warmest wishes

Last year I created some background panels by using up some of my scraps. This piece used here is one of those panels. Inkspirational is looking for pretty quilts, so I took a background die and put it through the machine. This particular die (don’t know the brand) has never cut that well, particularly on thicker paper so I decided to use it as a pattern to look as if quilt stitched and I added the center pieces separately. My original thinking was to punch out the pieces and back the panel with another colour, but the poor cutting didn’t allow for that. The whale was stamped and die cut using an older Hero Arts kit and to attach it I die cut the center out of the patterned piece backed the whale with foam tape. I wanted it to look as if it was stitched into the quilt like you see those puffy sections on real quilts so I popped it back in place before attaching it all together onto the card front. I added the splashes and used an incentive stamp set from GKD for the sentiment. This I heat embossed in silver and die cut using some unbranded banner dies.

This will be a nice addition to my masculine card file as I have a few masculine birthdays coming up soon. I also have to make a card for my hubby whose 75th birthday is in early February. Not sure what I shall do yet. Any ideas gratefully received, lol.

Thanks for popping in to take a look. I really appreciate it.

sweet friend

Color Hues Color Challenge #101 – Red & Kraft As you know I don’t do a lot of stenciling but I’m trying to change that and this is one of my efforts. I took a, gifted to me, homemade puzzle heart stencil, some Kraft CS and Festive Berries ink and added the heart. With the ink still wet I added some clear heat set embossing so it has some shine. Initially I wasn’t quite sure where I was going with this card so I set it aside for a few hours. Then I wondered what it might look like if I added some ribbon and found this shiny twine which I added. It needed more so I pulled out a homemade dotted circle stencil and using a brush and some Vintage photo I added the small circles randomly.

The sentiment is from a small Creative Expressions set to which I added the silver scroll that was leftover from a different card. I was satisfied with the end result and in fact, actually like the card. Its always a bonus if I really like something I make as a lot of the time I don’t.

Thanks for stopping by, I appreciate your taking the time.

Stenciled thanks

With the holiday and having guests, I haven’t been spending much time in my craft room, but I did do a lot of clean up prior to Christmas Day. I found quite a few scraps and have since spent some time using them as well as trying out some new supplies. I have a few ready and will likely start posting them over the next weeks.

The card here is using both a scrap frame as well as a new stencil from Crafters Companion. It’s also using an old word die set that came with my Gemini. I used a part of the new stencil over the top of my ink blended piece using water on the stencil, waiting a moment and then lifting it off. It worked quite well and I liked the end result. Decided to use the frame to highlight the nicest part of the stenciling and added the word and small scroll top and bottom.

Its a very simple card and I’m quite pleased with how it turned out. I shall be entering this card into the challenge at Inkspirational.

Thanks for spending time with me today. I hope you all had a lovely Christmas and wish you a very Happy New Year too.

Christmas in space

The latest challenge at CYHTP is: Anything Goes Embossing with a Twist of WINTER FUN. I guess the twist isn’t taken with this creation as although its a fun card it isn’t strictly winter fun. As some of you are aware, occasionally I do a commissioned card for a friend and this is one of those times. This is for her step dad who loves anything scientific. I thought space and robots were perfect and turning it into a Christmas theme card was fun. After my recent Colorhues pink and aqua card I wanted to do another using the same layout and style. It took a few days of thinking before I had the idea to use rockets as the side panels and I got these from an Adobe graphic and photo program. I used my computer to get the images sized correctly and then added them to a dark gray CS to give a border. The center panel was using CS and some Rub On images along with a stamp from the Robot set by Brutus Monroe. The Christmas sentiment stamp is from Hero Arts. Puffy Sticker’s are from a sheet I got at the local market. For the embossed panel I used a Sequin folder from StampinUp, on a metallic silver CS and I backed it with a dark gray for the border. I know sequins aren’t really a Christmas theme, but I don’t have a folder with stars and I thought these at least gave a space look to the background. I stamped the robots onto a scrap piece of heavy CS as fussy cutting is easier on a heavier weight. Once stamped I also heat embossed clear and then I fussy cut each one before adding a bit of sparkle to them. The bottom robot needed to look more Christmassy so I added a Rub on hand bell that I also fussy cut. Before I actually glued the panels onto the background I sprayed them with shimmer spray so they twinkle and also it has the look of snow in real life. Messed up the spacing slightly putting on the panels but I don’t think it is something that a non crafter would notice.

This was such fun to make even though fussy cutting was a challenge for my achy hands and I’m really pleased with how it turned out. I’m blowing my own trumpet, but hubby loves it and I’ve shown it to one or two friends who also think its a great card. Once in a while I think I’m truly inspired. LOL!

Thanks for spending time with me today, I really appreciate it.