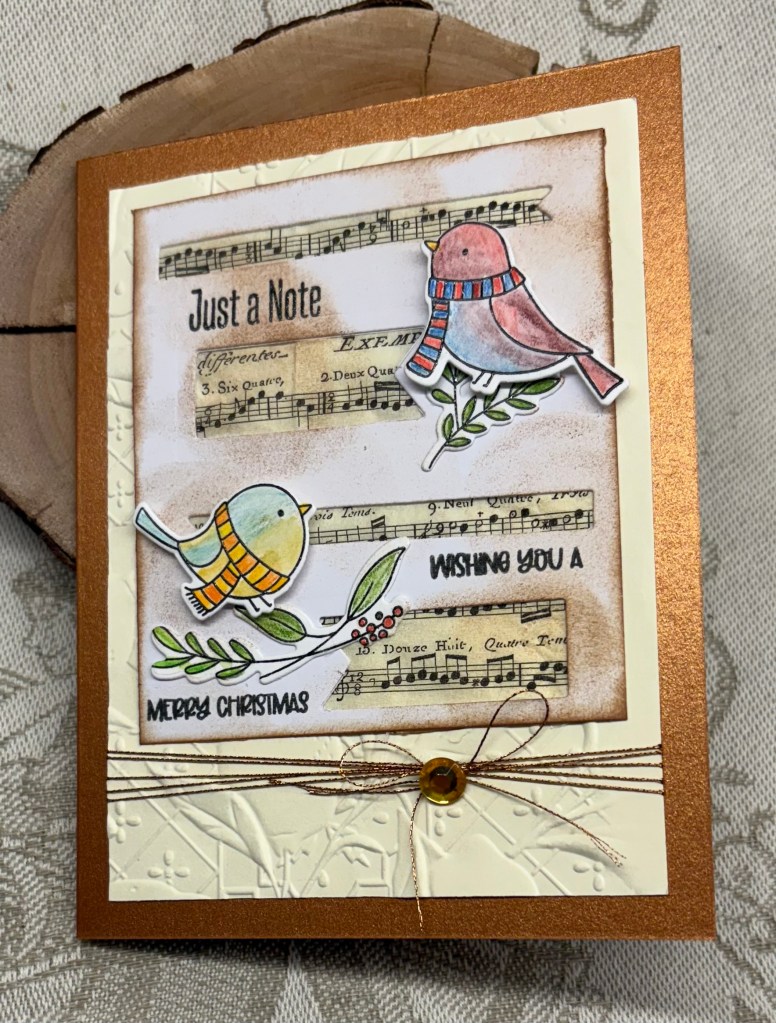
hexagon fun fold

card flat for mailing
upright showing the shape.

Another of my commissioned cards, this time with a golfing Christmas theme. I thought it would be a nice one for the challenge at Krafty Chicks challenge #746 – Christmas so am entering it there. I saw this fold on Pinterest and searched for a tutorial so I could make it my own version. I could have figured it out, but sometimes it is just easier to see how it is done and this tutorial was really easy to follow. The paper I used is from a paper pad from last year. My images are all from a stamping buddy who gifted me with an envelope full of golf related images and I am really grateful to her for them. She knows who she is. I fussy cut the Tee ball and the Santa hats using pencils to colour. Then I coloured the focal image using pencils and some glitter pens. Once it was coloured I fussy cut it strategically so it stayed together as one piece and I edged it with a black pen. Once I had the card base cut, scored and folded I added all the smaller panels and then taking the suggestion from the video I added a strip of plastic at the centre so the focal image has more stability. Except for the Tee balls everything is glued flat, although as this card is to be gifted personally not mailed, more dimension wouldn’t have been an issue.

I’m really pleased with how it turned out and I know my friend is going to be thrilled with it as will her father for whom it is intended.

I think I have two more Christmas cards to make and then I’m done for this year. I wasn’t going to bother with these two, but have learned that the mail strike may be over next week. The government stepped in and is forcing them to settle. Obviously there will be a backlog to clear, but at least people will receive the cards sometime in January, late but not so bad as to matter. I’ll confirm with my stamping buddies as soon as I am certain the strike it over.

Thanks for stopping by.

interactive Flap card

One of my friends commissions several cards per year for her family and I try to do something a bit different each time. I shall add this card to the challenge at Peace on Earth

This is my first try at a flap card although I’ve had the Spellbinders die for some time. I found a tutorial to follow and this is the result. One thing I realized is that keeping the pieces in the orientation in which they are cut, makes it easier to put together. The frame didn’t seem to fit until I realized the orientation was off. The die set came with daisy flowers but as it is an intended Christmas card I used poinsettias instead. Mine came from a die by Dee’s Distinctively and I only used three, so have enough left for another card. The PP is from a paper pad but I’ve mislaid the brand name. Sentiment is from a Divinity Design set and I also added a sentiment on the underside of the flaps but it’s another temporarily mislaid set. Its probably underneath the stuff on my work surfaces.

Underneath the flaps

I used a small YNS shape die to add the pull tag at the top, but couldn’t find the stamp set with the words I needed, so I hand wrote pull. The next goal, after our party this weekend, is to sort out my craft room and find the missing sets. They aren’t gone, just hidden.

Once I figured out how it works after watching the video several times, it wasn’t that difficult to do and I’m pleased with the end result.

Thanks for stopping by, I appreciate you and your time.

Christmas in space

The latest challenge at CYHTP is: Anything Goes Embossing with a Twist of WINTER FUN. I guess the twist isn’t taken with this creation as although its a fun card it isn’t strictly winter fun. As some of you are aware, occasionally I do a commissioned card for a friend and this is one of those times. This is for her step dad who loves anything scientific. I thought space and robots were perfect and turning it into a Christmas theme card was fun. After my recent Colorhues pink and aqua card I wanted to do another using the same layout and style. It took a few days of thinking before I had the idea to use rockets as the side panels and I got these from an Adobe graphic and photo program. I used my computer to get the images sized correctly and then added them to a dark gray CS to give a border. The center panel was using CS and some Rub On images along with a stamp from the Robot set by Brutus Monroe. The Christmas sentiment stamp is from Hero Arts. Puffy Sticker’s are from a sheet I got at the local market. For the embossed panel I used a Sequin folder from StampinUp, on a metallic silver CS and I backed it with a dark gray for the border. I know sequins aren’t really a Christmas theme, but I don’t have a folder with stars and I thought these at least gave a space look to the background. I stamped the robots onto a scrap piece of heavy CS as fussy cutting is easier on a heavier weight. Once stamped I also heat embossed clear and then I fussy cut each one before adding a bit of sparkle to them. The bottom robot needed to look more Christmassy so I added a Rub on hand bell that I also fussy cut. Before I actually glued the panels onto the background I sprayed them with shimmer spray so they twinkle and also it has the look of snow in real life. Messed up the spacing slightly putting on the panels but I don’t think it is something that a non crafter would notice.

This was such fun to make even though fussy cutting was a challenge for my achy hands and I’m really pleased with how it turned out. I’m blowing my own trumpet, but hubby loves it and I’ve shown it to one or two friends who also think its a great card. Once in a while I think I’m truly inspired. LOL!

Thanks for spending time with me today, I really appreciate it.

leaf print thank you

For a while now, I have been wanting to try using a real leaf to get a print onto card stock. This morning the perfect leaf was in my driveway – damp from rain – but intact and pretty. I brought it inside and before it had a chance to dry I placed it onto a scrap piece of CS added another piece on top and ran it through my Sizzix making sure it was pressed down quite hard. The result was quite a surprise and while the piece didn’t show the entire leaf, I still liked it. Using a StampinUP die I cut it as a rectangle. At the time I wasn’t sure what my intentions were, but checking some challenges I realized that it would fit at least 3 if I used it. What I came up with is this card. I took a Kokorosa die and cut the Maple leaf. I added some ink but kept it very soft as it was a background piece. Then I found the copper sparkle CS and cut the panel before adding it to my card front. From there I added the Maple leaf and then the leaf print layer. The pumpkin is stamped with a GKD stamp and fussy cut before popping it up as you see. The sentiment is from a set for which I have lost the brand information but I suspect it is either MFT or Spellbinders. I’m not sure if the sparkle layer is a bit strong but nevertheless I like the card. You can be sure I shall be looking for other leaves to try this technique with and my hubby loved it.

Challenges I shall be entering: https://thesisterhoodofcrafters.blogspot.com/ fall/leaves, Pumpkin, Pumpkin, Who’s Got the Pumpkin, Challenge #327 – Seasonal

Thanks for stopping by and I appreciate your time and any comments you may leave me.

Vortex

Seize The Birthday #293-Dots as the current challenge. Having just received this new unbranded stamp set, it couldn’t have been more timely. The stamps include various patterns and I chose 2 of them for this card. The background reminds me of a vortex, hence the title. I used Faded Jeans ink and repeat stamped the design until I was happy. On a scrap piece, using the 2nd stamp, I stamped the compass and heat set it clear. The sentiment stamp is from Joy Clair and this was also heat embossed after which I added it to the background giving it a small border.

The compass was coloured using various pencils and some water. I added some silver sparkle as well as some gold and then using a Hero Arts Infinity die I cut it out. After adding a smaller foam circle to the back I adhered it to the background layer. I cut this layer down a little before adding it to the navy card front. Hubby loves this card. His comment was, ‘simple but effective’. I’m quite happy with the end result and one of our boating friends will receive it for his birthday when the time comes.

Thanks for stopping by, I appreciate your time and any comments you may leave for me.

sorry for your loss

One of my yoga and coffee group ladies, lost her mother last week so I made this card for her. I used a Taylored Expression tree die for the focal layer and a StampinUp EF for the background section. After cutting my trees I added some lost shadow ink and before it was dry sprinkled a little silver embossing on top so it has more texture and a little shine. After adding some foam tape I set it aside so I could emboss the background on some StampinUp PP. This was then added this to the entire card front. The die cut was added and using a small piece of scrap card along with using a transfer from some rub-ons I have, I did the little bird. Then I fussy cut before popping it up on foam tape. I cut my circle with another StampinUp set and added the sentiment in Blueprint sketch ink. I also sponged the edges with the same ink.

I’m quite happy with the end result. It has a soft and subtle look that works for a sympathy card.

I’m adding this card to the current challenge at CYHTP although the option of adding fall colours hasn’t been taken.