Floral Fantasy

CAS Game #168

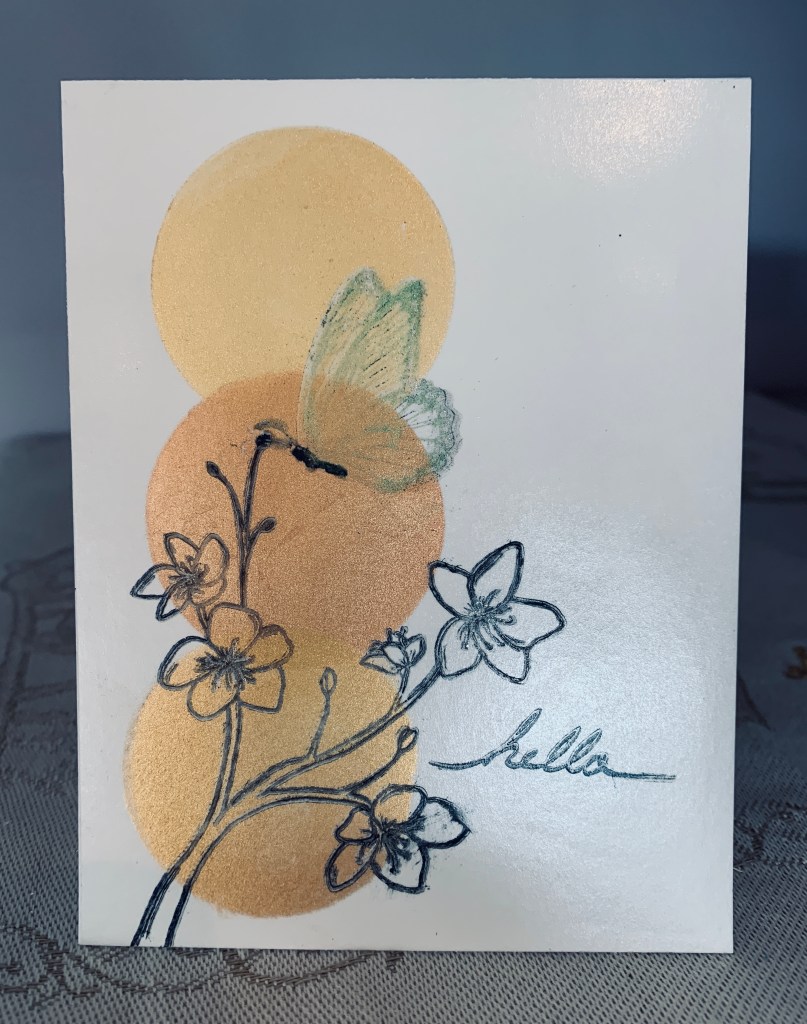
I am amazed at how quickly my stamp order from MFT arrived and decided to use one of them for the AAA challenge. I didn’t do the optional twist for this card. I did however, try to use some of the tips from an AI water colour video to add the colour to it. To cut out my panel I used a die set from Spellbinders. The sentiment is from a GKD set. To get the colour I used Tombow markers and an almost wet paintbrush which helped to spread out the colour to the rest of the flower. Once the flowers were done I used a shimmer water colour paint to add the wash behind the flowers. I need a lot of practice before I can say my water coloring is decent, but even so, I’m not unhappy with this card.

Using a Photograph

PP497 – A Sketch Challenge from Claire

My hubby has been taking photographs of ferns recently and then in post production he changes the photo a little. The background for my sketch effort is one of those changed photographs. The photo here doesn’t do it justice as there are a lot of colours in it but they show up quite dark for some reason. That said I pulled some of the colour from the background into my focal pieces as well as into the layered borders.

The die cut hexagon is one of the rescued pieces from a project I did some days ago. The inchies are also from previous projects and the die cut flower is using up the last of a water coloured piece I did some time ago. Die used for flower is from GKD and the hexagon is from a set that came with my Gemini. The stamps used are from CTMH and I stamped with Distress Oxide ink Mermaid lagoon to try to match the turquoise blue elsewhere. The pink glitter strip is also a left over piece. I am happy with how it turned out.

Cozy Sweaters and Fireside Chairs

Challenge # 125 Use Stencils, STITCHES of any kind

With one challenge requiring the use of stencils and the other stitches I came up with this card. Stamps, dies and sentiment are from Hero Arts with the exception of the ribbon die which is from GKD. The cable knit background is a Bonnie created stencil which I thought perfect for both challenges. Thanks Bonnie. I inked the stencil twice as the first colour I chose (yellow) wasn’t right and I went over it with Fired Brick. I let a bit of the yellow still show to give a tweed look. Cut it down to the size I required and added to card front. Added the ribbon strip also Fired Brick down the side. After I had stamped the images I die cut them, coloured them and glued them in place. I fussy cut the sentiment after heat embossing it before gluing it at the top. Another Christmas card to add to the few I’ve done so far.

A Stitch in Time

Stitches of any kind

The mood board at Double D is all about stitches and I had fun figuring out what I wanted to create. The first thing I did was to create the background piece so using Distress Oxide inks I sponged on a whole lot of colour. Taking a scrap piece of real lace I soaked it with water and laid it flat pressing it down with a cloth. It left an impression of the lace pattern on the inked piece. I did this several times to get the whole piece with some lace texture. Let it dry overnight before cutting it to size for the card front. Using the last rescued hexagon piece and a glitter pen I inked the edges of the hexagon. Stamped the splash from a GKD set called Tiny Textures and then stamped the knitting from another GKD set called Art from the Heart on top. Adhered this to background. Sentiment is from the same set and I stamped it and then cut it into 2 pieces as shown. I also added the pink glitter pen around the edges of these. Using a ribbon die set I cut two pieces out of white cs and coloured the bottom one with the same glitter pen. Glued this piece across the card and then added the white bit on top so it too looks stitched. I’m really happy with how this one turned out.

Layers

The Card Concept #138 {Summer Fun}

Even with the style explanations I still have some trouble defining a style. That said, this card has a lot of layers so to me it is more Clean and layered and the photo is nautical so a perfect theme for me. I found a nautical chart on line and sized it in my graphic program so I could make the background piece. Layered this onto some dark blue. Did the tiled background and layered this onto the same blue. Did the same thing with the sentiment which is from a GKD set. The image is actually repurposed from a store bought birthday card. I fussy cut it and popped it up onto the tiled layer. Then I added a sponged piece to give the illusion of ocean waves.

Festive & Fun

Create Your Own Background

This card started out because I had some scraps I wanted to use up. The oval die cut being one of them and the sun behind it. In wondering what to do with it I decided that adding the birds would work so I stamped them from the Hero Arts jungle kit I bought last year. I cut out several layers to glue together for dimension and coloured them with Inktense pencils. On another scrap piece I added some clouds and the sun and then glued it to the oval with flamingo tucked in as shown. Before this step I used a pencil to colour the frame and then added opal blaze polish in gilded avocado. This gives so much shine it is amazing and it intensified the green too. Then it was a question of what to do next and I decided to try my new turnabout rainbow stamp from Concord & 9th. As you can see I didn’t get my placement right so the background isn’t rainbows at all but I liked it so used it anyway. Sweet Stampin challenge is to make your own background and I achieved it even with poor placement. To balance it I used a Paper Rose stitched die frame and matched that to the oval before adding it on top. I stamped the sentiment on a left over cloud and added that underneath the oval. When it was finished I wasn’t sure if I had done the right thing but my hubby called it very festive and fun hence the title. Looking at it today I decided I like it. Yes it is very strong and bright but it works.

Just add Water

DRU Challenge #147 – Summer Time Fun

After my striped card on a previous post I had the cut out circle left over as well as a few small pieces. I decided to create another ocean style card and this is the result. The mermaid is an unbranded die I purchased a long time ago and I paper pieced her tail using all the small pieces. In retrospect another time I do something similar will be too add the strips to a separate piece and then die cut the tail as doing it the way I did proved to be quite tedious and fiddly. I coloured her hair and body using pencils and added some gems to her hair, waist and tail for added dimension and interest. Using a couple of Sakura gelly roll pens I added a gold necklace, bracelet and some sparkle. Using a shell border stamp from a GKD set I added a row of shells and coloured them lightly. I backed the striped circle with another piece of scrap so it would fit nicely behind the die cut center. This was another pre-cut scrap from a failed project that I didn’t want to waste. Circle die cut with a set from GKD. I popped up the mermaid on dimensionals and added a few gold dots onto the striped piece. The sentiment is called Seaside Sentiments by Inspired by Stamping. I cut this one into two pieces so I could place them where they fit best.

Perches in the Soul

PP496 – A Clean-and-Simple

I had been thinking about this card for a few days and decided that today I would try out the idea. As PP is asking for clean and simple I figured it would work for their challenge. Stamp set is one I’ve had for a long time (gift certificate buy) and not really used much, I decided it was time I worked with it. Got it from Inspired by Stamping and it is called Sweet Aviary. The sentiment comes from a GKD set called Snow birds. The first thing I did was to dry emboss the hexagon frame which is from Crafters Companion. It is a fairly heavy thick die and each time I passed it through it either ripped the cs or creased it in places. In the end I took the best one and hand cut the shape out so I could use it cleanly. Before I did that I stamped the bird more or less in the center added some red glitter to it with a pen and when dry stamped the cage on top. Added some glitter to the cage with a Sakura gelly roll pen and then added the red sequins. I am completely out of tiny red gems so note to self is buy more. Because the glue came through the hole and I didn’t like it, I used a red perler pen and added a dot to each center. I am very happy with the result considering the initial challenge of getting the hexagon the way I envisioned.

Rose Gold Congrats

Wedding Challenge

The challenge at Double D this week is all about weddings so I made this card. I used a confetti die from MFT and die cut the word panel. I used Versamark all over it and then heat embossed the rose gold on top. Did this twice to get good coverage. I then die cut a second piece in black paper and paper pieced all the black into the spaces. I could have just placed a black piece behind the entire panel but while tedious to do I think the paper piecing gives a better look. I then took a scrap of sparkle paper, die cut the loops, from same die set, and added them to the bottom of the card front. Used a few gems to give some added punch and considered it finished.

The above slim line card was made using scraps, but in my opinion it wasn’t good enough to enter into a challenge so I set it aside and created the rose gold one. I found the gray cs was a bit dull so I tried to add some shimmer with perfect pearls and dislike the result. It looks better in reality than on the photo because the camera has picked up all the smudges and smears which are not so apparent in R.L. Birds are done with sparkle cs and really sparkle in R.L.

Circles with Blossom

CAS Game #167 – One Layer + optional twist Inspired By The Graphic

This is my initial attempt at using Perfect Pearls and Versamark ink on a card. I had hoped that when I stamped the next images they would lift off the powder and leave a ghost impression but it didn’t quite work. Nevertheless I like how it turned out for the most part. I used the blossom stamp from GKD’s set Birds and Blossoms and the same butterfly as on my previous post. I also used glossy paper for this card which made stamping a bit more challenging. Hopefully it will dry properly and not smear. I’ve never tried doing this before so it is good first effort in my mind.