Back in Vogue

Spring Has Sprung

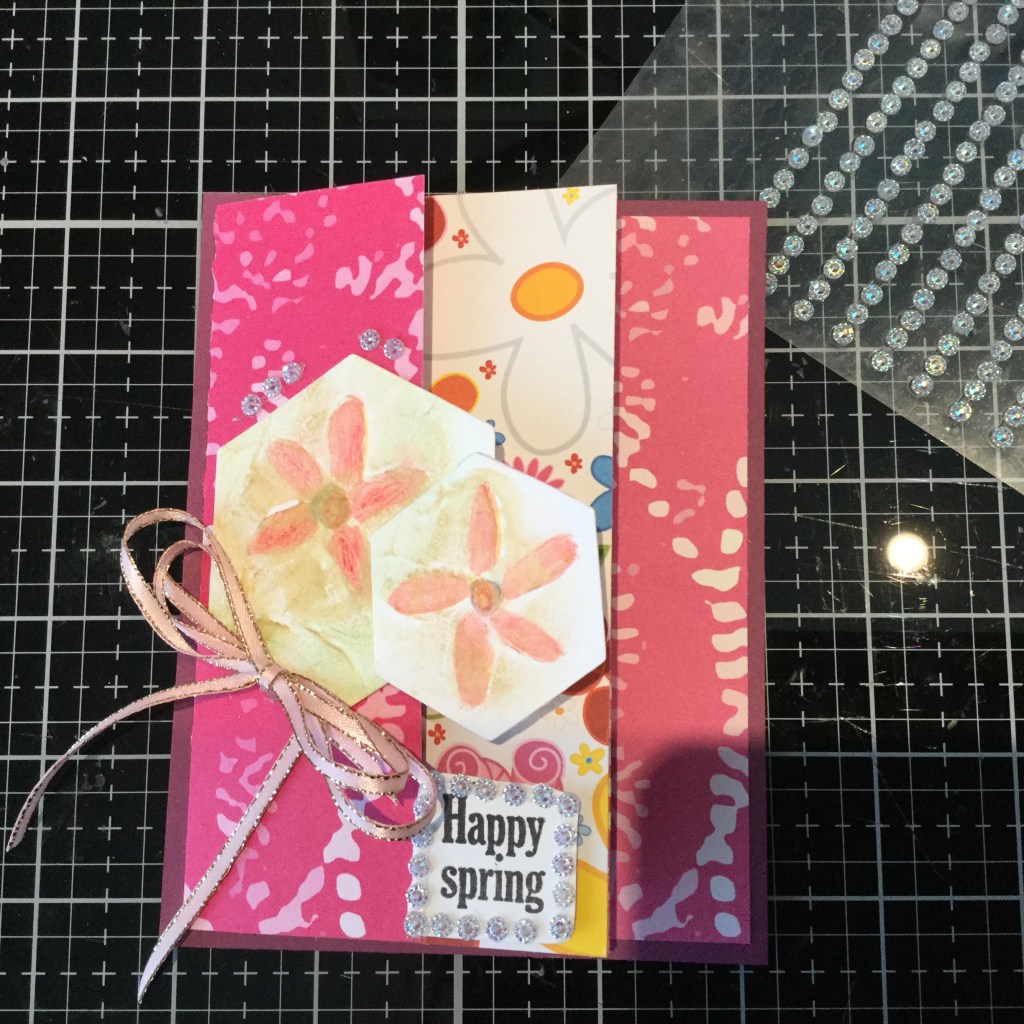
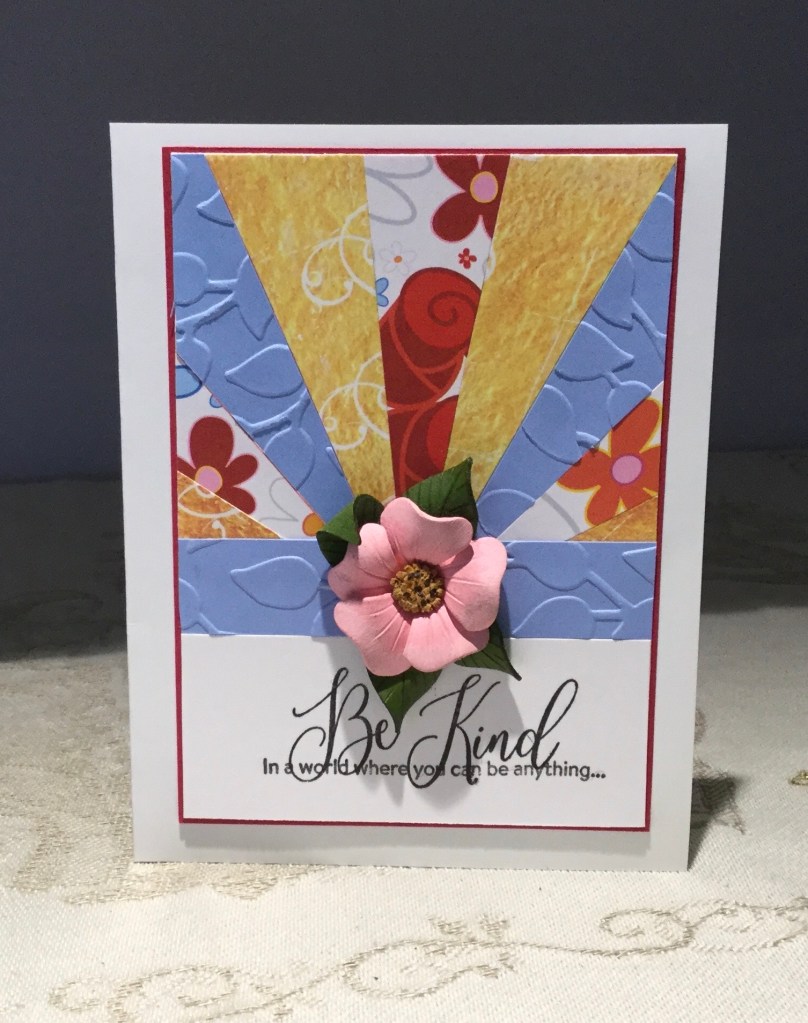
These sunburst type cards were in vogue for a while and then disappeared. I never made many of them but do like the look and recently I noticed a StampinUp DT mentioned they are coming back. Anyway I decided to make one using some pp that I keep storing. I got this package a long time at Costco of all places. I matched up a couple of the colours in the floral pp and dry embossed the plain blue one for texture. After mounting it onto a red border and adding it all to the card front I stamped the sentiments (from SSS) deliberately over stamping the tiny words to the bigger ones. I’ve had the pink flower forever. It came as a pin and I removed the back but didn’t find a use for the flower until now. Maybe it isn’t specifically a spring card but I like the bright colours which mean spring to me.

Smile Hugs

I have no banner stamps at all so I have handmade a few so I could enter this challenge at Double D.

Banners Challenge

I vaguely remembered someone using washi tape to make some banners so decided to give it a try. After getting a bit of twine I folded different types of washi tape over it and then cut them into the shape. Managed to cut the twine in the wrong place but on the smaller bit it was just enough to add to here. Using another of my recent watercolour pieces I stenciled in the sun shape and added the leftover die cut word. Added the Divinity Design image that I hand coloured with distress inks and gave dimension to by cutting several and gluing together. Sentiment is from same set. Still have some banners left over so may do something with those and enter again and I just found a napkin piece that I had glittered from a Christmas napkin so I am thinking of using those and doing an early Christmas card.

Hoppy Spring

I did one card yesterday for the Sweet Stampin challenge and this card from today should also fit the challenge at the Sisterhood of crafters challenge.

Make Your Own Background
SPRING

I was playing with some backgrounds yesterday and again this morning and had a piece of watercolour paper already partly inked with some left over inks on my mat. Decided to add to it with other inks and this is the result. After cutting this piece off I took a moon stencil and sponged in the moon shape. Added some shine to it with a dauber. Then I stamped some gold stars all over background. While it was drying I stamped and coloured the bunny from a set called Spring Fling by GKD and when it was dry I cut a tiny slit so I could tuck the fussy cut image into the slit. Using same set I stamped a line of sentiment added some gold along the edges and glued as shown. Still have some watercolour pieces to play with so hopefully will come up other cards soon. Hubby likes this and has borrowed my other bits to take some photos for himself.

Something Cute

For making this card I decided to use a cute image and also I made my own background so it would also fit the challenge at Sweet Stampin too.

SSC227
Make Your Own Background

I decided that the navy could be represented using a card base and some of the colours could be used to make my own background. Using a template that has thin cutouts and inks, tattered rose, wild honey and twisted citron I sponged through to make the stripes. This gave me my background which I glued to card base. Taking a SSS set called Lifting Hearts that came with dies, I inked the hearts on the side and added the strings in green. I then used the mouse stamp and coloured it with the same inks but intensified the green in the balloon a little to make it stand out. I die cut this piece and several others out of scrap card stock and glued them all together to create dimension. Saw this on Jennifer McGuires post and it sure is nicer than pop dots or foam tape and is a great way to use up scraps too. These colours remind me of spring, but the image does as well because balloons are fun and all critters are active after a long winter. Using a copper gelly roll pen I added a bit of sparkle to the heart balloons and also to the package. Added some shimmer to the balloon as well.

Recipe for Whimsey

As one can see the recipe calls for five items and like my stamping buddy Gayle, I made a list and checked them off as I put things ready.

Challenge #222 – Recipe for Whimsy

The first thing I did after deciding I wanted to use a small poppy stamp (by GKD) gifted to me by another stamping buddy, was search for some pp on line. I knew I didn’t have anything like this in my stash. I found the image and printed it out. I laid some scortape across the card front and glued red ribbon on top. I then added the pp over which I added the lower, wider ribbon border. Wanted thin at the top and wider at the base. So I now had two of the required elements. My stamped image are obviously the flowers and I stamped them, then clear embossed before adding colour using Inktense pencils. The left over piece of ribbon became the bow. The die cut is the rectangle and it was cut with a nesting set probably by Spellbinders but I forgot to keep the label for these. Don’t use them often so can no longer remember who made them. The last element was something shiny and I went with red sequins. I thought I might make a heart or something similar but the sequins work the best to my eyes. Sentiment is from the poppy stamp set. I like how the reds all work together even though they are different.

E for Embossed x 2

In thinking about this challenge last night I decided that embossing would be the way forward for me. Then this morning I noticed that Global Design has a sketch challenge and I wondered if I could create a card to fit both challenges … I could and I did.

#498
GDP#234

In keeping with the JAI challenge I dry embossed a ‘Crafts Too’ cherry blossom folder on some mirrored cs and repeated that on the card base. I lightly swiped spun sugar ink over the card base for a hint of pink. Then to meet the GDP sketch I cut out the banner from the mirrored piece and glued to card front trying to keep the design consistent across the card. After going through my stamp sets I pulled out one that I vaguely remembered I had and found a stamp for cherry blossom. Stamp from a GKD set called Vogue Vases 2. Using my misti I stamped the image in hickory Smoke and heat embossed clear. That allowed me to use my Inktense pencils to add colour without smearing. Using an oval die I cut my shape added some foam tape and popped onto card front. Initially I forgot to add colour to the edge of the oval so I carefully did that even though already glued down. Taking a sentiment from the same set I stamped in pink and added some pink powder to heat set. Cut that down to correct size and popped up at the bottom. Felt some bling was required so added 3 gems. It isn’t a complicated card and I am really happy with it.

Spring Time

The photo reminded me of a Penny Black stamp called Winter Trails that I thought would be a perfect background for this card so I pulled it out.

Photo Week

Using my Misti and some Versa Fine ink in lavender I stamped the background image. I added clear powder and heat embossed. When it was cool I added various inks to create a sky and some background fields. Because I had let the stamp float off the edge of cs so that the snowy footprints wouldn’t show up. Once I had polished off the inks from the image I cut it down and added it to the card front. Taking my tulip die from Holland I cut out the tulips, once in green and once in pink. I glued the pink flowers over the top of the green and cut away all the rest. Using a pencil and some water I added some definition to the flowers. Added some pop dots behind some and glued the rest flat to the scene piece. To get the illusion of more tulips I took a couple of gel pens and added dots in the background. Not sure I should have done this but too late now. I’ll add a sentiment when I decide for what occasion it will be used.

Fun Fold …

The Paper Players has a Tic-Tac-Toe challenge. I chose the first line and made my card using that theme, ribbon, rhinestones and PP.

PP484

I had just seen a fun fold variation that I liked so decided to try it out. First I chose the PP and cut it to size and then scored as instructed. I added this piece to the card base. After dry embossing some 3D folders I cut some of results out using a crafters companion hexagonal shape. I used pencils to add some colour but wasn’t happy so I ended up using some Inka Gold paste over the top. I liked this better. After gluing the shapes together and then adding them to the front fold I also added some ribbon on an angle. Placed a few rhinestones at the top of the shape. Stamped the sentiment and surrounded it with rhinestones and then glued to 2nd fold. The last fold has a blank sheet for adding a personal message and I added another small cut out from the 3D embossed piece here. The flower strip down the 2nd fold is part of the PP.

Tulip Time

Decided to do a Dutch theme for this colour challenge as I had the digi stamp on my desk and had already fussy cut it but hadn’t used it yet.

GDP#233

First I dry embossed the pink piece and cut it to fit the card front. I also swiped some pink distress ink across it very gently to add more definition. Glued to CF. After colouring the digi image and adding foam tape to the back I added the sentiment (from GD) to make it look as if she was holding it. Tucked a tiny flower into her hand as well. Before adhering I realized it still needed something so I search for an image of a windmill, put it into my graphics program so I could fade it out somewhat and then added that to the center. Now I added the main focal piece on top. Added a shadow with a gray copic marker. I didn’t really plan this card but let it evolve as I went along.

Really Bold

I love the bold colours of this challenge and while watching a program last night I guess I was thinking about how to make a card. The program was one that had knights and jousting in it and I noticed one of the standards had this blocked background. Decided to try doing something similar for my card.

Colour Week #528

I am not very good at numbers so dividing this card into the correct size blocks was my biggest challenge. In the end I kind of eyeballed it and while not perfect it works. Using some masking I inked each rectangle with two of the challenge colours. Then I stamped the basket and the eggs from a GKD set called Springtime Baskets, on a scrap piece and coloured using my Inktense pencils. I fussy cut this out and added foam tape to the back. Cut a scalloped circle in black and popped the image on top. The sentiment came from the same stamp set and I used this one so if I want to use it as a birthday card I can. I also added some sparkle to the eggs but that doesn’t photograph well. Well I managed to miss the challenge timing, unfortunately so I’m sad.