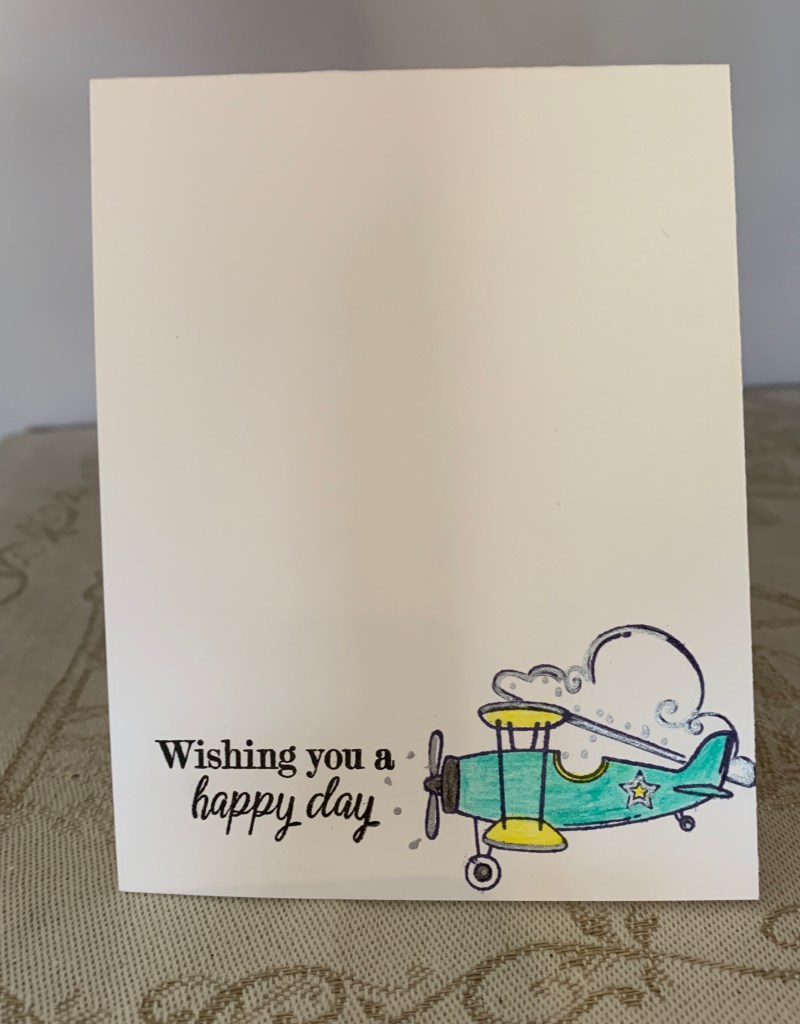
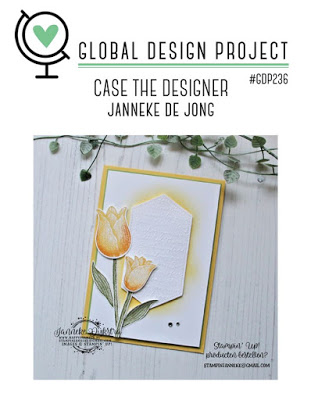
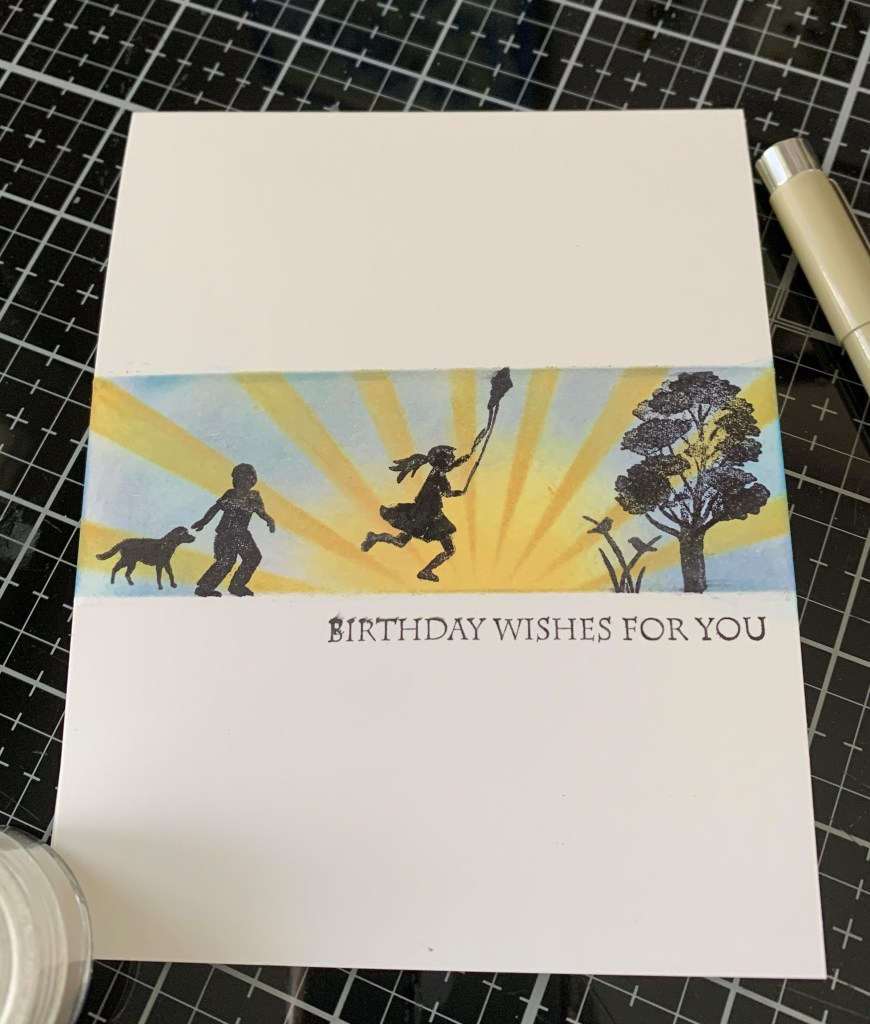
Recipe for Whimsey

As one can see the recipe calls for five items and like my stamping buddy Gayle, I made a list and checked them off as I put things ready.

Challenge #222 – Recipe for Whimsy

The first thing I did after deciding I wanted to use a small poppy stamp (by GKD) gifted to me by another stamping buddy, was search for some pp on line. I knew I didn’t have anything like this in my stash. I found the image and printed it out. I laid some scortape across the card front and glued red ribbon on top. I then added the pp over which I added the lower, wider ribbon border. Wanted thin at the top and wider at the base. So I now had two of the required elements. My stamped image are obviously the flowers and I stamped them, then clear embossed before adding colour using Inktense pencils. The left over piece of ribbon became the bow. The die cut is the rectangle and it was cut with a nesting set probably by Spellbinders but I forgot to keep the label for these. Don’t use them often so can no longer remember who made them. The last element was something shiny and I went with red sequins. I thought I might make a heart or something similar but the sequins work the best to my eyes. Sentiment is from the poppy stamp set. I like how the reds all work together even though they are different.

E for Embossed x 2

In thinking about this challenge last night I decided that embossing would be the way forward for me. Then this morning I noticed that Global Design has a sketch challenge and I wondered if I could create a card to fit both challenges … I could and I did.

#498
GDP#234

In keeping with the JAI challenge I dry embossed a ‘Crafts Too’ cherry blossom folder on some mirrored cs and repeated that on the card base. I lightly swiped spun sugar ink over the card base for a hint of pink. Then to meet the GDP sketch I cut out the banner from the mirrored piece and glued to card front trying to keep the design consistent across the card. After going through my stamp sets I pulled out one that I vaguely remembered I had and found a stamp for cherry blossom. Stamp from a GKD set called Vogue Vases 2. Using my misti I stamped the image in hickory Smoke and heat embossed clear. That allowed me to use my Inktense pencils to add colour without smearing. Using an oval die I cut my shape added some foam tape and popped onto card front. Initially I forgot to add colour to the edge of the oval so I carefully did that even though already glued down. Taking a sentiment from the same set I stamped in pink and added some pink powder to heat set. Cut that down to correct size and popped up at the bottom. Felt some bling was required so added 3 gems. It isn’t a complicated card and I am really happy with it.

Spring Time

The photo reminded me of a Penny Black stamp called Winter Trails that I thought would be a perfect background for this card so I pulled it out.

Photo Week

Using my Misti and some Versa Fine ink in lavender I stamped the background image. I added clear powder and heat embossed. When it was cool I added various inks to create a sky and some background fields. Because I had let the stamp float off the edge of cs so that the snowy footprints wouldn’t show up. Once I had polished off the inks from the image I cut it down and added it to the card front. Taking my tulip die from Holland I cut out the tulips, once in green and once in pink. I glued the pink flowers over the top of the green and cut away all the rest. Using a pencil and some water I added some definition to the flowers. Added some pop dots behind some and glued the rest flat to the scene piece. To get the illusion of more tulips I took a couple of gel pens and added dots in the background. Not sure I should have done this but too late now. I’ll add a sentiment when I decide for what occasion it will be used.

Fun Fold …

The Paper Players has a Tic-Tac-Toe challenge. I chose the first line and made my card using that theme, ribbon, rhinestones and PP.

PP484

I had just seen a fun fold variation that I liked so decided to try it out. First I chose the PP and cut it to size and then scored as instructed. I added this piece to the card base. After dry embossing some 3D folders I cut some of results out using a crafters companion hexagonal shape. I used pencils to add some colour but wasn’t happy so I ended up using some Inka Gold paste over the top. I liked this better. After gluing the shapes together and then adding them to the front fold I also added some ribbon on an angle. Placed a few rhinestones at the top of the shape. Stamped the sentiment and surrounded it with rhinestones and then glued to 2nd fold. The last fold has a blank sheet for adding a personal message and I added another small cut out from the 3D embossed piece here. The flower strip down the 2nd fold is part of the PP.

Tulip Time

Decided to do a Dutch theme for this colour challenge as I had the digi stamp on my desk and had already fussy cut it but hadn’t used it yet.

GDP#233

First I dry embossed the pink piece and cut it to fit the card front. I also swiped some pink distress ink across it very gently to add more definition. Glued to CF. After colouring the digi image and adding foam tape to the back I added the sentiment (from GD) to make it look as if she was holding it. Tucked a tiny flower into her hand as well. Before adhering I realized it still needed something so I search for an image of a windmill, put it into my graphics program so I could fade it out somewhat and then added that to the center. Now I added the main focal piece on top. Added a shadow with a gray copic marker. I didn’t really plan this card but let it evolve as I went along.

Really Bold

I love the bold colours of this challenge and while watching a program last night I guess I was thinking about how to make a card. The program was one that had knights and jousting in it and I noticed one of the standards had this blocked background. Decided to try doing something similar for my card.

Colour Week #528

I am not very good at numbers so dividing this card into the correct size blocks was my biggest challenge. In the end I kind of eyeballed it and while not perfect it works. Using some masking I inked each rectangle with two of the challenge colours. Then I stamped the basket and the eggs from a GKD set called Springtime Baskets, on a scrap piece and coloured using my Inktense pencils. I fussy cut this out and added foam tape to the back. Cut a scalloped circle in black and popped the image on top. The sentiment came from the same stamp set and I used this one so if I want to use it as a birthday card I can. I also added some sparkle to the eggs but that doesn’t photograph well. Well I managed to miss the challenge timing, unfortunately so I’m sad.

Love in Spring

This card has been created for the Paper Players sketch challenge.

PP483http://thepaperplayers.blogspot.com/

It is the only card I’ve had time to make this week. Started with the background using a star stencil from stampinbuddy Bonnie. Pounced versamark through the stencil and heat set clear on top for the resist technique. Added a few star stamp images here and there and then sponged distress oxides on the top until happy with sky. Added perfect pearls for some shimmer and then cut this piece down. Added to a pale blue scrap piece for a thin border. Added this to the card front. I used some strips from StampinUp to get the sketch lines. And then added the (any shape) sentiment on top. After stamping the tower and the lovers in versamark I heat set them both in black and fussy cut. Used my Inktense pencils for colouring the lovers. Thought this would make a nice anniversary card for us later in the year.

The reason I was playing with star backgrounds was by the request of my hubby. He required something like this for his photography so I played around with several ideas and he was able to create the photograph he had in his head. I took part of one to create this card.

Windmill Greetings

Using my new stamp from a craft store in Holland, I created this card. I think it fits the Just Add Ink challenge so I am entering it for that.

#497

A while ago I deconstructed a store bought card that my hubby received because I like the striped background. Using a stitched frame die I cut the two pieces and adhered them to a card front. I stamped the windmill, coloured it very lightly and fussy cut it out. Popped it up on top and added a SSS smile die cut to the top portion. It still needed something so I added the clogs, also fussy cut and a small flower sticker to the side.

Smile

Decided to try for this challenge and had fun coming up with my effort …

Challenge #7 – Die Cuts
Challenge #180 – Circle

One of my stamping buddies makes absolutely gorgeous CAS cards and I decided to emulate her style. For this card I used 3 die cuts, the Sketchy Rings from Memory box, a feather die by Simon Says and the matching die for the bird from GKD set called Happy Spring. I also use 2 sentiment stamps from an older set by SSS.

After stamping the bird I coloured him with my inktense pencils and a Sakura pen to enhance the edges of the wing and breast. Then I die cut him. Die cut the other elements and glued them as shown. Added the bird. I curved the small sentiment to follow the curve of the ring and stamped then I did the same with the bigger stamp. I’m pretty happy with the result even if I do say so myself. It is an ‘any occasion’ card too.

Pear Shaped

When playing yesterday I made a 2nd card that works for this challenge.

CAS Game #161

Using a StampinUp set that I’ve had a long time but hardly inked I stamped the pear using distress ink Shabby Shutters. I then stamped the stem and the two leaves. I added a small amount of pink to create a blush on the pear. Stamped the sentiment, from same set, and proceeded to doing some spatter. At first no matter what I did the spatter simply wouldn’t happen and in frustration I hit the brush much harder than I intended. You can imagine my shock when the spatter did what you see in the photo. I was about to cry and throw it all away when I realized that it was fine. The larger amount of pink looks like juice dripping down and having it within the sentiment makes it work. So I let it dry, decided I like it and here we are. A happy accident and another card I quite like.