Thanks

PP566 – A Theme Challenge from Claire

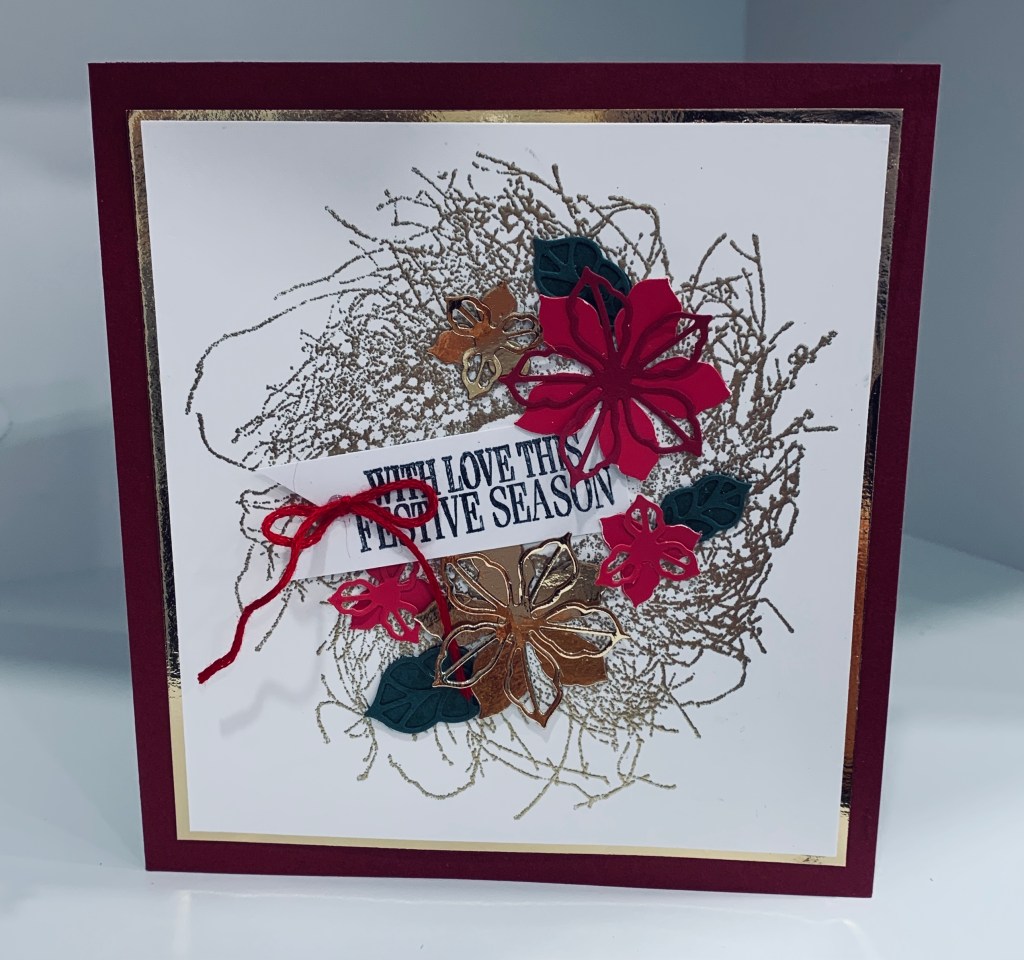
For this challenge I decided to use my last inked background piece and some curvy mixed border dies. I think these are Spellbinders but can’t remember for sure. I had the gold frame left over from a previous project and added it to the card front. Then I looked through my PP until I found one I liked as a background. Added this layer and then cut the inked piece to go on top. Using some dies from Concord & 9th that came with a turnabout stamp set I die cut the word letters out of gold CS then glued them in the space between the curved pieces. From the same set I die cut a few leaves from some copper metallic CS as well as a scrap of brown CS and also some circles using 2 sizes of hole punch. I glued the brown and copper leaves together and added them and used the small circles to add a bit of interest and embellishment. Hubby liked this one a lot.

A Forest Christmas

www.asyouseeitchallenge.com/ & A Walk In The woods Challenge

It is always great when I can get one card to work for two challenges. Double D wanted a walk in the woods and my trees and deer fit well for this. And the As You See It, want us to fill in the blanks about what Christmas means to me. Where to start with the explanation is more challenging than making a card. So many things sum up Christmas for me. Family and friends rank way high on my list as do memories. We have no children and no family living close enough to visit for holiday celebrations and I honestly cannot remember our last family Christmas. In a way it has become the same with friends as the people closest to us in spirit live too far away for short visits. Memories become important in this situation. As well, we have a small tradition where, when we traveled a lot, we always made sure to buy one Christmas ornament that represented that holiday so I call our tree a memory tree. Many ornaments have a big memory attached to them and putting up the tree is a trip down memory lane for both of us. Celebrating Christmas in our new home this year is exciting and I’m happy to say that we shall have guests for the holiday.

My card used a leftover border circle that was from a long ago project, some dies from creative Expressions and a LawnFawn stamp set. Sentiment is from a very old Hot of the Press stamp set. I added a few sequin stars and a little sparkle to some of the trees and used a Sakura glaze pen on the deer eyes, nose and tail. He was coloured using Inktense pencils. I love this little deer as he is so cute.

Ribbon, Pattern Paper and Embellishments

Tic-Tac-Toe

I had various scraps on my desk and I used one piece and some gold CS to begin this card. PP is from a Reminisce paper pack, Gold CS is Recollections, ribbon and sequins from my stash and the stamp used for the tree is from Noel Mouse by GKD. Sentiment is 2 stamps from Divinity Designs. After putting the panel together I added it to the card front and then added the tree with the sentiment behind it. Heat embossed tree and sentiment and used glitter pens to add some colour. Added the ribbon at the bottom and edged it with a bit more gold. I tried to keep this card quite simple. Made a second card with the other scraps. Similar but different.

Santa on this one is from a store bought card from last years collection. Too cute to throw away and he works on this card quite well.

Leaf Dreams

Color Hues #29- Brown and Orange, Just Us Girls Challenge #608 – Wild Card Week,

With one challenge calling for Orange and Brown and another for leaves I was able to make one card to fit both challenges. Always enjoy being able to do that. Using Distress Oxides in Carved Pumpkin, Gathered Twigs and Brushed Corduroy, I first brushed and sponged the inks onto some scrap CS. After spritzing it and drying it I then ran it through with a leaf pattern folder which I cut down to the size I needed. Mounted this piece onto a white CS to get a thin border and added all of this to a Warm cocoa card front by GKD. I found one of my leaf dies (again unable to attribute to a particular company) and cut the leaf branch from the left over inked piece. Then I highlighted this with a bit of Inka Gold so it had more depth. On another scrap piece I used a sentiment from ‘Bird Friends, The Cat’s Pajamas’, and cut this to size before using a glitter pen around the edges. I added one extra leaf on the sentiment piece to finish the card.

Baby it’s Cold Outside

Sketch Challenge

For this card I really had to think hard on how to get the background piece as I don’t have any large background dies that have a patterned edge. For the penguins, Santa hat and the flourish I used 3 different stamp sets, one by LawnFawn, one Hero Arts and the last by the Cat’s Pajama’s. Sentiment came from the latter set. I wanted the card to look cold and found the PP among my Reminisce stash from last year. I got clever with the background layer as I have a small die set that I believe is from either Spellbinders or Sissix that I purchased in a discount sale. At the time I didn’t know enough to keep the packaging name so cannot attribute some of my items for this reason. Anyway the largest die is a square with the scalloped edging and to make this fit the card front I cut 2 and played a little to get them to fit together seamlessly. It worked like a charm and I am thrilled with the result. With the layered piece on top you would never know that the background is 2 pieces. I also got the look I was going for, as to me this looks cold.

The image panel was done using the flourish stamp and Speckled Egg ink which I heat embossed clear. Then I added the other inks over the top. Spritzed it a little and once dry it was ready to add the penguins and sentiment. The images were coloured using some Sakura pens and InkTense pencils and I used a glitter pen over the sentiment as well. Finally I added a few sparkly snowflake sequins.

Poinsettia Wreath

https://shoppingourstash.blogspot.com/

I think this is the first time I’ve entered into this particular challenge and this card is another one I needed to fix due to poor stamping. Using my Penny Black Wreath stamp I heat embossed it after stamping. Unfortunately I didn’t realize I hadn’t gotten a good impression so the end result wasn’t great. I left it for a day or two knowing that if I gave myself time I would come up with a way to use it. I had the small poinsettia dies (by Sue Wilson) out along with some scraps of gold and red papers so I cut them as well as a few leaves and placed them as you see on the card. Then I used a sentiment stamp I’ve had for a while but not used before (from Paper Wishes or Hot off the Press I think) and added it by tucking it underneath some of the flowers. I added a small bow made using embroidery thread. After adding this panel to the gold I glued it all to the red card front. The red card stock is the same as the darker red on one of the flowers but it looks much darker in the photo than in R.L. If you had seen the wreath before I added the flowers you would likely have thrown it away, but as most of you know, I hate to throw things away and often find a way to use them. As this challenge is a flower challenge this card seemed perfect to enter.

Birch Trees Fixed

Fixing the error

I had stamped the birch trees a while back and cut them into the panels, but somehow managed to scratch one of the embossed pieces. I set them aside thinking I could fix it but at the time wasn’t in the right frame of mind to try. They sat on my desk until the other day when I had the idea of how to cover up the error. Using a small piece of scrap pp I die cut the birds using a very old die but one I can’t remember who by. I added them over the scratch on the left and used the last one for the panel on the right. Then I die cut the sentiment using some more scrap pp. I glued a single piece of pp behind the panels, added them on top and finished with the sentiment. To my mind it is a good save.

Snowflakes Galore

Challenge #261 – Clean and Fresh

As I was having some issues this morning with a couple of uploads to challenges, I went through all my saved blogs to see which ones used the same linking system so I could try with another blog. In the process I came across the As You See it Challenge and decided to make a card to enter. I like these colours and I had seen a Pinterest post that I wanted to try. This is my take on the card I viewed. Almost the same except different colours and different types of snowflakes. I started out with a silver card base to which I added the white panel. I had pre-stamped some snowflakes in two corners prior to attaching. Using a square punch I cut four squares from white CS and stamped the snowflakes in as close to the challenge colours as I could get with my inks. One or two were stamped using VersaMark which I then heat embossed in silver. Once I had popped up and attached the squares I added a couple of gems to the center of the larger snowflakes. It is an easy card to make but required several different stamp sets to find snowflakes that would work. Most are GKD but one set is from LawnFawn and another from Divinity Designs.

Going in Circles

http://sundaystamps.blogspot.com/

This card was made some time ago, but I didn’t post it thinking it might work for a challenge eventually. The Sunday Stamps challenge seems to be a good one to enter it into. The circles are all fallouts from a different project and instead of throwing them away I wondered if I could use them somehow. This card is the result. The background is dry embossed but I had trouble with my Big Shot and couldn’t get a solid impression so in reality one can see texture but on the photo it doesn’t truly show up. The sentiments come from a Reminisce package of PP and I mounted everything onto a navy CS. It may not follow the sketch exactly but I think it is close enough for the challenge. Hope so anyway.

Hooray, it’s Christmas

Just Us Girls Challenge #607 – Photo Week

So many talented DT’s on JUGs and I am once again trying my hand at their challenge. There are several stamp sets involved with this card, the little foxes, moon and clouds come from an MFT set, the banner has been cut from an image from the Stamping Village that after stamping, I cut from the rest, as I only wanted the Hooray, the gloves come from a GKD limited edition set I got from SSS. The word ‘it’s’ was created on the computer as my handwriting leaves a lot to be desired and the Christmas came from another set that is somewhere on my desk and can’t find at the moment. I fussy cut this out and went over it with a gold pen and I also fussy cut around the banner before popping it over the bow for the gloves. I stamped the little stars with a metallic ink and added a touch of sparkle to them with a pen. I die cut several of the foxes and glued them together, so I could add dimension without foam tape. I guess these colours are more like Autumn than Christmas but I quite like the end result.