Celebrate Love

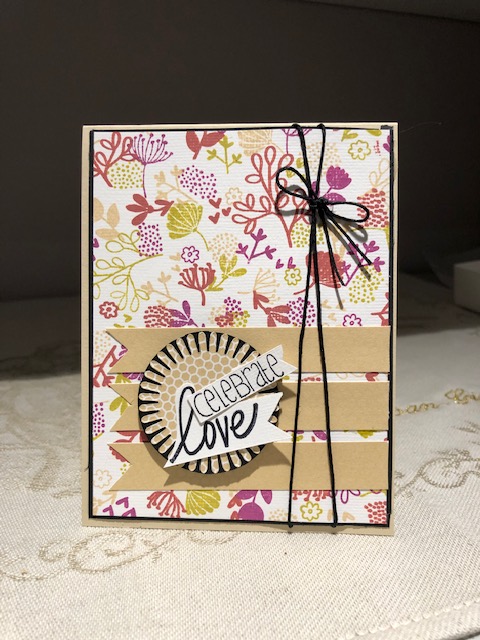
I think this card meets 3 challenges but it took a bit of thinking to make it work.

PP473 
Project 223 | Theme Challenge
SSC222 HAVE A BANNER OF A TIME!

I started with the colours at Paper Players and a Concord & 9th Turnabout stamp to get the background piece. After cutting it down a bit I added it to some black paper for a tiny border and then added the banner pieces and the twine. Adhered it to the card front. Used a circle die in black to put behind the fringe circle by Memory Box. Then I looked at adding the sentiment and couldn’t believe I had only one tiny stamp that said celebrate. This is from Simon Says and I also used the word love from another unnamed set that I had forgotten I had. Couldn’t think how to put them together initially as they were a bit big for the circle and then had the idea of making them into two banners as well. Now it fits the theme at Global Design and the banners at Sunday Stamps. As I have very little time getting one card to work for 3 challenges is a huge relief.

Birthday Balloons

Made for the Mod Squad challenge and just in time too.

Balloons challenge

Once again I used my layered happy birthday die set from Spellbinders only this time I used the entire set to cut out several layers. I also used 2 slightly bigger balloons from a Simon Says set I’ve had forever. After cutting all the pieces I layered them as shown. The balloon piece behind the sentiment has glossy accents on the balloons. I also used tiny pieces of foam to pop everything up so the layers would show. Photo doesn’t do it justice really as the layers don’t show as much here as they do in reality.

Welcome baby

Somehow balloons and a baby go together so even though I don’t need a baby card right now, I made one to keep in my stash for when I do.

Project 222 | Sketch Challenge
Challenge #352 – Colors

I thought this might fit the Mod Squad challenge as well however it isn’t a birthday but a birth so perhaps not. The other two challenges is what it was designed for. Started with the card base in one of the colours of the CAS challenge and then added one of the other colours on top. I added some PP to the base underneath first. I already had the circle die cut on my desk as I didn’t use it for the original project it was cut for. Added a bit of gold around the edges and then stamped the bunny in the center. Used versamark and a pink powder and heat set. Coloured with Prisma pencils. I die cut various balloons in different colours and arranged as shown. Added the strings using a gold pen. Stamp set is a GKD called Happy Spring and sentiment plus sun is from same set. Balloons cut with dies from a Spellbinders set called Layered Happy Birthday.

Hearts

Double Trouble challenge asks for embossing so this card fits the bill.

Challenge 47 – “Hot or Cold” 

The folder came with my Gemini and I loved the 3D effect that it gave. Using my new Ranger powder in lemon drop after I’d swiped the Versamark ink over the raised parts I heat set. I cut this piece down a bit but it is a larger card than I usually make. Decided to add some hearts on top and the sentiment is a GKD set called Grand Greetings. Figure this card could be for a wedding or engagement as I’m sure someone will be heading to the alter at some point this year. I decided that trying to make this card work for more parts of the challenge would ruin it so stopped at the first part.

new World

This card fits several challenges and seemed to take me ages to put together as I kept getting interrupted.

PP472
SSC221
Just us Girls

The Paper Players wanted something New, Sunday Stamps – Stay Neutral and Jugs was a theme Word Snowflakes. I’ve had the world die from Sissix for a long time but couldn’t use it a lot as it wouldn’t cut well on my Big Shot. On the Gemini it was a different story and it cut beautifully. I used one of the gray tones as close a match as possible to the Neutral colour challenge and adhered it another gray silvery piece and then onto black. With the white sentiment banner and the stamped sentiment I covered off 3 colours. Before gluing to the base I used a corner punch to round off the corners and punched small holes so I could add the snowflake brads at each corner. The banner was created on my computer as I didn’t have any sentiments that would work, so created my own, and didn’t have the right shaped banner die either. I fussy cut this out and popped it on top of the world. Added the winter sentiment because inside it says ‘It is snowing somewhere in the world right now’. I also added some iridescent gems to the center of the brads for a bit of bling. i’m really happy with how this one turned out.

Water Bubbles

One thing is certain, I am no water colourist and am now considering finding someone to teach me. That said this card isn’t a total dud and may grow on me.

CAS Watercolour
Stamp Act

I started by stamping the rising bubbles, by Designs by Ryn, with Amalgam Ink. On a separate piece I also stamped the Seahorse from a Gina K Designs stamp set. Added a few seaweed images with Distress oxides after I had used water colours to try to get a watery look. It looked awful but I refused to throw it away so ended up using a curved die to cut it down to what you see. This was much better so I adhered to a card front and then stamped the sentiment. I fussy cut the seahorse and popped him up. Sentiment from same set.

New Everything

Trying out various new things with this card. Had fun doing it.

New Things
Something New

The new stuff is as follows, 3D Embossing folder by Crafters Companion, Embossing powder from Ranger and a new Stamp set by Unity Stamp Company won in a recent challenge. Started off by stamping the images onto white cs in Versamark and then heat embossing in Gold. Added a bit of colour using Sakura pens. I had a very thin gold frame left from a project and decided to use it here. Cut the white card down to the size I wanted. My Christmas gift from Hubby was a Gemini, but it initially didn’t work due to a faulty switch. Managed to get it changed this morning so just had to try it out. Folder came with the machine so I embossed the card front and added a swipe of versamark and my new powder called Lemon Drop which I heat set. Added the image panel and a die cut word on top. The embossing powder has a lovely shimmer to it.

Self Created Pattern Paper

The Modsquad challenge is to create your own PP and Double D’s mood board is using a punch. I managed to do both with this card.

Patterned Paper
Punch

Taking a piece of the light blue background paper I used an old stamp set by CTMH and peacock blue Distress oxide ink. I randomly stamped several of the Paisley images over the paper. I found a scrap of the same colour as the ink card stock and punched the border with an old Martha Stewart punch. I glued that onto the white card base first and then added the rest. I added the focal piece to some gold CS to tie it to the sentiment embossing. From the same stamp set I stamped the sentiment and heat embossed with cosmic shimmer powder. I rounded the corners with a corner punch and popped it on top using a foam back. It is a very simple card but I like it a lot.

Gift Box

The DiesRus challenge is for anything Christmas and I needed a box for a card series I had made as a gift and decided to create one.

Anything Christmas

I had done 10 cards all different and many with layers so I needed a fairly decent size box and initially wasn’t sure how to go about it. A little bit of research and I found a link to a tutorial that I could follow: https://intatwynedesigns.co.uk/intatwynedesigns/?p=10157 . Very good explanations and measurements. I literally just followed along pausing while I did the cutting etc. I had also seen an idea for using my HeroArts kit found here – https://heroarts.com/blogs/hero-arts-blog/november-my-monthly-hero-countdown-idea-giveaway-1 and I incorporated that into my box. The box is the same on both sides so it took me quite a while to do. Die cutting panels, colouring them with Prisma pencils and adding the embellishments etc. over the past 2 days. I even die cut the pot bottoms in PP to make them look more realistic. For the sentiment on the roof section I used a word die I’ve forgotten the brand name of. The card set and envelopes fit perfectly inside and I’m really happy with the result.

Celebrate

Global Design is a CASE the designer challenge this week. I had some time and still had a few left over bits and pieces so used them to create this card.

Global Design Project 220 | CASE the Designer

Card base is white with some pp and washi tape added at the bottom. Using a left over piece of Distressed sprayed card I cut it into the shape similar to what is on the designers card. I popped it up and added the die cut word on top. I had the pine cone and one leaf left from a class project done late October and hadn’t used them yet so I popped both up at the bottom of the shaped piece. I added the little bird as he was also left over. Now I think all my scraps are completely used for the time being.