Trumpeted Wishes

Fabfri188

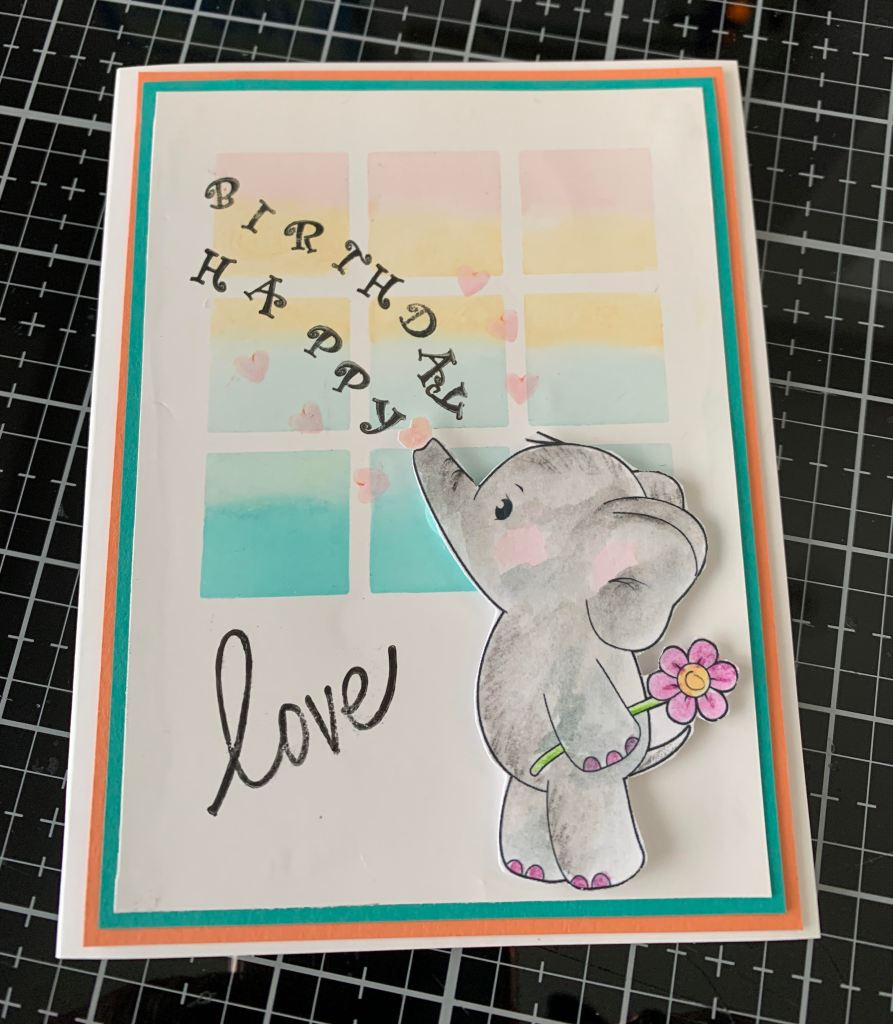
I had seen a card using an elephant to blow bubbles on Pinterest and the idea stayed with me enough to want to play with a version of my own. I matched the colours as close as possible bearing in mind that I don’t have any StampinUp inks. Thanks to a good friend I do have some of the card stock so was able to mat my effort with two of the colours accurately that way. My elephant is a free digi stamp that I resized, printed, hand coloured and fussy cut. I had made a stencil of the smallest window frame die I own and used that to create the background in the close matched colours. Then using a small alphabet stamp set from Hero Arts I stamped each letter to make the sentiment. I added a few pink hearts as well. In addition I stamped the word love at the bottom. Don’t know who made that small set, but think I got it at Michaels a long time ago.

Tropical Colours

SSC229 TROPICAL VIBES

When playing with the Madala card previously posted I realized that I could use these stamps for a 2nd entry for Sunday Stamps. I had also taken a look at a video at GKD on using this set, and I liked one of the cards Gina had posted. This is my CASE on her card with a little extra license. Instead of making it a square card I decided to keep it in my usual sizing. After figuring out which Distress Inks would work to get most of these colours I began stamping. I had some paper lace on my desk so I masked off that section before stamping the upper portion of the card. Then I stamped the circles leaving enough room for a fish as I thought the circles could be defined as bubbles. I stamped the fish from another GKD set and once all was dry (for once I was patient) I added some yellow to the fish. My brush still had a bit of the shimmery yellow on it so there is a slight shine to the fish that can’t be seen on a photo. Then I added the paper lace in two layers. Stamped the sentiment, layered it onto the yellow, then onto the blue card front and declared it finished.

Mandala

Project 237

The colour challenge at Global Design made me think about using the GKD Mandala set that I’ve had a while but never inked. I matched the colours as best as I can using Distress Oxides and proceeded to stamp using the smaller wreath builder template. I didn’t get my placement exactly right but decided not to begin again. I kind of like the fact that it isn’t perfectly stamped although subsequent ones will be better I’m sure. My hubby liked the design and stole the card so he could photograph it for his collection, which made me smile. After stamping the sentiment at the bottom, I matted the image piece with some navy cs and then put onto the card front.

Tropical Hibiscus

SSC229 TROPICAL VIBES
PP487

I liked the tropical theme at Sunday Stamps but have very few stamps that would work as a tropical idea. Decided to use a largish Hibiscus flower stamp that I got in Bermuda last year made by Card Craft Stamps and a corner stamp from GKD that has hibiscus too. I stamped both on 2 separate pieces of water colour cs as I knew I would be fussy cutting the larger flower. It had the word Bermuda with it and I didn’t want that part. I used Amalgam ink so I could water colour without bleeding. Then I proceeded to water colour initially using some Distress Inks but I eventually went over it all with my shimmery paints. The photo seems to have picked up the sheen of the paint as well as the glittery pen I used on the sentiment, but it looks paler than in R.L. The colours in the challenge are actually 5 and I think I’ve managed 4 of them. It has enough glitter to it to qualify for the Paper Players so it will be my 2nd entry there. I matted it and then added it to the card front. The sentiment is also GKD and I stamped it then cut it into pieces so I could stack it as shown. Once adhered I went over each word with a blue Sakura gelly roll glitter pen. My last card for today – I’ve been a busy bee – lol.

Dies, Stamps and Embossing

DRU Challenge #143 – Spring Flowers

I’ve made a few cards in a similar vein recently and this is the 2nd one I’m posting. I still haven’t posted the very 1st one, which is my personal fave, but it’ll be posted eventually. For this card I used a SSS set that is my current favourite set and after stamping, I die cut several of the leaves so I could stack them for dimension. I used Distress Oxides to colour in the leaves. As well I added perfect pearls to make them shimmer. The embossing was done using a Sissix thinlits set and run through the BigShot. I really like how this embossed part looks. I added some shimmer to the pink cs which made it darker but has a nice shine. Glued it to a plum punch card base. Did the sentiment and added some colour to top as it was too stark for the rest. Added a few gems to finish it. I’m glad I waited to post this as it works for the current DiesRus challenge.

Fur-Ever Friends

Just Us Girls #532 – Color Week

My inspiration for this card came about because I had this die on my desk and I was thinking I hadn’t used it in a long time. Cannot remember the company but I’ve had it for some time. I pulled out some navy paper and die cut it then adhered it to a copper/rust coloured card front. To add the colour brown I decided to use one of my Divinity Designs stamp sets and stamped the deer in Gathered Twigs Distress ink. After clear embossing it I watercoloured some Tea dye ink, stamped the sentiment in brown and then used a copper Sakura jelly roll pen around the edges, over the spots on the deer and eyes. In addition I lightly brushed a bit of colour over the white circle. As well I went over the sentiment in the copper. Added a bit of navy blue bling and glued circle to card front. I’m really glad I bought these Divinity Design cute stamp sets as I’ve used them a lot already.

Country Garden

DRU Challenge #143 – Spring Flowers

Using an old wooden block stamp by Stampendous I stamped the image. It was coloured using a combination of pencils and some shimmery watercolours. It also has a touch of glitter sparkle here and there. The die cut frames are from Paper Rose and is called Stitched rectangle frames. After I had die cut them I brushed some shabby shutter distress ink to take away the stark white. The smaller frame is several layers so there is a tiny bit of dimension to it. The image and the outer frame are flat. I had some left over pieces from an intricate border frame bought in Holland so I added those leaves to each bottom corner. Fussy cut the sentiment which is from GKD.

Gloss and Sparkle

PP487

I had made this card last week but didn’t post it at the time. The red border is very sparkly but I can’t make it show on the photo and I tried 3 times. The ladybugs also have glossy accents on them and there is sparkle around the butterflies too but no luck in making it show up on the photo so you will just have to take my word for it. I used a stamp set from GKD and distress oxide inks to stamp the images then I coloured the ladybugs using my Inktense pencils. Added the glossy accents for shine and dimension. I masked off the ladybugs so I could add the butterfly images before adding the glossy accents. It works for this challenge as it is CAS and sparkly.

Masking

https://perfectlycas.blogspot.com/

I masked off the top third of the card and then stamped the first image using my crazy bird stamp set by Tim Holtz. I masked him and stamped another one and did it again until I had them as shown. I then coloured in the original using a combination of pencils and Sakura pens. As I didn’t have a sentiment I decided to create my own in CorelDraw which I then attached across the top of the birds. There is a drop shadow in the sentiment.

Silhouettes

https://perfectlycas.blogspot.com/

I decided to try masking a small area and use a stencil and some sponging. Tried it twice as the first one the stencil moved. Used a Tim Holtz ray stencil in Distress Oxide Wild Honey and then used other inks over the whole thing to get a sky and a sunny glow. The little silhouettes came from a GKD set called Framescape simply spring. I stamped them along the edge. Added the sentiment from a very old rubber stamp set. I also embossed a line top and bottom. This has some shimmer as I went over it with some perfect pearl powder but the photo doesn’t pick it up. I shall have to do more practice with this idea as I don’t think I did a brilliant job. I have another idea so may try again next week.