Sunburst Easter

A while ago at a local Art exhibition I saw a gown made with purples, yellows and teals. I fell in love and from that moment have wanted to create a card with these colours. In checking the Just Us Girls Color Week challenge these colours fit perfectly.

Easter Greetings

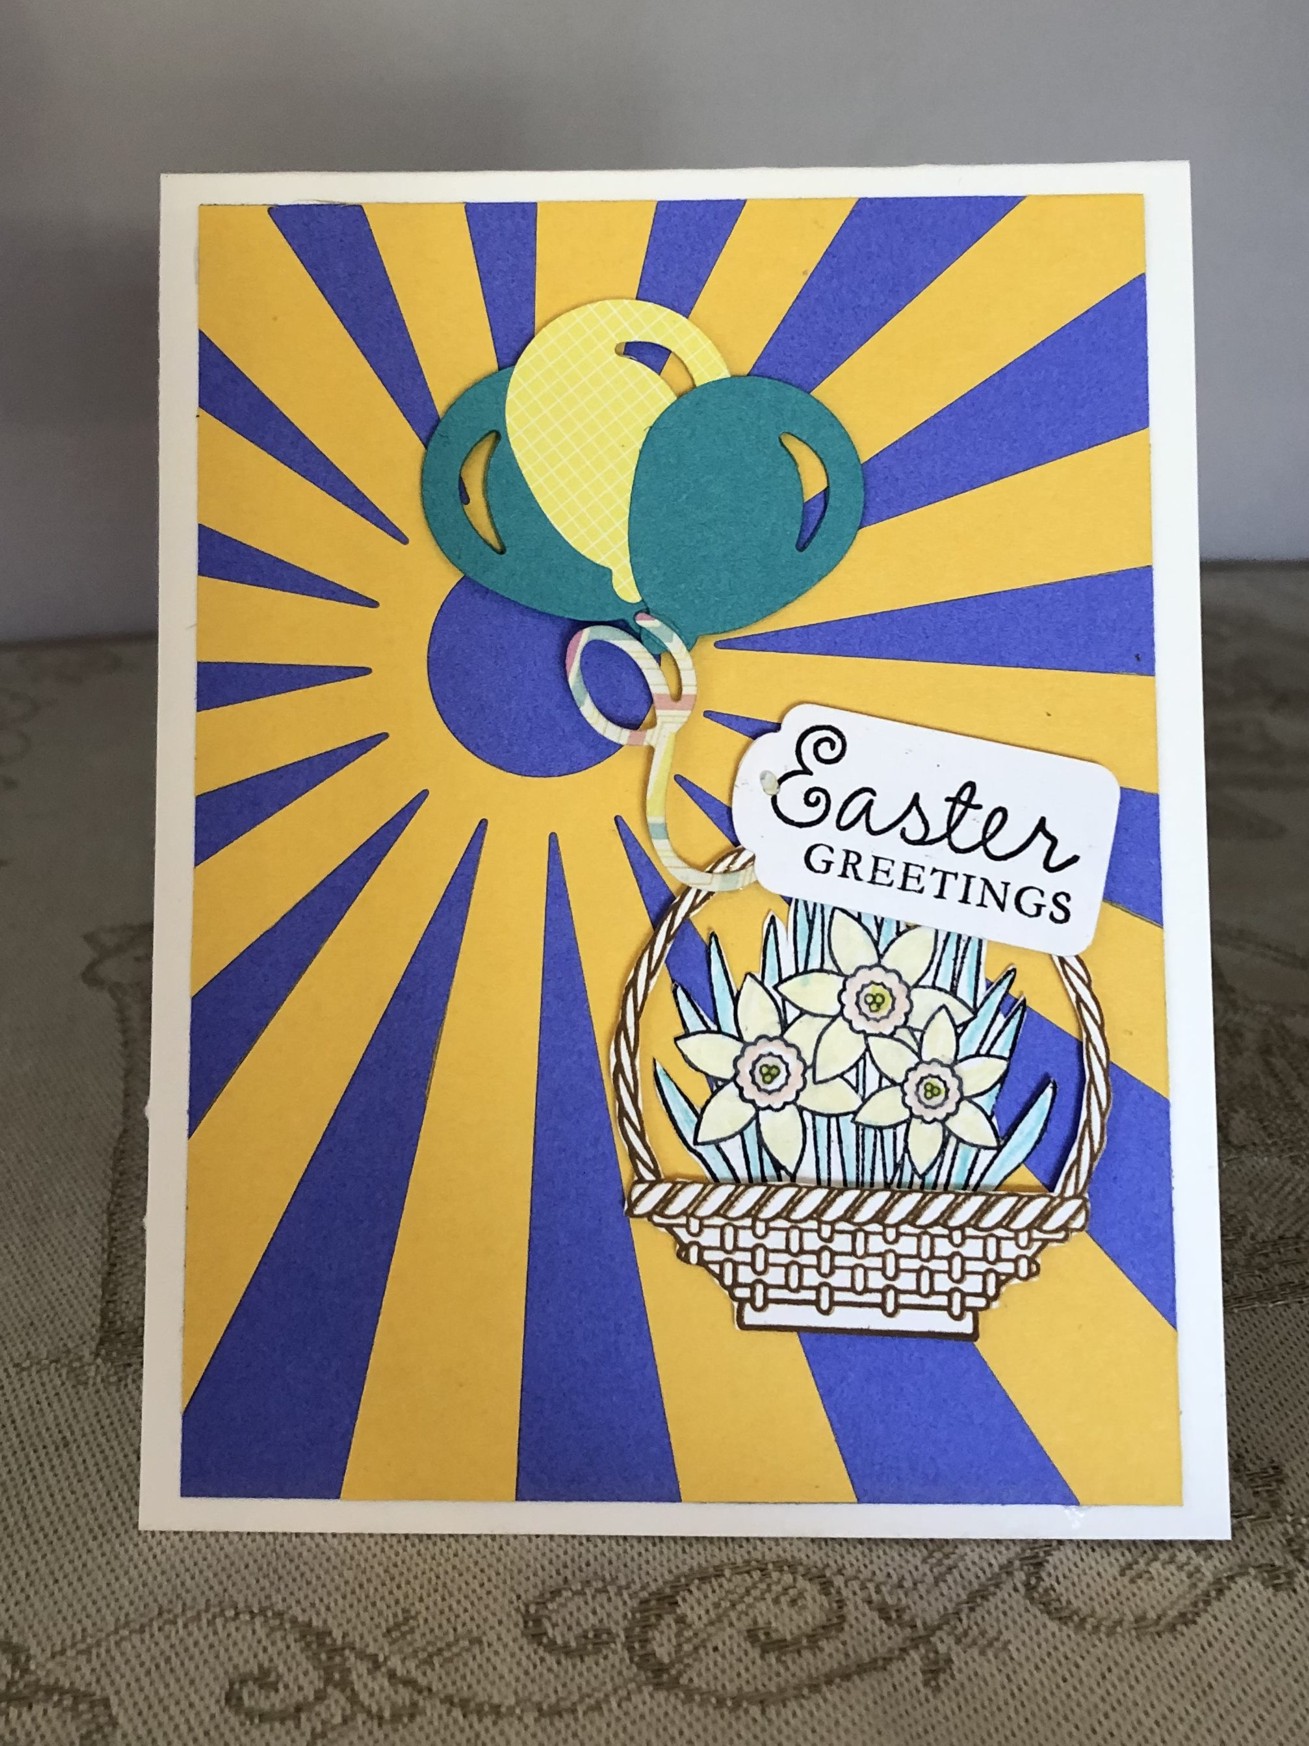
In addition to the Just Us Girls, this card also fits the Modsquad weekly challenge, http://modsquadchallenge.com/one-or-more-die-cut/. I took a piece of Wild Wisteria CS and after die cutting the sunburst in yellow using a Simon Says die called Sunshine I adhered the two pieces together. Trimmed it down a bit and added to white card front. I then took a Spellbinders die set called Layered happy birthday and cut out the balloons from some scrap pieces of teal and yellow CS. I added the paper cord and some dimensionals to pop them up. Using a GKD stamp set by Claire Brennan I stamped the basket and the daffodils, coloured and fussy cut them out and attached the handle to the end of the balloon string. Added the label, also a die cut, but who made these dies I’m not sure, because in the early days I never thought to keep names of products like I do now.

Stand Tall

Its funny how one finds a stamp not used for a while and then get an idea of how to use it on a second card. In my previous post I needed an extra image for my safari circles and couldn’t find anything that would work, then I remembered the flamingo set and dug it out. Didn’t want to be bothered with masking although I probably would have had a nicer result had I masked off the birds. Also the slightly less than crisp images are deliberate as I thought it gave the illusion of feathers.

Coy Looks

I coloured in the beak and eyes and added the darker wing on top. Mounted onto a navy CS and I drew a silver edge too. Then found the closest pink card base to adhere the whole panel to. Not made for any particular reason but more just to play without having to think too much.

Safari Greetings

Inspiration for this came from something seen on a walk I take with our dog and I wondered if I could create something similar in a card. This is my effort. The circle frames and side piece are from some leftover wrapping paper too small to use on anything else. Stamps are old wooden block ones I often forget to use with one clear stamp from a flamingo set.

Hello

The word dies were found on sale at Hobby Lobby when on vacation in Texas and the feather die cut was left on my desk from another project. Layout is as close to what I saw on my walk as I could get.

First Turnabout Card

Finally broke out my new turnabout tool kit and stamp from Concord & 9th and did some playing. Didn’t like my first try but this second one was much better so went with it. These turnabout stamps are addictive and now I’m keen to buy a few more stamps.

Better than Alright

I used various Distress Oxides here. I stamped the sentiment square and using dimensionals added it to the center. As well I die cut some leaves and added them tucked below the sentiment square. A few matching gems was all that was needed to make this card pop. I added the main panel with a foam pop up to a matching background piece and then adhered to card base.

Spring Tree Stencilled

Having not yet used this gifted stencil I decided it was time to do so. I used embossing gel and while it was still wet added vintage pearl EB powder on top. I then heat set this creating quite a lot of texture. Unfortunately the tree part didn’t really stand out so I brushed in some greens and a bit of brown.

Happy Spring

It still needed something more so I added the bling in green gems. I mounted this panel onto another stencilled starburst piece combined with some PP. To hide the seam I added some ribbon. Added the sentiment at the bottom. In retrospect I should have used coloured card stock for the stencilled piece as the tree would have stood out a lot more. I shall remember this when I next use it.

Easter Bunny

In an effort to do some acrylic block stamping I created the panel strip on this card front. I didn’t like the initial result so I added a bit more water and then sprinkled on some starburst powder which I liked a lot better. I stamped the bunny from a Simon Says set and coloured him in using a few copics.

Easter Bunny

I added the sentiment on the left and felt it needed something more so I stamped and coloured the carrots for the bunny. I tore up a scrap piece of PP and added the two strips to the back of the panel and then added this to the burnt orange paper. This was then added to the card front.

Musical Notes

The object of this card was first to use a stencil and then to make it musical so it fits 2 challenges. Made for a personal challenge over at Stamp Buddies and also for the Double D Challenge Let’s make some music, http://daranddiane.blogspot.com/ Obviously I started with the stencil piece first and in an experiment I used Gesso and mixed in a small amount of blue alcohol ink and some blue glitter I had left over and wanted to finish. At first I thought it wasn’t going to work so before it was dry I added a bit more glitter in both blue and gold. When it dried however I realized that the original mix was actually quite nice. I cut the panel down just a bit and chose a navy CS for the card base. Then I took an old wooden block music stamp and some vellum and stamped it in versamark ink which I heat set with fine black detail EB. I attached this to the stencilled panel and then adhered everything to the card base. The little bird came from the Happy Spring set by GKD and I used copic markers to add colour after which I fussy cut him out. I added him to the vellum using dimensionals to lift him up.

Musical Notes
Inside card

I also stamped the bird on the inside of the card using pencils to add colour and used the sentiment from the GKD Snowbirds Stamp and die bundle set.

Flower Layer Love

This began as an entry for this months Flower Power GKD challenge and evolved into an entry for the Modsquad http://modsquadchallenge.com/layered-looks/ this week as well. I began with a piece of sandy yellow cs and stamped the rays in Aged Mahogany Distress Oxide ink. While they were still wet I partially sprinkled some vintage pearl EB on top and heat set it. I added the white heart strip to the lower portion and then layered the rest on top. I used Lisa Hetricks (GKD) Today and Always stamp set for the other images which I stamped, coloured and fussy cut. I also used a Love word die that I cut out of some almost black thick paper. It was a bit harsh so I went over the word with one of my Sakura pens and while the ink was wet I added a tiny amount of a pink EB and heat set it.

Flower Layer Love

I used the ink pad to do the edges of the panel and also added some black for a border and added it all to the Plum Punch card base. It still needed something so I added some tiny purple gems to the background and also to the word. It is sparkly in reality but the photo doesn’t show it well.

Sparkly Feathers

Left over from another project I had the oval foam sparkly piece and wondered what to do with it. I also had die cut an intricate frame when trying out a die I hadn’t used found during my organization project. At the same time I rediscovered my feather dies so I cut a few out and brushed ink on them. They needed something extra so I dotted glue here and there and shook a bit of glitter on top. I added all of the above together, but still had no idea where I was going in my head. In the end I stamped feathers in different colours onto white CS stamping off each time to get a more faded look. I added this piece to some black paper and then added it to the Teal card.

Sparkly Feathers

Not sure how this card will be used but most likely for a masculine birthday as I never have enough masculine style cards. It isn’t one of my best creations but it isn’t a truly bad one so it will be given to someone for sure.

Sympathy

I like to have a few sympathy cards on hand as one never knows when one may be needed. The new die from Cheapodies and an Inspired by Stamping stamp set called Seaside that I’ve had for a while, but only used one or two stamps from, were calling me. After cutting the bulrush from a scrap piece of CS I took another piece of CS and brushed various distress oxides over it. Then I stamped the images on top and coloured them in. The beauty of distress oxides is that one can colour over the top or stamp in other colours and it works.

Sympathy

I used my Sakura gelly roll pens to colour in the dragonfly who comes from a GKD set. I did the edges of the panel with my liquid chrome pen. Wish they had this in gold but so far only seems available in silver. Assembled this onto the Wild Lilac card base.