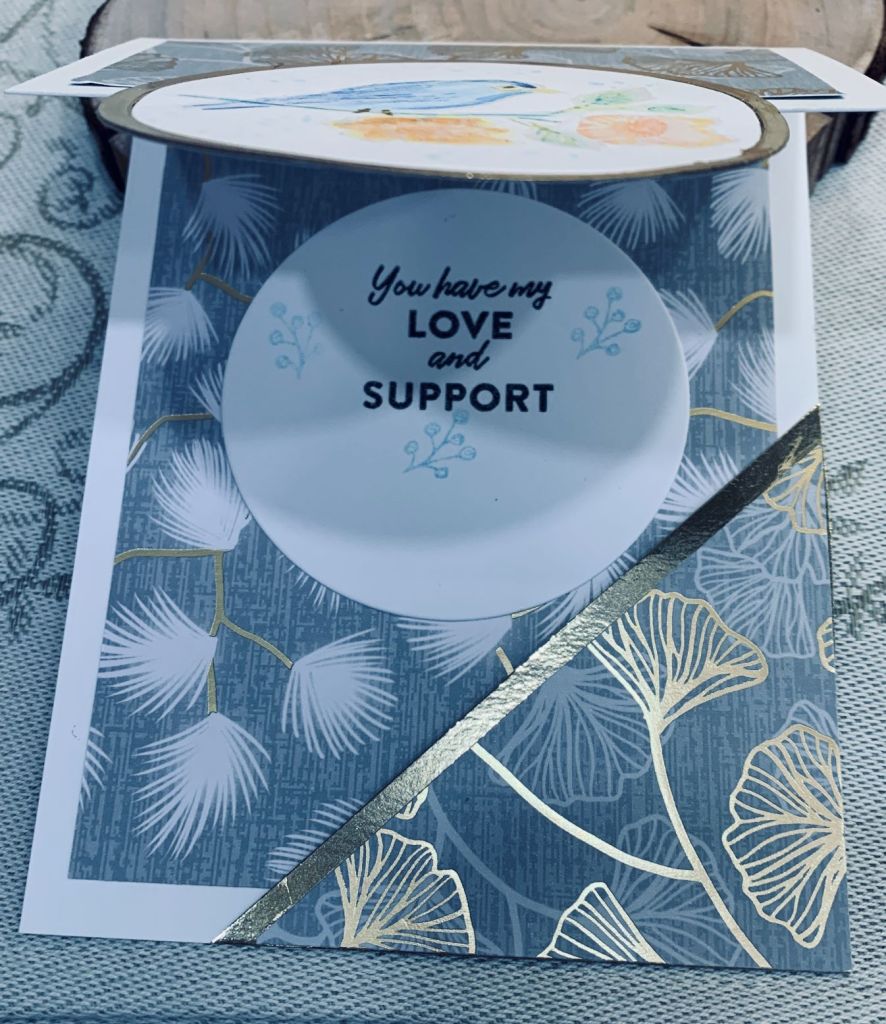
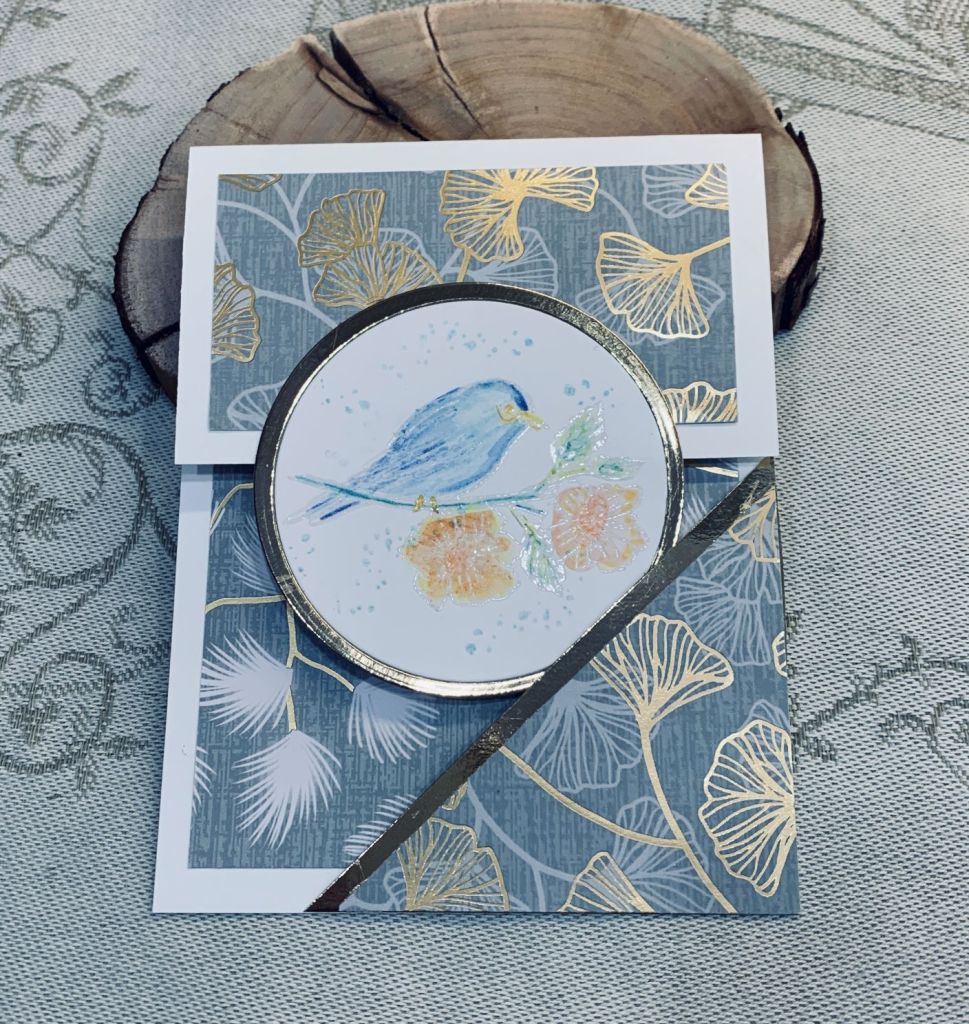
Monochromatic Scene

Basic Black

Having seen a card on Pinterest that used black on black I was intrigued enough to try my own version. In my case I used a new stamp from Nellies Choice, called Lake with Rowing Boat, whereas the one I saw used florals. Using Versamark ink I stamped it several times before heat embossing in clear. It needed more, so I inked it again with Black Soot and added black powder for heat embossing. This was better but I repeated it several more times before I was satisfied. And getting a good photo of a card like this needs more expertise than I have but hubby is too tired to help. The sentiment is from MFT I think – I’ve lost the label that I usually keep with my sets so I’m not sure. I stamped this with Versamark on a scrap piece of vellum and heat embossed in black. I used a corner punch to give it some shape and added the glue to the back where the words are in the hope that it doesn’t show. My hands are very shaky today, not sure why, but probably due to some neck issues I’ve had recently, so in spite of being careful a small amount of glue does show. If I try to pull it off I’ll spoil the whole card so decided to leave it alone. I wish the photo did it justice as it’s quite nice in reality.

This card is for the challenge at Colorful Options and I may make another if I have time. Thanks for looking.

Monday Already?

Caffeinated Christmas Card Challenge #13 – Snowflakes

When I first saw this stamp from The Rabbit Hole Designs, I knew I absolutely had to have it. It arrived just prior to Christmas and my design today is the first time using it. To me it is a perfect image for the Caffeinated challenge so I am uploading it there.

Intially I stamped the image onto a scrap piece of white CS using Hickory smoke as I wanted a softer outline. Then using pencils I coloured the image using a combination of water colour and some Prisma. I wanted the pencil lines to show on the bird body as it looks more like feathers so although I blended it out I used a very light touch to do so. I added a bit of silver sparkle in the feathers and eye although it doesn’t show in the photo. For the background I used a stencil from Warm Wishes and Iced spruce ink and then I added some sparkle in places using a Sakura glitter pen in silver. I also hand drew some curved lines to denote a snowy base. Once the focal image was coloured I carefully fussy cut it so it could be popped up onto the background. I’m not sure, but now wonder, if I should have used some Tumbled glass ink for the background, as the iced spruce came out darker than I thought it would. That said I still like the end result and it makes me smile as that ostrich is clearly still exhausted.

Thanks for stopping by and a Happy New Year to all.

A Birthday Tweet

Color Hues #55 Light Pink and Gold and New DT Members & #191 Something New

I’m supposed to be working on some year end paperwork, but as I hate doing it, instead, I created this card. It wasn’t my plan to begin creating just yet, but this idea popped into my mind because, as so often happens, a few scrap pieces got stuck on my desk and kind of created themselves into a pattern. So the diamond shape is left over from a long ago challenge and in my tidying up the other day, appeared on my desk and the matte gold strips were also on my desk from an earlier project. They looked interesting going across the shaped piece so I glued them on. Then I had a flash of adding the pink and as I already had the tiny masking strips I added them and then added the pink using Distress ink spun sugar. The little bird and foliage is a new set I’ve just acquired and only partially used once. Its from MFT and is called Winter Songbirds. This helped me to decide to add the card to two challenges. I stamped some foliage in the back using Delicata Golden Glitz ink and then popped up the diamond on top. I had stamped the die cut images and coloured them with the same pink ink and a gold sparkle Sakura pen. I also used a small amount of Pumice Stone on the bird. The photo makes the gold sparkle look more yellow/green but it is gold in reality. The sentiment is from the same set and I popped it up at the bottom of the diamond. I thought about adding a few embellishments but decided against it for now and I can always change my mind before sending this to anyone. Pale pink isn’t a go to colour for me, but I’m happy with how this looks.

So its back to what I should be doing now. Happy New Year to everyone and thanks for stopping by.

Shooting Star

https://peaceonearthchristmas.blogspot.com/

I guess this challenge stuck in my mind, and as I had a not so great night last night, the idea for this card was born as I was tossing and turning. This will be the first card for my stash for next Christmas, LOL. Using up scraps of gold CS I die cut a few stars and the small strips first. Then I scored the layer that is four and one half inches square. I played around a bit with placement and then glued the rays but only glued the part that is behind the star. I cut them when dry and then I added the shorter rays which are a shiny gold. After putting the stars together I added foam tape to the back before placing them over the scored area and the bottom section of rays. Added a few Studio Katia gems from my stash and the sentiment piece (Divinity Designs). When the card is moved the rays wave slightly and the gems really pick up the light. The panel was added to a 1/4″ bigger card base using foam tape.

I hadn’t planned on spending time in my craft room today, but we did all our last minute errands yesterday because the weather forecast for today was for freezing rain. This on top of all the snow made us decide we weren’t going anywhere today. The conditions are not great outside and we see on the news that the airport is still having issues with catching up on all the recent chaos. A lot of travellers are not getting to their destinations this Christmas which makes me feel a bit sad for them all. I’m glad I’m home, dry and warm. Thanks for stopping by.

Winter Wishes

https://peaceonearthchristmas.blogspot.com/

This card was made a while ago, but I didn’t post it at the time thinking it may work for a challenge at some point. As it has a gold embossed background I think it works for the current Peace On Earth challenge so am entering it there. The folder is from SSS and the border piece is done with a Spellbinders bracket die. The sentiment is also Spellbinders and I cut several and layered them together before glittering the surface piece. I have several poinsettia dies but I cannot remember which set I used to make the ones here. I think it may be a GKD set. I used some of the fallouts as embellishments and glittered those too. Its a simple card but I like how it turned out.

Hope you all have a fabulous Christmas and a great New Year too. Thanks for stopping by.

Silent Night

https://caffeinatedchristmascardchallenge.blogspot.com

This is truly my last Christmas card and I figured I may as well make it fit a challenge before I go on to other things so I’m adding it to the Caffeinated Christmas challenge. I couldn’t resist this digi stamp by Sassy Stamps and have to say that the owner of this little store is wonderful to deal with. I had some downloading issues and she kindly resent them in a format that was less challenging for me to access.

I resized the image using CorelDraw and then printed it ready for colouring. I used a combination of pencils and a bit of watercolour shimmer paint to add the colour. I also added a bit of glitter to the hat bell and the tiny heart underneath the sentiment, as well some Sakura glaze to the buttons and shoes. Sentiment came with the image. I used a leftover piece of frosty looking CS for underneath the focal image and chopped the corners using a small punch. Did the same to the focal panel and then added it all to the card front. A few dew drop gems and it was complete.

I hope you are all ready for Christmas and having fun in the preparation. I finished adding some greenery to our front porch and a couple of red bows and consider everything now set for the season. Thanks for taking a look.

Stuffed Stocking

Christmas Stockings Challenge & December Stencil Fun

I had been wondering which stencil I would use that would work for both these challenges and didn’t really have anything in my stash. Even my stamp sets are limited as to stocking choices. Then at the local dollar store I saw a couple of stencils that would work so I bought them. The image is quite large so my card is on the larger side, but as I’m hand delivering this last batch it doesn’t matter. I couldn’t find my scraper and what I ended up using wasn’t the best choice so my stencil butter did get slightly underneath in a couple of places. I decided to go with it anyway and the section where the top of the stocking and the bear meet got covered up with the sentiment so the worst of the problem was solved that way. I bent the sentiment strip slightly and added double tape in the middle so it stays curved. Stamp used is from StampinUp. Poinsettias are from Dees Distinctively and I cut several colours and then pieced them together. I added a few embellishments from my stash after I had added the layer to the card front. Except for a couple of cards for my neighbors I am done with Christmas cards for now.

Our good friends arrived from Vancouver for a couple of nights and they spent all of yesterday helping with our decor. Ron helped outside and Dale, who is a Christmas mall designer, did the inside. I had already done the tree, but she finessed it a little bit. Our home looks amazing and the best part is that everything is fixed in such a way that all I have to do is lift it, cover it and store it then next year do the reverse. When we had the unexpected early snow fall, we thought we wouldn’t get any outside decor sorted, but we had enough rain last week that the area where the bigger items have to go, was clear. It was really good of our friends to help us with this as it is quite a big job and my hubby is dealing with tennis elbow (very painful) so he was dreading doing it alone. Finally I feel in the Christmas spirit and we also feel very blessed to have friends such as these.

Double Embossed

https://cyhtp.blogspot.com/2022/12/anything-goes-embossing-with-twist-of.html & Peace On Earth Christmas Challenge #29

Having seen a very pretty embossed card recently I decided it was time I tried something along the same vein. Unfortunately my embossing initially was pretty bad with ink from the folder in the wrong places. The folder is from Crafters Companion. I had used a brayer to add some Spun Sugar ink to the folder but the faint pink doesn’t show up much on the photo. As well I am finding it a challenge to get the right sandwich for these 3D folders which didn’t help any. Rather than throw it away I lined up another piece of CS into the folder, but I cut it into a smaller section beforehand. It worked quite well and I now had something to cover up the smeared ink. Using Versamark I stamped the sentiment and heat embossed it and at the same time I did the flower the same way. I lined it up as well as I could over the bottom piece so that the design looks continuous and glued it. The stamp set is by StampinUp. As well I went over the entire two layers with some shimmer which doesn’t show on the photo but is quite pretty in my craft room. A few gems and I called it finished. Considering how bad it looked at first, I’m quite pleased with what I ended up with. My housekeeper will love it. Thanks for stopping by and have a great weekend everyone.

Warm as Toast Birdies

Peace On Earth Christmas Challenge #29

Not having made a Z-fold card in a while, when I saw a specific one on Pinterest I decided to try one of my own. I liked the idea of adding a 3D effect to the focal panel but didn’t have the right die so I used this border frame die from Papertrey. Unfortunately I had a bit of trouble die cutting it well and after 3 tries I decided to use the best of the 3 and hide the poorly cut section. The little birds are from a new set I’ve purchased from MFT’s recent sale. The foliage and PP are from StampinUp. I used watercolour pencils to colour the birds and die cut them once finished. The card was inspired by both the Pinterest version and the bottom right photo on the mood board. It is intended for some special friends who love birds and gardens as much as we do. And of course as is usual after I’ve completed a card, I now have an idea for using a different style frame and adding to it to give the 3D effect. Why these ideas always come to me after I’ve finished a project is beyond me, but that is what happens. Maybe I’ll make another before too long using the new idea.

The snow is sparkling outside as it is clear and sunny today. Don’t know how long it will stick around, but as it stands right now, we cannot get any outside decor done, because we can’t see where to put it due to the amount of snow. Now we understand why our neighbors had all their decor done by mid November. We live and we learn, haha.

Star Power

https://doubletroublechallenge.blogspot.com  & https://colorfuloptions.blogspot.com/

This predominantly white card has silver glitter stars with embellishments in green. As mentioned in a previous post I’ve been doing quite a few CAS style cards and this is one of them. The embossing folder is one I cut in half and is by CTMH. I used paper scraps and embossed 2 sections which I then glued to the square card front. The stars are from an Infinity Die set by Hero Arts and gems are from my stash. The banner die is unbranded and the sentiment is from Divinity Designs. Once all the elements were on the panel I glued it to a slightly larger card front. It fits the challenges as White with a pop of colour, Thing 3. I’ve taken several photos of this card and this one is the best of them. For some reason I am having issues getting the colour to show on some photos at the moment.

Thanks for taking a look. Have a great weekend everyone.