Jungle Creature

CAS Challenge at Paper Players

When I saw this challenge I remembered my Hero Arts kit from last year and thought it was perfect to use here. As well I remembered seeing Angie doing a wonderful series of cards using it and this is my take on something she did.

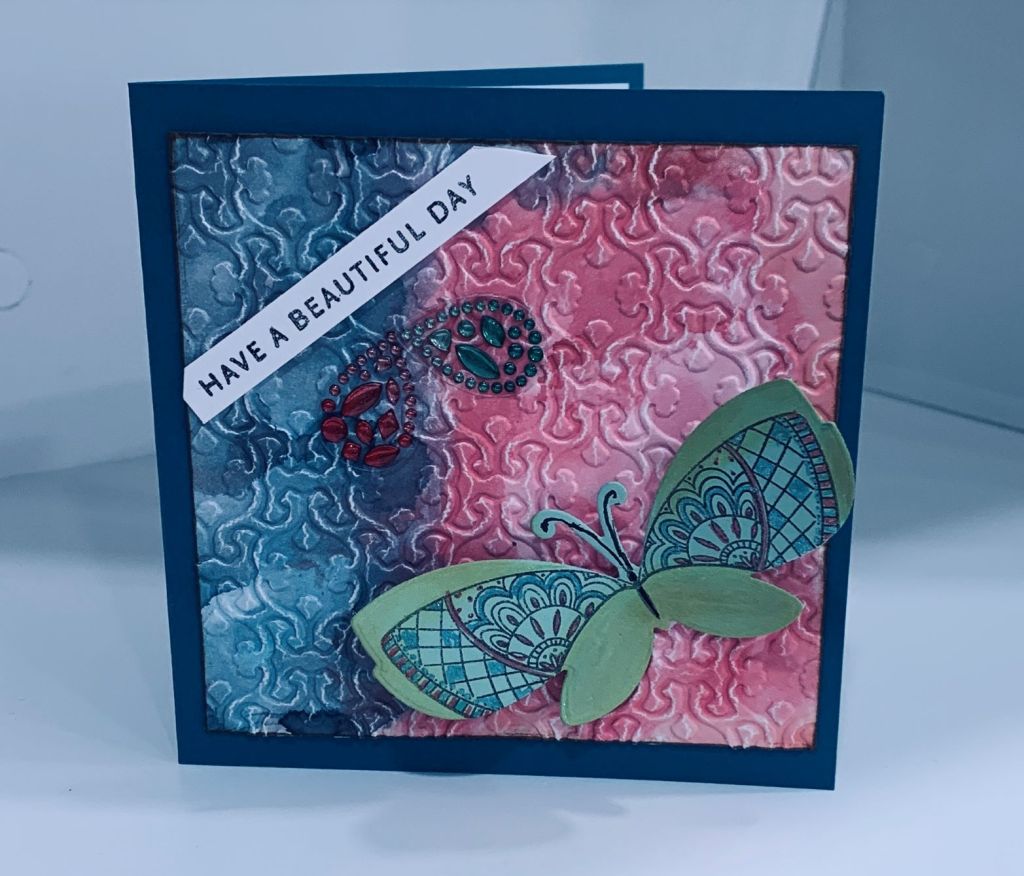
First I stamped and die cut the elements I wanted to use and then I coloured them using a mix of Inktense pencils and Sakura Glaze pens. I found adding the glaze over the spots of the leopard and letting it dry, before colouring it meant that I didn’t have to worry about being too careful. Adding shading was done in several layers and I’m fairly happy with the result. I did the same thing with the branch. I stamped the sentiment and heat embossed in white. Then I took a Hero Arts stencil and added ink using peeled paint and twisted citron distress inks. After adding the sentiment strip I carefully glued the branch and the leopard in a position I liked. Mental note to self, is to use this set more, as it has lots of great pieces and makes good generic or masculine style cards. And an FYI for my stamp group – if you haven’t invested in a Magic Mat, for your die cut machine, it is a worthwhile investment. It has been a game changer for me.

Brighter Days

Anything Goes Embossing With A Twist of Pink

This is from the stamp set I’ve mentioned a couple of times in recent posts. It is from Concord & 9th and is one I’ve had for a while and only now am inking up. I’m also still on my kick of partial embossing only this time I used a folder. As I had 2 folders that are similar and because I wanted to emboss just a part of the card I had the bright idea of cutting the folder in half. I marked it and asked my hubby to cut it for me as his tools are better. He kept one of the hinges, and I added tape for another, to ensure it stays straight. This particular folder is from CTMH. I stamped the rainbow and used some water to spread the inks into any gaps. Then I fussy cut. I added the fussy cut clouds and originally planned a different sentiment from the set but I didn’t like it as it was too big. Instead I used the one you can see. I fussy cut the edge of folded strip which is also partially scored on the back piece. It still needed something so I went over the rainbow and the clouds with opal blaze which makes it really shine. A few raindrops with some Nuvo crystal glaze and a small stamped sun finished the card. No pink on this one but I’m adding it to the Can You Handle the Pressure challenge.

Have a Beautiful Day

Anything Goes Embossing With A Twist of Pink

Having finally cleaned and tidied my craft room I am back in creative mode. The card front is a leftover 4X4 piece that I unearthed when sorting through the leftover scraps and putting them away or discarding. The background is something I made last week and set aside for use later. I added a bit more ink to it this morning and then dry embossed it with the brocade folder from Craft Concepts. Sentiment is from a Concord & 9th set left out for me to use, as I’ve an idea for some of the stamps. The butterfly is one from last week and is when I discovered the the die set and the stamp set I thought went with it didn’t match. Seeing as I’m unable to throw stuff away unless deemed totally unusable, I rescued it by adding some colour using mainly Sakura glitter pens and now it looks as though it was supposed to be cut this way. The bling is from the dollar store. The oval shape worked when I put two together as they reminded me of butterfly wings. We have snow today and I can see a lot of fluffy stuff is falling. Hope it doesn’t stick for long.

A Pinch of Love

Global Design Project # 330 | Sketch

Initially I couldn’t think of anything that I wanted to do regarding this sketch and then when I did figure it out I couldn’t find the stamp set. I had a bad night, not able to sleep last night, and in the end I got up and searched my craft room until I found the stamp set. It is from Newton’s Nook, Tide of love and I thought it would be cute. I had inked up a background during the week which I hated, but after using a Spellbinders distressed edge die and then wetting the edges so I could form them a bit I liked it better and I knew I was going to add StampinUP DSP over the top so only the edges are really showing. I love this particular DSP and it kind of reminded me of ocean waves. Anyway I stamped the 3 images and coloured them with various Sakura pens. They are so small I wasn’t too worried about shading. Then using the matching dies I cut them out and added some foam tape to the backs of each. Using the sentiments from the same stamp set I did the strips and scored one end of each. I angled the edge so they would fit together and placed them as shown adding the images around them. I added a few water droplets as well but decided against further embellishment. I’m quite happy with this card but am now determined to clean up my craft room and sort things out before I make another. When I can’t find something it means it is past time to put things away.

Something Metallic

Challenge #24 – Metallic

Originally my intention was to have this card work for 2 challenges, but it didn’t turn out that way. To make this I used some silver duct tape over a piece of CS which I then die cut. I trimmed it down to fit and added a black piece behind it. Then I took some striped paper and cut a strip to add as a border top and bottom. I think the die came from MFT, but I’ve temporarily misplaced the label so I’m not 100% certain. The angle of the photo makes it look quite large but it only covers 1/3 of the card front.

CAS and Colours

Challenge #457 – Colours

I find colour challenges really challenging because in many cases I don’t have the right colours. However I think I’ve managed reasonably well with this card. First off, the base is almost an expresso brown and the sentiment is the same colour. Merlot was represented by Aged Mahogany which is pretty close, but the green was really hard. In the end I used Forest Moss and over the top a touch of Evergreen bough which seemed to mix into something resembling the Evening Evergreen. I used an older StampinUp stamp set called Kinda Elclectic for the leaf sprig and butterflies and for the sentiment I used another older SSS set called Smile. To finish the card I spattered some Aged Mahogany.

Thinking of You in French

Color Hues #35- Navy and Pink

After I had finished my first floating technique card I was left with the outline of the heart shape. Instead of discarding this I used it to create this card adding a few other die cuts along the way. The card stock and DSP are from StampinUP. The heart flower is from the new unbranded dies I received yesterday. The heart was another piece left over from the previous post and I added that flat and raised the striped portion around it. I added some ribbon at the bottom which anchors the flower stem and some pink gems to embellish. The sentiment is from a StampinUp set, gifted to me by my girlfriend, and is called Petite Cocchinelle. Its a cute set and will be used because I have several friends who are French. This card is intended for one of them. I have one more pink heart on my desk so most likely I’ll use it soon. I ought to be tidying up, but once again I am creating instead.

Heartfelt Thanks

Shades of PINKChallenge #258 – Photo ChallengeAnything Feminine / for a Lady

The salesperson who has been helping us with all our plumbing fixtures etc, has been really helpful and kind. She did her best to get decent timelines for delivery and followed things up regularly. We decided to do a thank you gift for her and I put together a package of my cards and made this card to go with it. It fits 3 challenges so I’m entering it into those at the same time.

Feminine for Sisterhood of Crafters and must have a flower, pinks in the photo challenge at Inkspirational and pinks for Double D as well and this card fits the bill. The heart flower die is new, unbranded and came from Amazon today. I picked out various pink scraps so I could cut the flowers and make the layer on the card front. Started by cutting the heart and adding some white CS behind it. Stamped the sentiment from Itty Bitty Basics MFT and cut the lighter coloured frame for the heart. After adding foam tape to the layer I added it to the card front. I added a few gems here and there and used the tiny heart stems to embellish. The DSP layer is from StampinUp but the card stock is GKD. I still have a couple of heart shapes to play with and will likely come up with two other cards using those.

Dragonfly Birthday

Challenge #2 2022: Anything Flies using only PINK AND BLACK

When I saw Gayle’s post to this new challenge, I simply couldn’t resist adding a post of my own. So thanks Gayle, I wouldn’t have known about it without you. I also should thank my dear friend Cheryl who shared the floating technique with me and this is my first attempt. I used various pink scraps to create the floating heart following the instructions I had been given. Wouldn’t you know, I can’t find my acetate so instead I used something slightly thicker which came from packaging. It didn’t want to cut through with the die but because the die made enough of an impression it was quite easy to use scissors to get it to release. Although you can’t see it on the photo, I did use a pin point die on the black layer so there is a subtle texture on it. Note to self, always do your heat embossing before using a pin point die. I ended up with white powder spots everywhere and had to edit the photo closely in an editing software to get the spots removed. It doesn’t show as much to the naked eye, but the camera picks up everything whether you want it or not. I used a set of infinity heart dies from Hero Arts to cut all the hearts and used the PaperRose dragonfly you’ve seen me use in the past. I cut the dragonfly from some silver CS and added a few gems for his eyes and tail. The sentiment is from Joy Clair every day sentiments, which I seem to be using exclusively lately. This technique is a fun one and the end result is quite different because it truly looks as if it is floating on the card front. It is one that is useful for colour challenges so I suspect I will try a few more soon.

this is the original photo before I cleaned it up.