Blue & Silver Christmas

Peace on Earth Christmas Challenge #4

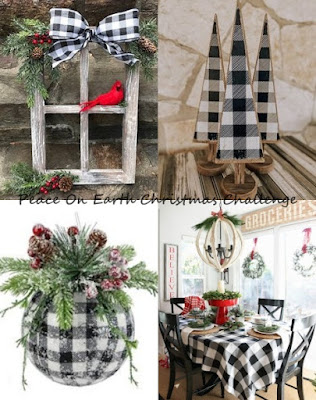
There is something about Navy and Silver that appeals to me and I really like the mood board shown below. For this challenge I decided on a slimline design and using a navy piece, silver heat embossing along with an incentive stamp set called Holly Jolly from GKD, this is what I came up with. I die cut a silver snowflake with an older GKD snowflake die to add at the bottom. The background glimmer layer was done using some new ombre look StampinUp CS. I added a layer of silver mirror CS behind the navy layer and like the subtle difference in the 2 navy card stocks used. Doesn’t really show on photo but is visible in R.L. Added a gem center to the die cut snowflake and it was finished.

Believe in Magic

PP568

I decided to go with fairies for this challenge and it took me 4 tries to get my stamping right. I messed up 2 with inky fingers and on the next one didn’t get my mask in place properly. The fourth one I liked. The stamp set is from GKD and is one I’ve used once or twice. I used Sakura Glaze pens to colour in her wings and pencils for the mushroom. Added a touch of glitter to her wings and the edge of the mushroom. For the fairy dust I used a metallic gold ink by Delicata. Originally I thought I might heat emboss, but instead went with the ink as it looks more delicate than embossing would. Keeping it CAS is always a challenge for me but even with the addition of sequin stars I’ve managed it. I die cut the panel with an unbranded stitched edge rectangle set and added it to the card front. All in all I’m happy with the result.

Embossed Ornament

Make the Cards Challenge #42

For my background I borrowed a stamp from a friend, but I have no idea of the brand. I stamped it with Versamark and then heat embossed in white to get a tone on tone look. My stamping was a bit wonky so it looks a bit smudged in places but I used it anyway. I couldn’t find my fun foam so I cut 2 more layers and glued the background to them for dimension before adding it to the card front. I created my own ornament using a scrap circle and a snowflake stamp from GKD which I heat embossed in silver. From another GKD set I used the ornament hanger stamp and heat embossed this before fussy cutting. I also used a hole punch so I could thread cord through it. Then I made the bow, cut two sparkly twiggy leaves and added them to the ornament and cord. I quite like the simplicity of this card.

My electricity is going to be off all day today as work is being done to upgrade the lines and panel so I am hurrying to submit this post before turning of my computer. We shall be out of the house until the work is completed so I will go to our boat and pack up all the items that need to be protected for the winter months. At least we will be warm there.

Patterned Paper Trees

more Trees

While I was playing with another entry I had several scraps on my desk that I wanted to use up. The glitter strip is a stenciled shooting star piece that was left over from a previous project. The stitched edge die cut was also leftover and I had cut several trees from the pattern paper shown on a couple of other posts. I used tumbled glass to create some clouds but wasn’t happy so I swiped the panel and then softened it with a sponge. Using some MFT cloud dies I added the 2 small clouds. Glued the trees with one popped up slightly, added a couple of sequin stars to tree tops and added the sentiment at the bottom. I need 10 more cards and I’m then done for Christmas and can concentrate on some other things.

Cool Yule

Welcome to Global Design Project #319

The Cats Pajama set I got this year has a couple of really cute images and I like this particular sentiment because it reminds me of Australia. I’m not sure why? Anyway I stamped the bear image on PP and fussy cut him out. The penguin was done on regular white CS, coloured here and there using glitter pens and also fussy cut. Using border curvy dies I cut the snowy slopes out of both white and lavender scraps and then glued them down as shown. Using an ink that works on a metallic type CS I stamped the sentiment and then popped up the two images. Adding some sequin stars to the sky area finished the card and yet still kept it simple. I’ve added it to the Global Designs challenge.

Trees and Snowflakes

TREES

I wanted to use up a glitter paste that was going hard so the other day I began to play around with it. Last year I received something that had an interesting patterned paper so I saved the paper and cut some of it up to use with the glitter paste and a stencil. It was on my desk after drying and I was wondering how to use it when I thought that white trees might work and in this way the card would also fit the DD challenge. It actually looks better in R.L. than on the photo and I deliberately didn’t add a sentiment to the card front as it was already busy enough. Dies used were from MFT and Creative Expressions. Gluing items on top of glitter paste is a challenge and in the end I had to use some tape as well as pop ups. Hopefully the trees won’t fall off in the mail.

Silver and Gold

Color Hues #30- Silver and Gold

The combination of silver and gold is something I like a lot and it is perfect for an elegant Christmas card or a wedding in my opinion. A couple of days ago I was playing around with another card very similar to the one I’m posting here, but colours were white and gold with a tiny amount of green. I made 2 at the time as I wanted to use up the extra bits. In thinking about this challenge I realized that the design of the earlier ones would work well for these colours and this is the result. Using 2 types of gold, one in a matte finish and one in a shiny finish then a silver one with a matte base. After die cutting the frame using an unbranded set of stitched rectangles I cut a base for the frame out of the matte gold. I also cut some solid squares using a 1 and 1/4″ punch. Using the shiny gold I die cut the thin square frames using 2 dies from a Concord and 9th set. I glued these as you see onto another piece of silver CS. Then I added the solid squares. Using a Creative Expressions poinsettia set I die cut the flowers and leaves out of both silver and shiny gold and added them to the solid squares. After stamping the sentiment from a Divinity Designs set I added 2 tiny embellishment centers to the flowers. I’ve had a lot of fun with this idea and like each of the cards I’ve made. I think the shiny and matte finishes work really well for the flowers.

Twinkle Twinkle …

PP567 – A Colour Challenge from Joanne

The striped bottom was glued to the black cs and sat on my desk for weeks until I decided what I wanted to do with it. The Paper Players challenge seemed the best way for me to get creative with it. I also had some paint chips sitting around as we had been choosing paint for a bathroom so using a Spellbinders set, I die cut three stars from the various tones of gray chips. These were added to the black piece and on top of these I added some tiny silver sequin stars as well as a few extra around the larger ones. I then used some glossy accents on the larger stars. As well I added 2 silver mirror card strips at the bottom. Using a GKD set I stamped the sentiments heat embossing the larger word in silver and used a sparkle pen on the smaller ones. I set it aside to dry before adding it to the card front. Can you believe I lost it on my desk? I was so frustrated and eventually went to ask hubby for help. He found it stuck to a label sheet which fortunately released it easily.

Anything Christmas

Peace On Earth Christmas Challenge #3

When rummaging around my basket of paper scraps looking for a specific blue piece I unearthed the black plaid piece and set it aside. I thought it would work for this challenge and this is what I came up with this morning. I first used and EB folder on the kraft card front. Then I found the red scrap piece and used it to back the plaid layer and added them to the card front. Taking more scrap red I added a strip across the entire card. Using an old ornament die (one of the first I ever purchased) I cut a gold back and the black and red filigree piece and put them together. Added a few gems and popped this up onto the red layer. I stamped the sentiment (from Divinity Designs actually 2 put together) and trimmed the kraft into banner ends and popped that up too. Because I was using scraps I didn’t have exactly what I needed for the red layer so I put 2 pieces together leaving me with a small seam. To cover up the seam I added a line of small gems and a couple of larger ones onto the sentiment strip and on the corner of the red piece to balance it all. It all seemed to work better than I expected which is always a bonus to my mind.

Merry Christmas

Global Design Project #317 | Color Challenge

Its been a while since I entered into a Global Design challenge, so I decided to try this colour challenge and get going once more with entries. Pink is a somewhat unusual colour for a Christmas card but I went with it anyway as these are the cards I need currently. I dry embossed the pink piece using a folder called Champagne and Holly by Couture Creations. Lately I’m having trouble with my machines and embossing is a challenge but I managed to get most of it with an impression. Then I die cut the word using both the blue and the green and offset them on top of the pink. Did the same with the trees and adhered the lot to a white card front. I added a tiny bit of sparkle to the holly berries, but in retrospect probably shouldn’t have. Using some of the leftover blue I cut several strips to add top and bottom of panel and along the bottom of the main card. Then I die cut the word Christmas from the pink CS and added it to the strip. Dies used are from MFT (small trees) Creative Expressions (larger trees), MFT and Sissix for the words. Had fun and quite like the end result.