Doggone Fun

When I noticed the card my friend posted to this challenge I decided I would have a go and do the same. I already had an idea in my head so making it work for a challenge wasn’t difficult.

Challenge #44 – Wrap It Up
Challenge #5 – Winter Holidays

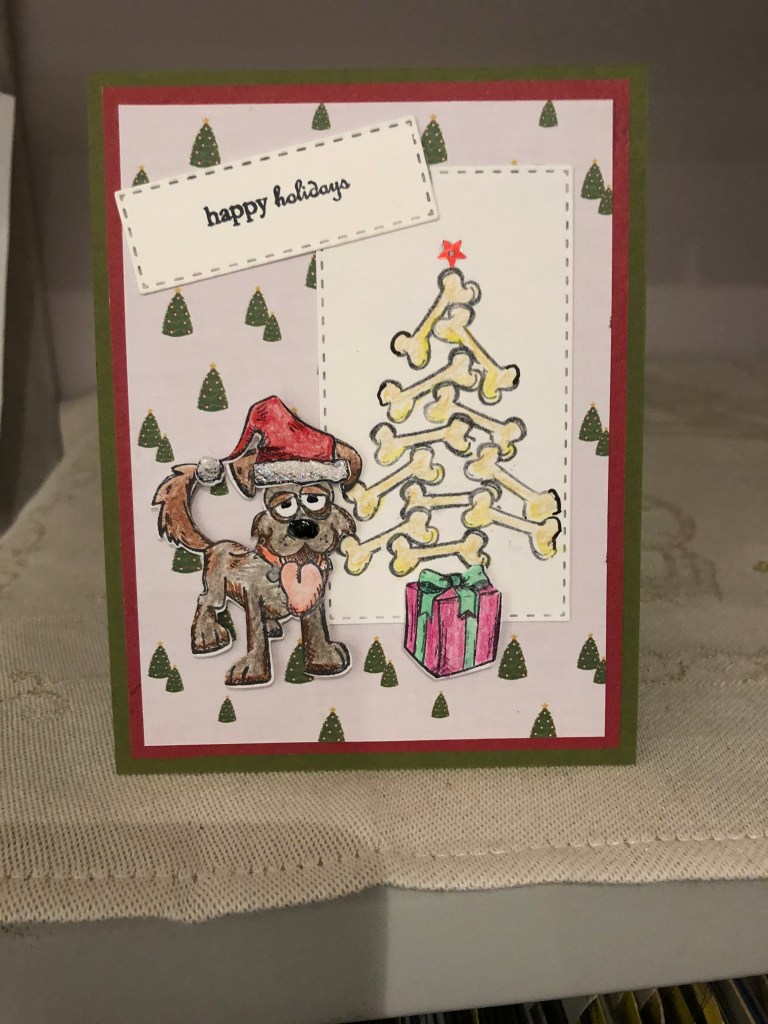
The PP was added to cf which is from GKD and colour is Fresh Asparagus. I wanted something fun so I created a tree out of dog bones using a Tim Holtz Stamp as well as the little gift box and Santa hat. After colouring the gift I added a touch of shimmer and die cut it. Using his Crazy Dog stamp set I chose one of the dogs stamped and die cut it and used Prisma pencils for colouring it in. I also added a touch of shimmer to the dogs tongue. The dog bone tree was done on a separate stitched rectangle die cut and I coloured the bones slightly to make them stand out. Added a tiny sequin star on top. PP is from a paper pack from Recollections.

After adhering the rectangle panel to the card front I popped up the dog at the side and added the package at the bottom of the tree. Added the Santa hat to the dog and some glitter to the hat. Added the sentiment on an angle and it was complete. Sentiment is from a GKD set.

As this card has a holiday theme and has a bow on the package I’m including it in the Artsystamper challenge as well.

Peace Dove

For this weeks Mod Squad challenge I created another card, which my hubby loves …

Non-Traditional Christmas

Using totally non traditional colours I die cut the dove in a mulberry paper so it has subtle shading to it. I had already die cut the sentiment in white but I have a new product purchased yesterday called Shimmer Stix dauber in Rose gold so I used it over the white sentiment and got a lovely shine with a hint of the rose gold. I love it. Got one in frost too and that was added to the embossed piece so the whole thing has a shimmer. The folder was given to me yesterday and I have no idea of brand. Used a scrap piece of pink glitter CS for underneath the embossed piece and adhered it all to the Plum Punch CS from Gina K. I had a few pink/lavender pearls left so I used them here for added interest. I am really happy with how this one turned out.

Pear Tree

For the Double D challenge I created this card …

Twelve Days of Christmas Part 1 Days 1-6


I found a free digi stamp here – https://beccysplace.blogspot.com/2010/11/partridge-in-pear-tree.html . Printed and fussy cut it out before I painted it. Using mostly my shimmery water colours I coloured in the image. I did use a few copics here and there to get more definition. Using a Sissix EB folder I made a panel with snow falling and added to front. I then cut out the frame with an unbranded rectangle set and popped it up with foam tape. Added the sentiment at the bottom. Added the fussy cut image inside the frame with some of it popping out at the top. Hubby brought me a glass of sherry with the consequence that the frame is slightly crooked. Remind me not to drink when crafting – lol.

Musical

CAS Colours and Sketches has a new challenge and although I thought I was done with making Christmas cards I realized that I could make a few as a gift set for a friend so this is part of what I did.

Challenge #350

I started with the corrugated card front in one of the stated colours or as close to it as I can get. I then took a cherry red cs and tore the edges over which I adhered the stamped music piece. Stamp is a very old wooden block and I have no idea of the brand. Using some foam metallic gold glitter I die cut the snowflake and adhered to the front. Die is from Gina K. I quite like how it turned out.

Heart Happiness

This weeks Global Design challenge is a sketch and the following is what I came up with …

Project 218 | Sketch Challenge

One of my stamping buddies gifted me with a lovely scrapbooking package earlier this year and the pp in the card came from that package. I just love this type of pp, but hate covering it up so in an effort to keep as much visible as possible I used vellum for the center pieces. I also used a left over strip of cream to go behind the heart die cuts. Using a stitched heart die set I cut the two bigger hearts and attached them as shown. I then cut 4 of the small ones in a gold cs to pop up on top. The gold cs matches the gold in the pp. The sentiment strip is from the same gifted package. I am so blessed in my on line friendships.

Winter White

I really didn’t intend to make another Christmas card but I came across this particular challenge and simply had to enter it.

Challenge #134

Funnily enough I actually had the snowglobe die on my desk because I thought I might use it these past few weeks and then didn’t. It is called Winter Fun and is by Precious Marieke. I decided to make it into a shaped card and played around until I got a good cut with top fold. Using the inner circle die that comes with it I also cut another piece which I had dry embossed with a Sissix Snowfall Speckles folder. Then I die cut the houses using a Cottage Cutz die. It was a little too long so I snipped off the last house and snowman. I added tiny pieces of foam to the back of the houses and adhered them to the card front. I also added the tiny snowman to the middle of the circle as he was too cute to waste. Using a sentiment die for which I cannot find the name but think is from Sissix, I die cut the words twice. Once in plain white and then again in a Lawn Fawn cs called Pixie Dust. I added the two together to the card front. It still needed something so I used a small amount of a HeroArts glitter lacquer on the roofs of the houses. The glitter doesn’t photograph but it sure adds something special to the look. My hubby was impressed – lol.

Snowman

I made a series of this card for a special group of people in my life. Hadn’t yet uploaded any so here is one of them …

PP470 – A Theme Challenge

After choosing the image I wished to use and also the card stock I proceeded to make the background paper. This is my version of a card I saw on Pinterest – and from this person – https://lisasstampstudio.com/2019/10/handmade-christmas-card-with-some-delightful-techniques.html . I decided it would be fun to try her idea and technique. In her technique, for the cream coloured background I am using, she used a mix of glue and water to create spatters to which she added EB powder and heat set. I tried it but wasn’t happy – I even hand drew a few lines and swirls with the glue but for me the effect wasn’t enough. In the end I looked in my stash to find an old bottle of embossing fluid that I’ve had forever. I dipped a brush into this and spattered it all over the cs. Then I added my favourite EB powder Cosmic Shimmer and heat set the lot. Now I was happy. I actually did this on a full 81/2″ by 11″ sheet so I could cut it up and make multiple cards. Worked perfectly. I had strips of glitter cs left over so I decided to use them as shown and I also cut up some strips of the green to make things match. In later versions I used washi tape for the strips as it was faster and easier. I added the strips as per instructions on video and also added the sentiment panel I had pre-cut and heat embossed. After die cutting the snowman – a GKD stamp – which I had coloured using some Pigma markers I added him on the side. You can’t see the shimmer in the background but in reality the entire cream panel glows.