Gift Box

The DiesRus challenge is for anything Christmas and I needed a box for a card series I had made as a gift and decided to create one.

Anything Christmas

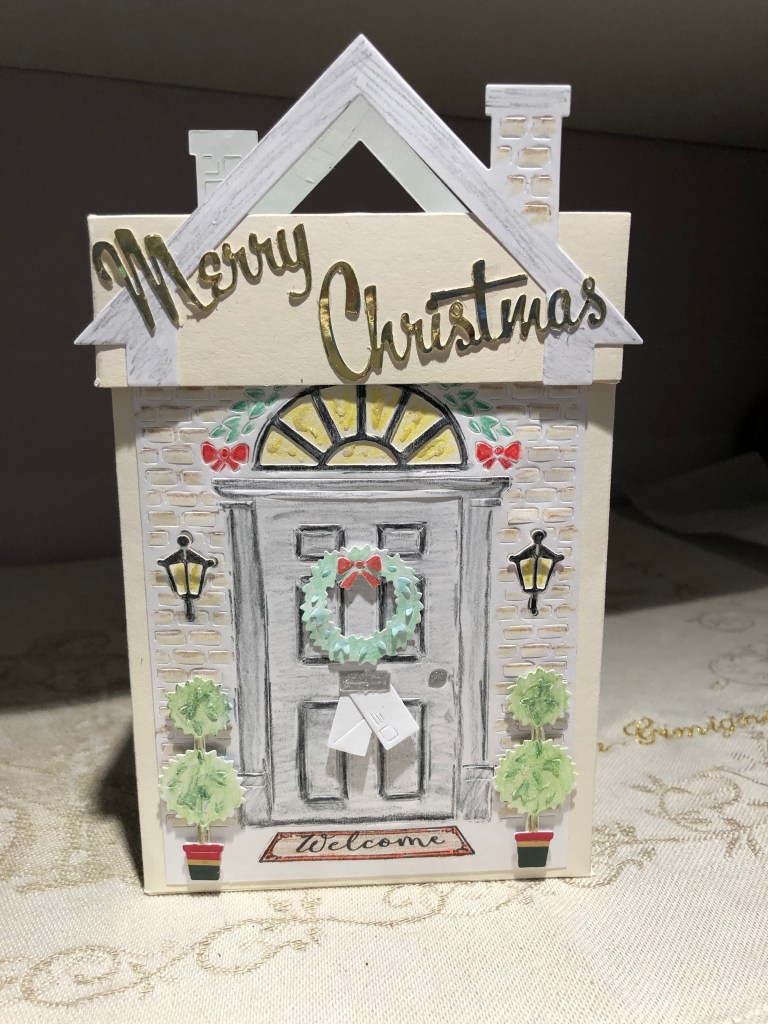
I had done 10 cards all different and many with layers so I needed a fairly decent size box and initially wasn’t sure how to go about it. A little bit of research and I found a link to a tutorial that I could follow: https://intatwynedesigns.co.uk/intatwynedesigns/?p=10157 . Very good explanations and measurements. I literally just followed along pausing while I did the cutting etc. I had also seen an idea for using my HeroArts kit found here – https://heroarts.com/blogs/hero-arts-blog/november-my-monthly-hero-countdown-idea-giveaway-1 and I incorporated that into my box. The box is the same on both sides so it took me quite a while to do. Die cutting panels, colouring them with Prisma pencils and adding the embellishments etc. over the past 2 days. I even die cut the pot bottoms in PP to make them look more realistic. For the sentiment on the roof section I used a word die I’ve forgotten the brand name of. The card set and envelopes fit perfectly inside and I’m really happy with the result.

Celebrate

Global Design is a CASE the designer challenge this week. I had some time and still had a few left over bits and pieces so used them to create this card.

Global Design Project 220 | CASE the Designer

Card base is white with some pp and washi tape added at the bottom. Using a left over piece of Distressed sprayed card I cut it into the shape similar to what is on the designers card. I popped it up and added the die cut word on top. I had the pine cone and one leaf left from a class project done late October and hadn’t used them yet so I popped both up at the bottom of the shaped piece. I added the little bird as he was also left over. Now I think all my scraps are completely used for the time being.

Joy

The mod squad wants a Christmas or winter card for this weeks challenge. I created this one a few days ago but hadn’t yet had the chance to upload it.

Christmas/Winter

Using a Spellbinders bracket die I cut the bottom of the card front. I also cut the label out of mirri card using a Spellbinders nestibility set. After adding a strip of washi tape to the middle of card front the label was adhered over the top. Using a word die by Dees Distinctively and some opalescent origami paper I cut out the letters and adhered them as shown. With a piece of GKD pp I die cut the deer and popped him up on top of the O. A fast and easy card to make.

Seven Swans

Double D continues with part 2 of its winter challenges this week and I decided to go with Day 7.

Twelve Days of Christmas
Days 7-12

A while ago I had found a free digital with swans and coloured it using my shimmery water colours. Forget where it came from so I can’t give credit. I added a slight touch of yellow to the necks of the swans. As well I had been playing with Distress oxide sprays and I had a piece of the blue left and I thought it would make a nice water background. It is quite shimmery as I had sprayed it with gold perfect pearl mist. I die cut various trees in different papers and adhered them to the card front. Then I added the water piece over which I popped up the fussy cut swans. I made my own sentiment with a line from the song using CorelDraw and I fussy cut this out in curves following the curved text. I stamped a couple of music notes and fussy cut those to add at each end of the sentiment strip. Added 3 tiny stars to some trees and it was finished. Fun to make this one.

Stripes & Colour Blending

Created for another challenge at Double Trouble this morning.

Challenge #45 “Earn Your Stripes” 
Color My Heart

And because I used 3 colours as well as black and white stripes I’ve added it to the Color my Heart blog. Colours used for the inked piece are Dried Marigold, Twisted citron and Shabby Shutters. I had this piece made from a while back and decided to use it here. I cut the striped pp from a paper pack and added to card front. Then using one of my Sissix pattern dies I cut the shaped piece through the inked piece and then added this to striped part. Before doing the gluing I also added a small amount of inka gold around edges and smeared a little here and there over the panel. I die cut the oval out of metallic gold sticker paper and using Stazon I added the sentiment hello. Came from my Hero Arts Xmas set. It didn’t show quite enough so I went over it with a copper pen from Sakura. The mouse is from a Penny Black set and I coloured it with Prisma pencils and fussy cut out. Popped up on top of oval. I also added a small amount of shimmer to the icing and the heart but it only shows in certain light as it is very subtle.

2nd Ornament Card

I had this small die cut backed with the glitter cs on my desk for a while as I didn’t have any ideas of how to use it. I also had a few snowflake cut outs left. After creating my recent ornament card I had the bright idea to use all these bits for another similar one. This is the result…

I glittered the snowflake pieces and then adhered them around the gold die cut. Added a hole for the cord and a small gold bow at the top and then added it to card front the same as the last one. It is quite effective and I like how it turned out.

Ornament Card

I made a second card for the Paper Players colour challenge so I could use up both the positive and negative scraps from the previous card. Having received a very pretty handmade card, which has a removable ornament on the front, I used the idea with my scraps.

PP471 A Color Challenge

Using the negative blue piece I paper pieced the positive bits into it and backed it with some shimmery vellum. I die cut this out using an old nesting set for which I stupidly didn’t keep the name, but suspect it is from Spellbinders. I punched a small hole at the top and added a loop of silver string tied into a bow. The loop is attached to the card back but is easily removed by recipient for later tree hanging. On the kraft cs I dry embossed some lines and added silver washi tape and left over striped piece. It has quite a bit of sparkle but once again camera doesn’t pick that up. I like the ornament shape as it is a bit different than is usual.

O Christmas Tree …

Global Design’s weekly challenge is to use a tree in the card and I had some paper scraps that needed using so this is how they got used.

Global Design Project 219 | Theme Challenge

PP is a leftover piece from a paper pack by Recollections, the tree was cut sometime ago and not used and I backed it with a white piece slightly offset to give the illusion of snow. Stamp is from Hero Arts. A dear friend shared some of her metallic gold paper with me so I cut a frame using a PaperRose stitched rectangle set and attached it to a small scrap of sparkly cs I had made myself. After gluing all this to the card front I added the tree by popping it up and added a tiny bow at the bottom. Used another small piece of sparkly scrap card to stamp sentiment and die cut that with a die from LawnFawn. It is quite a shimmery looking card but can’t get it to photograph the shine.

Snowflake charm

The Paper Players challenge this week and the last one of the season for them is to use Blue, crumb cake and either silver or gold.

PP471 A Color Challenge

I chose the CS first and then die cut two of the snowflake Marquees using the die from Memory box. I backed this with some gold mirri card and then die cut more snowflakes so I could paper piece in some blue. The blue has a slight shimmer to it and is also textured but I didn’t have enough for both so I also used a piece of the same colour but no texture and I added my own shimmer to it. I put one textured piece and one of the non textured into each marquee. I added 2 small sentiments on each. Added a few gold gems to finish it. Its a very simple card but looks pretty. I’m having some issues with getting my photos from my phone to the computer and at the moment cannot resize them properly so not the best photo unfortunately.

Memories & Fun

As you see it challenge is asking us to fill in the blanks for what brings us joy at this time of year. If I were to write down everything relating to this topic it would probably be a book so I picked just one thing out of a long list.

Challenge #215 – Holiday Joy!
Artsy Stamper
Challenge #44 – Wrap It Up

My card is created around memories relating to my tree and the 2 cats we shared life with at the time. Firstly I call my tree a memory tree as everything on it is about a memory of either making the ornament or a vacation. Our tradition is to buy one holiday ornament from each vacation. Some of those ornaments are real treasures and as such get hung out of reach of any pet we have. That said anyone who is sharing or has shared life with a cat knows how difficult it is to prevent them access to the tree. We solved it by having a few somewhat tacky items which we hung low and if they decided to pull one off and play it didn’t matter much. I always made sure they would come off easily thereby preventing the tree from possibly falling. Fortunately ours never once tried climbing our tree.

Using a theme from another card made this past week I used my set Crazy Dogs and Cats stamps/dies and I built a tree out of fish bone die cuts. I die cut this piece using Spellbinders Distressed edges and I added a touch of gold to the edges. Added a ribbon bow at the bottom and a star at the top. Did the same thing to the sentiment. Once I had stamped the two cats I coloured them with Prisma pencils and die cut them. Added both at the bottom of card with one playing with a leftover fish bone die cut. I also added googly eyes to both cats. In addition I’ve added this card to the challenge at Artsy Stamper and Double Trouble blogs this week.