Black & White #1

Made for 2 challenges: Double D black and white
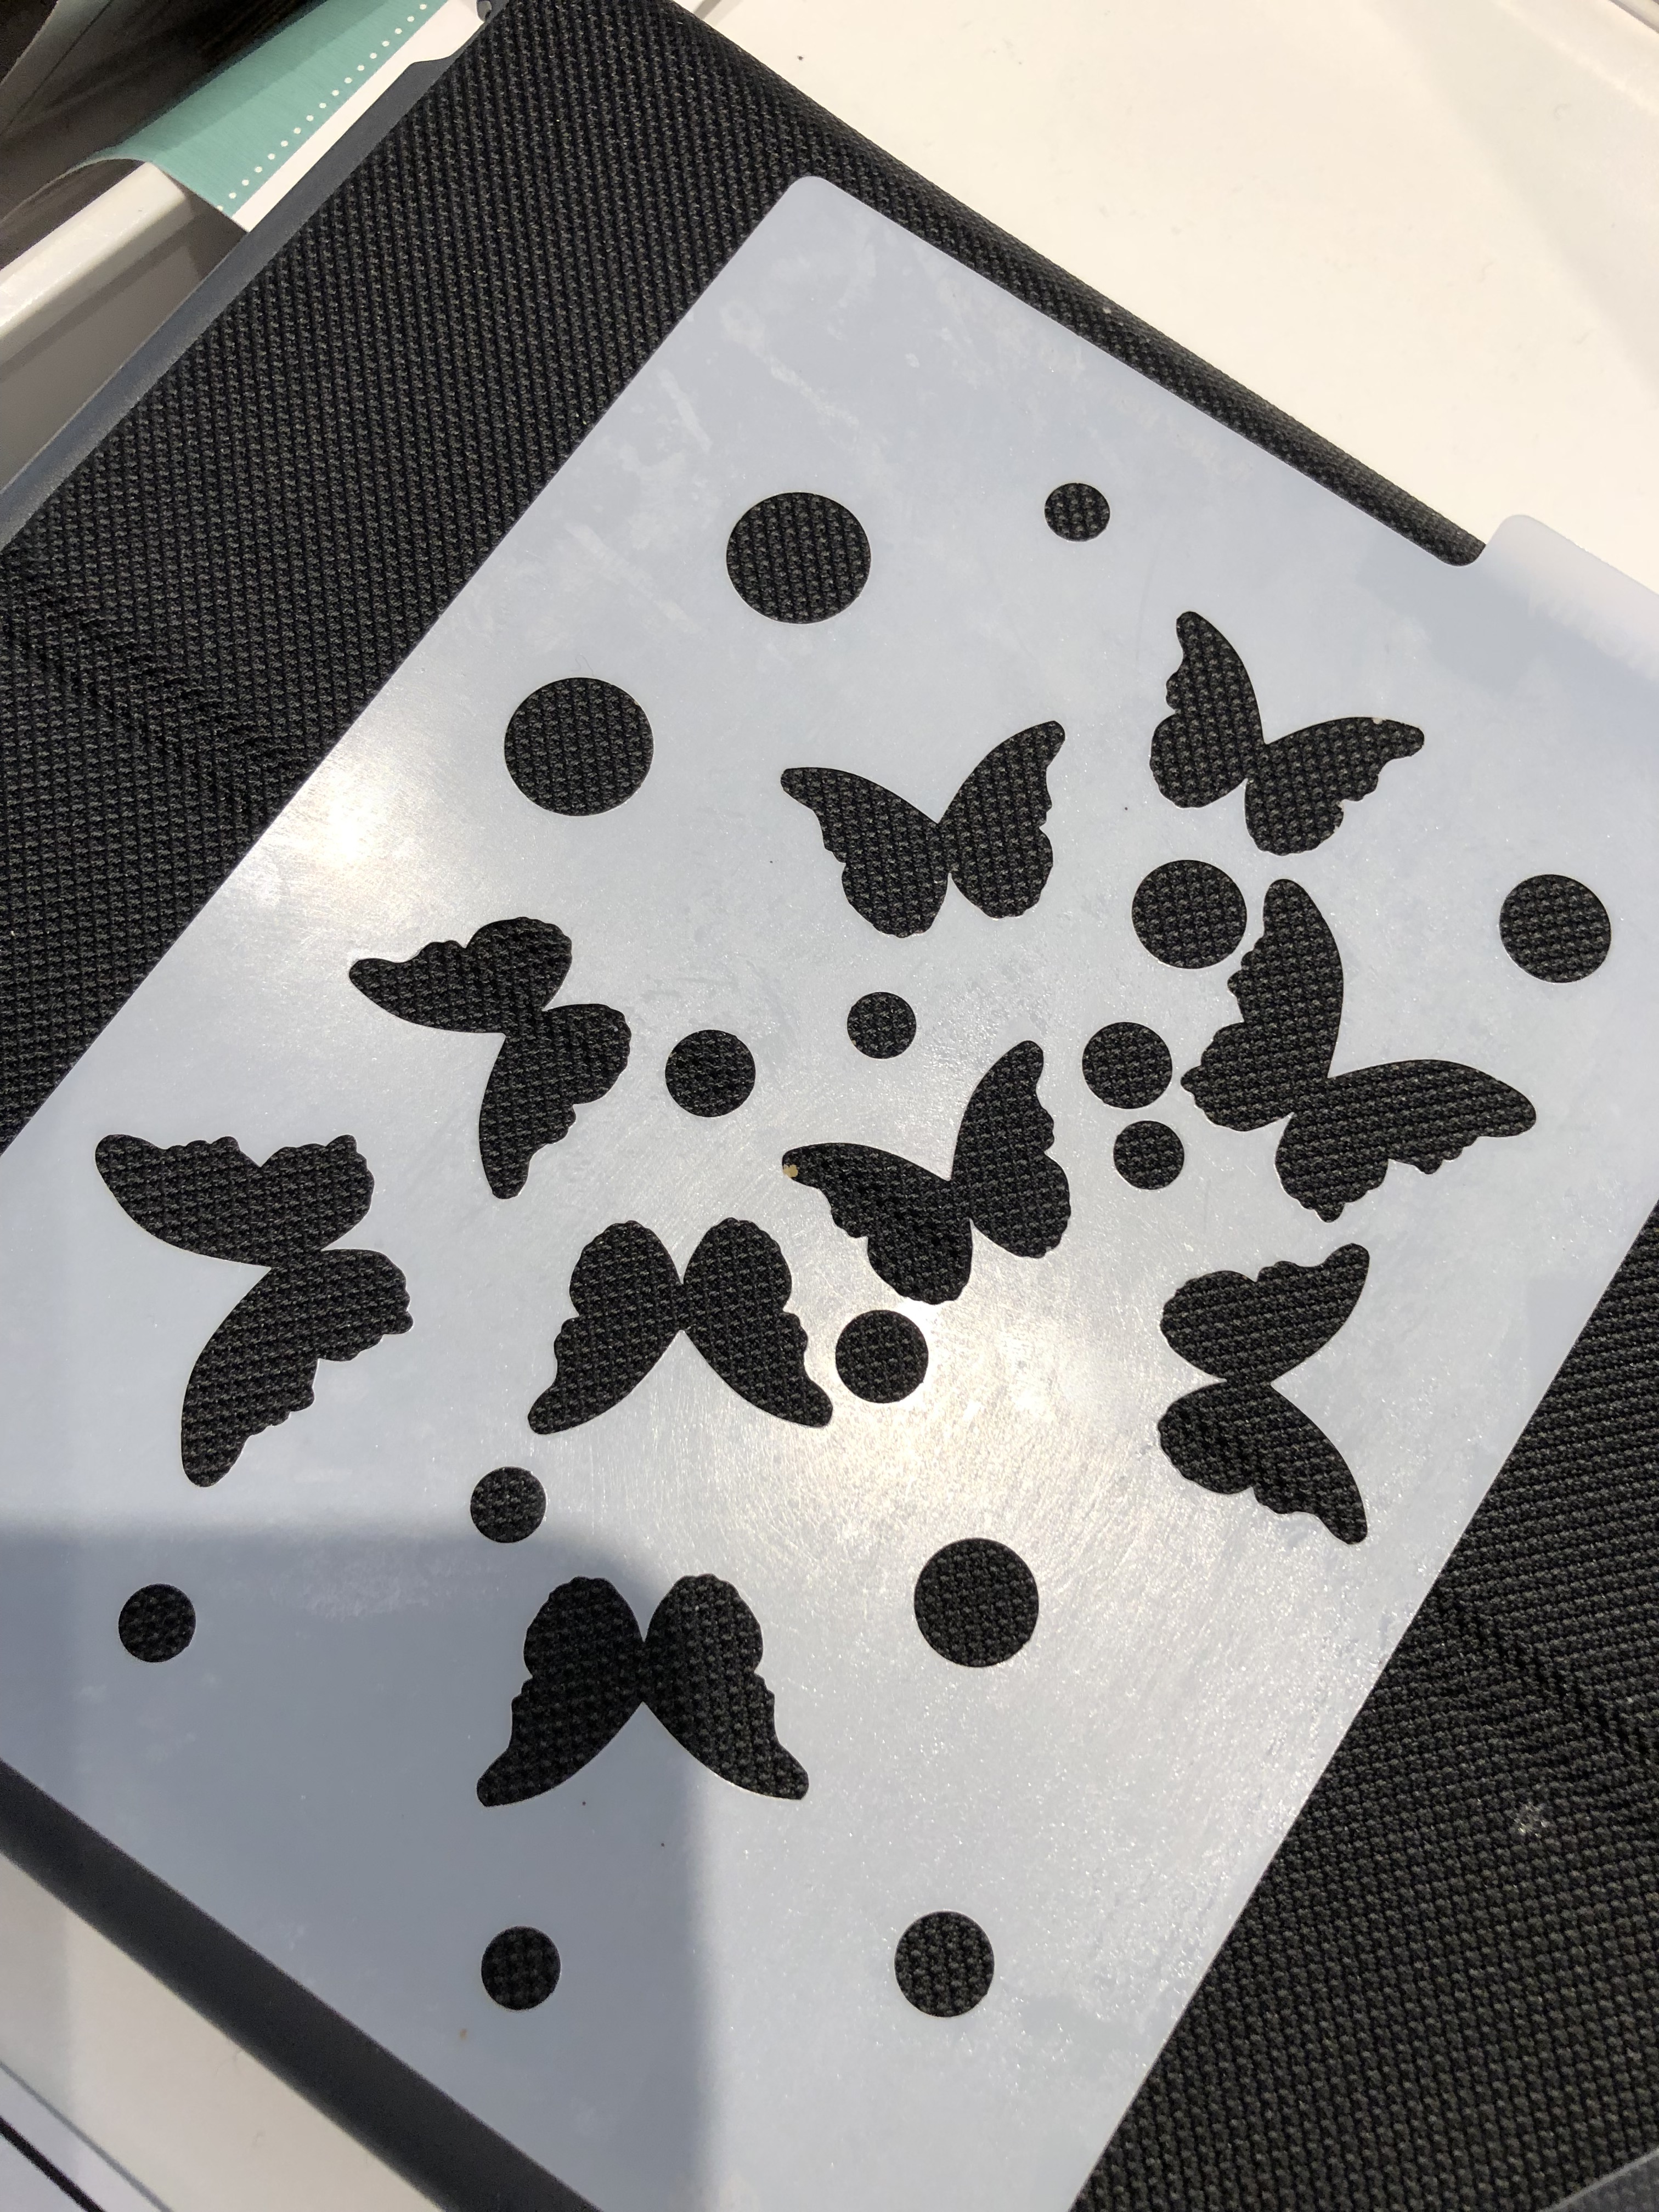
http://daranddiane.blogspot.com/ and the Modsquad use a stencil
http://modsquadchallenge.com/use-a-stencil/

I started by stamping the roses using a background stamp from Gina K, in versamark which I then heat embossed with fine detail EB powder. Cut this piece down and adhered to black card front. Using a small piece of scrap I then stenciled the butterflies, again with versamark and heat embossed this time in White. Stencil is one I’ve had for a long time and unfortunately do not know by whom or from where. In the beginning I didn’t think to keep track of those details so have a few items that I can’t identify properly. Picture below.

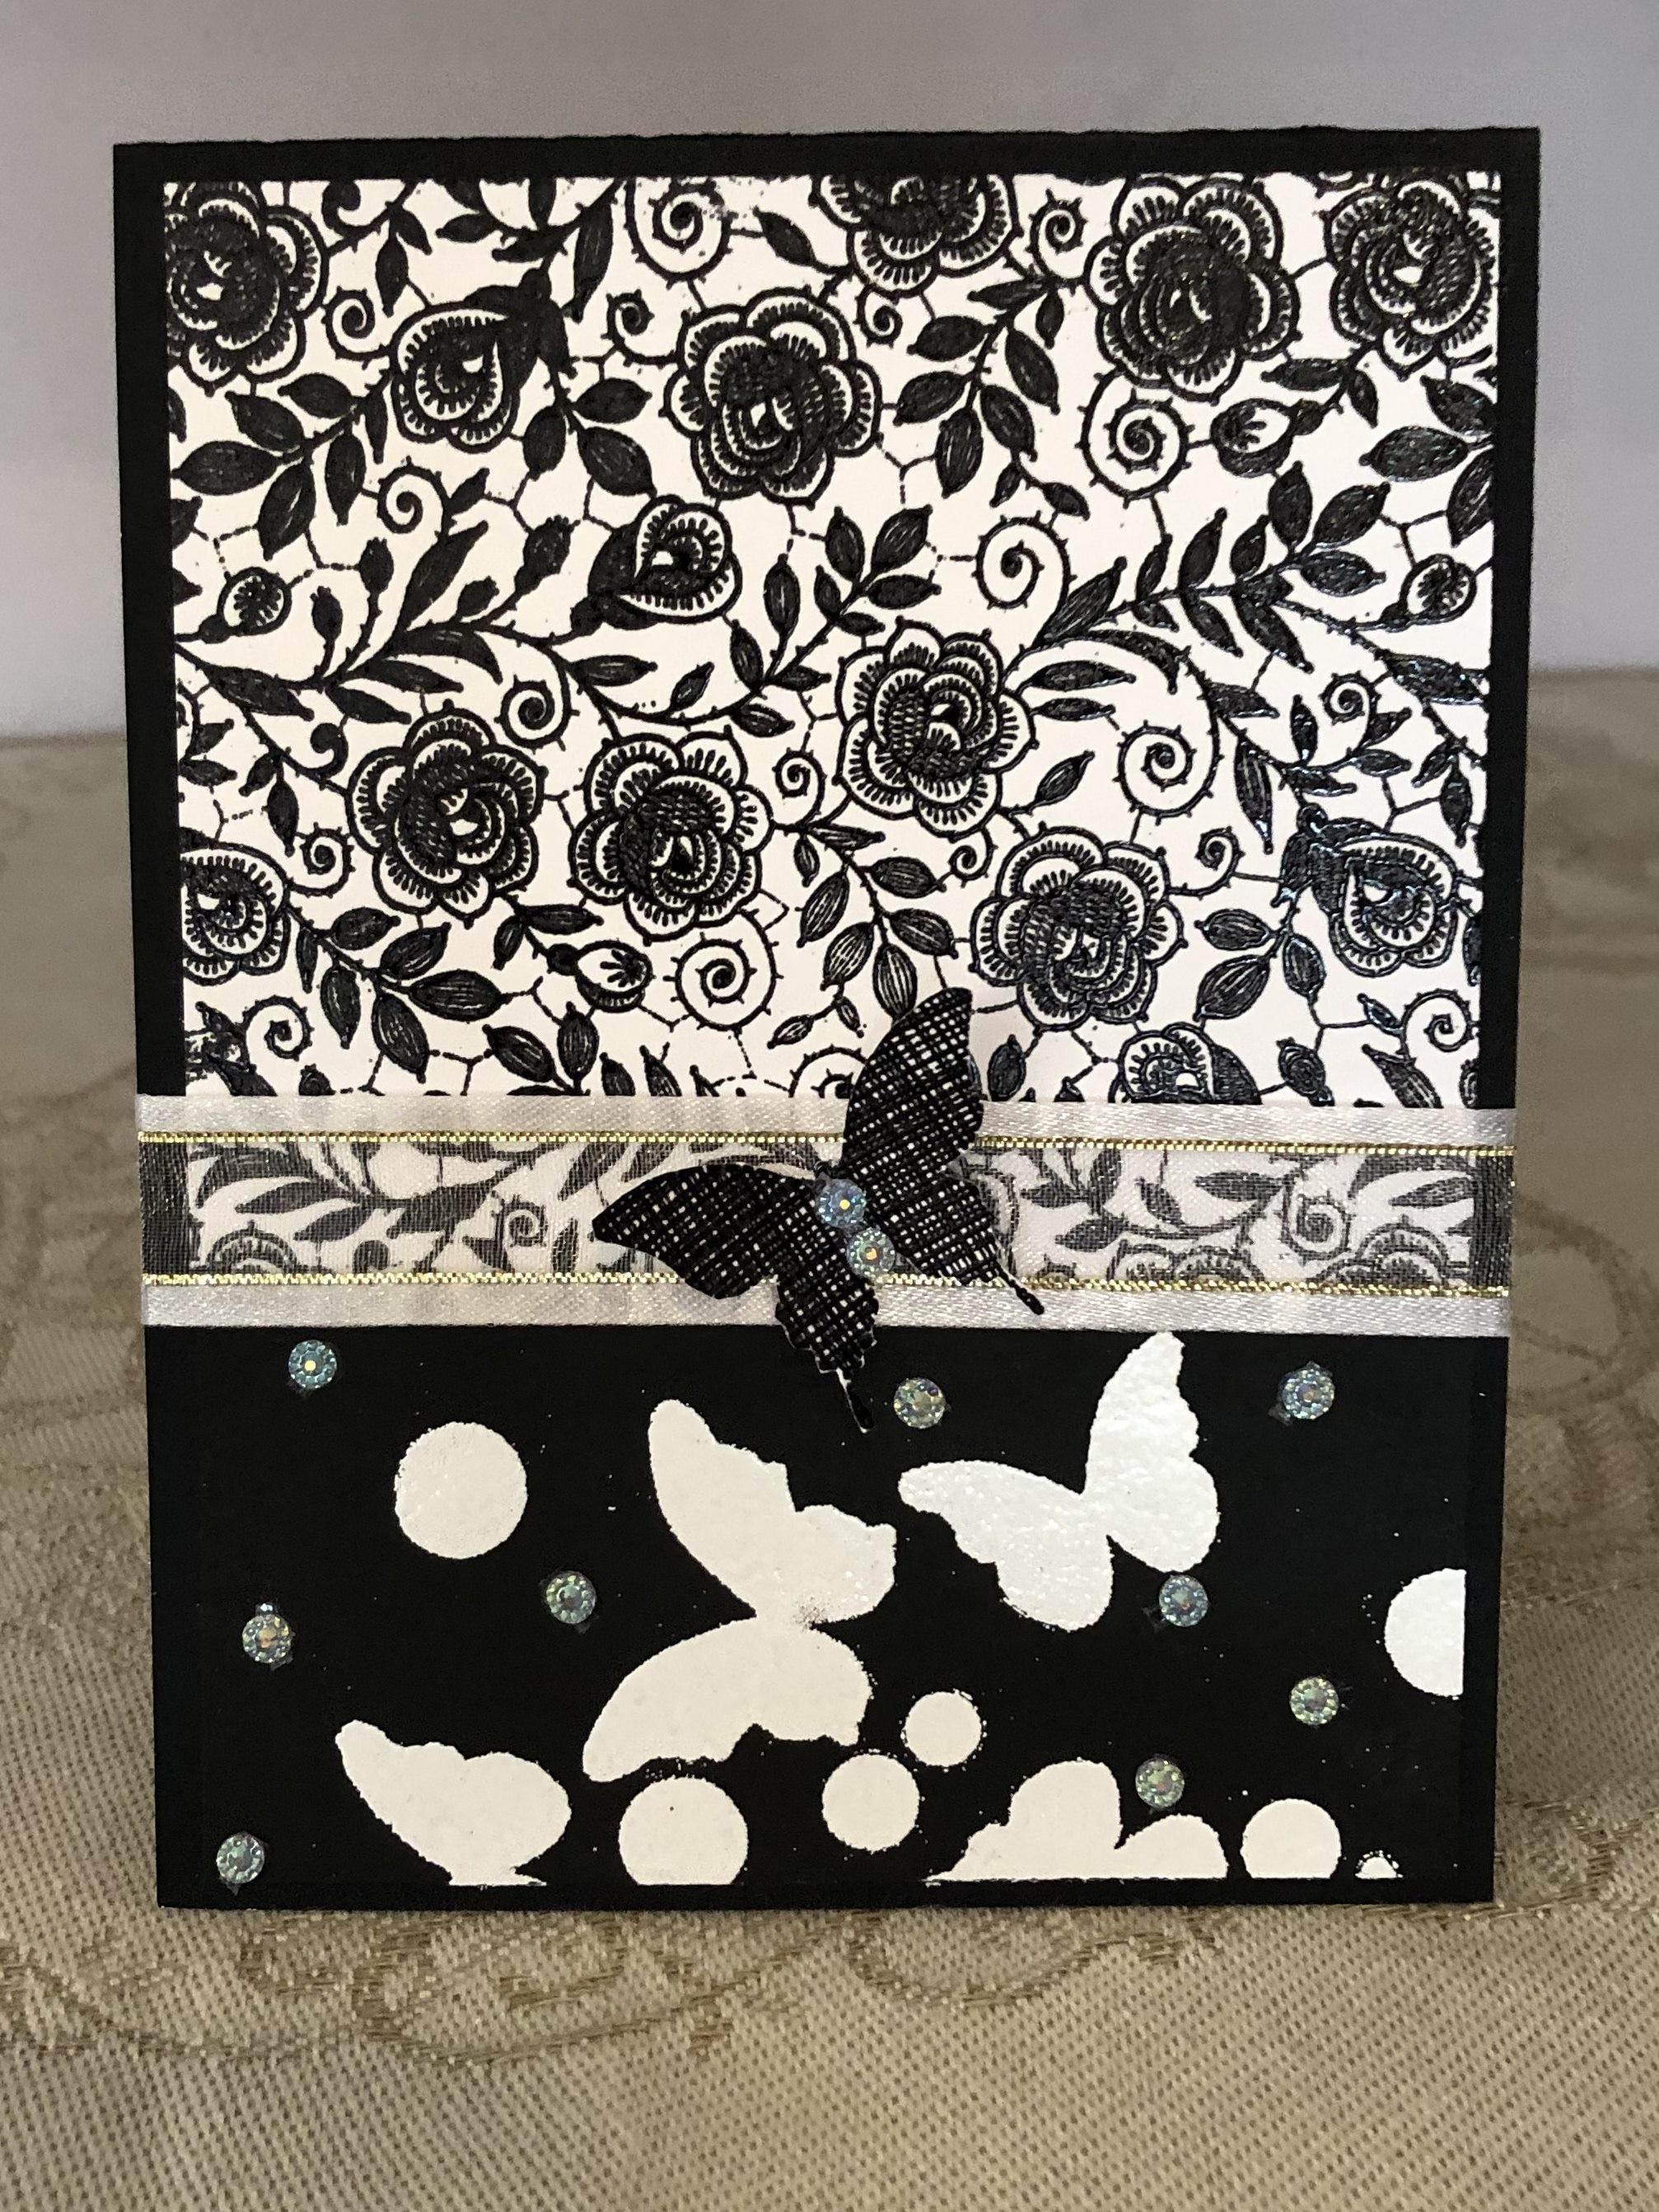
I cut this piece down to fit at the bottom of the other piece and glued it down. Then I added a small strip of ribbon around the card base. As well I stamped a butterfly image from a StampinUp set I have again in versamark and heatset that. I fussy cut it out and added to middle of the ribbon. A few small gems were added for some bling.

Watercoloured Birthday

Inspired by the watercolour challenge at Double D blogspot.

spot
Watercolour challenge at http://daranddiane.blogspot.com/

In playing around with the diagonal stripe background stamp used in my last post I actually messed up my first stamped image and couldn’t restamp it as I wasn’t using my Misti. Didn’t want to waste the piece but the lines were a bit thick and dark so I went over them with a silver pen using a ruler to guide me. After that I watercoloured the entire piece using Twisted Citron Distress Oxide ink. Then I had the idea of using a stencil, made by a stamp buddy as a gift, in graduating sized dots with Nuvo Glimmer paste called Blue Topaz. In the jar it looks very blue but when added over the top of the green it changed to what you see here. I really liked the result. After leaving it to dry overnight I had to decide how to use it. I picked the Cedar Waxwing bird stamp from another GKD set called Snowbird Stamp and die bundle and stamped it in Amalgam ink. I then watercoloured this image using my metallic shimmer paints from ColorArt. Die cut it out and popped it on top using dimensionals. The sentiment came from another GKD set The Wetlands and I die cut this, sponged the edges in the same green and popped it up at the top.

Ombre Stripes

This is made for the monthly challenge at Gina K Designs Ombre Ink blending. First I stamped the stripes in Amalgam ink using the GKD Diagonal stripe background stamp. I then sponged over the top with 3 different tones of violet Distress Oxides to get the ombre look. Using a diamond stencil I added Nuvo glimmer paste and let dry. After trimming the panel down a bit I adhered two purple strips of ribbon on one side and then adhered everything to the white card base.

I took the sentiment stamp, from the GKD stamp set called Lettered and Lovely using VersaMark ink. Heat embossed this with a Recollections Tinsel EB. I traced around the stamped image faintly in pencil so I could fussy cut it out into the stamp shape. Added this to the card front with dimensionals.

Friendship

Another of my new turnabout creations using Lovely Blossoms, again using some Distress oxide colours. I added some Gina K ribbon and then adhered it to the sweet Mango card base. I die cut the butterfly and glued it together before popping up on top of ribbon. Added the sentiment from the Wreath Builder set.

Made for the challenge at
http://www.global-design-project.com/2019/04/global-design-project-184-case-designer.html

This was inspired by the butterfly at this challenge. Fun challenge and fun card to create.

Marbled

My new Concord & 9th turnabout stamps arrived and I just couldn’t wait to try them out. Created this marbled background first using different Distress Oxides to get the effect. Using a fine glue pen I added some glue here and there and then burnished some gold foil in those areas. Cut it down to the right size and added to a small piece of black paper for a border.

Added some Gina K ribbon about two thirds down and then added the Koi die cut on top. I also used the same foiling technique on him for added interest. Added some tiny gems for bubbles and a sentiment hello. Decided to enter it into the following challenge even though it doesn’t follow the sketch exactly:
https://freshlymadesketches.blogspot.com/2019/04/freshly-made-sketches-383-sketch-by-jen.html . For once I can honestly say I love the result.

Three Trucks

Started out wanting to try a foiled grunge type finish and I used some Mirri card to accomplish it using a new 3D Texture fade embossing folder. Added some copper, silver and gold EB and heat embossed after which I swiped black stazon. Didn’t quite achieve the look I wanted but I know practice makes perfect so will try again soon. Panel was too big for a card front so I cut it in half using a wavy line die. Got 2 cards out of it. This one’s for this weeks Modsquad challenge:
http://modsquadchallenge.com/3s-company/

Made for Modsquad weekly challenge

I’m needing some masculine cards so the folder works for that and I added the other images by stamping and masking onto another small piece of card stock. I used Distress Oxides for the different colours. Stamped sentiment at the bottom, added a silvered edge using a pen and also cut the corners for interest. Popped up at bottom of main card and I added a bit of twine as well. It looks crooked in the photo but actually is quite straight. Not sure I like it but am not really in a creative mood so it will have to do.

Eggstra Special

Inspired by two things, firstly this sketch challenge at:
https://freshlymadesketches.blogspot.com/ and secondly by Susie Moore a member of the Gina K. Design team.

I don’t follow sketches very often and rarely do a CAS card so both are challenges for me. When I showed this to my hubby he said too much white space and couldn’t understand that this is exactly the look I was going for. Anyway I did a side fold card and cut off approximately an inch of the card front. I then added that inch back with the chosen PP. Because I am not always confident of a design when using masks I actually did a test piece on a separate bit of card stock and decided that it would work. I then basically stamped the exact same way directly onto the card front. I used Prisma colour pencils and gamsol to colour the eggs and did the test piece as well, as I can use it another way. Stamps are from a set called Springtime Baskets by Claire Brennan. I like that this card can be used as an Easter theme or a thank you card as the sentiment works for either.

Spring Daffodils

Intended as an Easter card and a thank you in one, I also realized this may fit the challenge at the Modsquad this week as it is also all pastels.
http://modsquadchallenge.com/pastel-fun-pink-main/ It fits the following challenge as well:
http://sundaystamps.blogspot.com/2019/03/ssc201-easter-hues.html

Spring Daffodils

I love this daffodil stamp from a set at GKD called Sending Love so I stamped the image with an ink by Delicata called Golden Glitz and hoped that it wouldn’t smudge if I used watercolours. Success, as it worked. I used watercolour pencils and a water brush (very sparingly) to blend but wasn’t happy with the white space so I also added a bit of lavender from ColorArte called Icy Iris to fill in the background. Then I fussy cut without worrying too much about accuracy. Using up some scrap pieces of PP I added the layers leaving a small border on side edge and then I popped up the flower on top. I also added a bow from a set called Springtime Baskets and a sentiment from that set too. I used the same watercolour on the sentiment strip and then added it at an angle. The gold and the ColourArte paint has a shimmer to it which isn’t evident in the photo but adds a lovely softness in RL. Personally I am really happy with how this card turned out and hope my friend likes it too.

Triple Heart Easel Card

This is my second Mother’s Day card and for this one I used a Hot off the Press template that I’ve had for a while and only used once or twice.

Mom in Brazilian Portuguese

Using a piece of CS colour Plum Punch and another 2 pieces of CS in different pink hues, I cut the large and smaller bases afterwards scored and folded in the indicated places. I then cut 3 hearts in graduating sizes decorating each piece with some pretty PP and Washi glitter paper. A friend had sent me a gift of some clear vinyl painted gold stickers and I used some of these to decorate the largest heart adding a few bling strips around edges of the main heart and the vinyl gold one. For the glitter heart I added the word mom in Portuguese along with a small strip of flowers to which I added jeweled centers. The smallest heart was decorated with a bit of pp and another 3D sticker. Each layer is designed to hold the previous one in position but I found the largest heart wouldn’t stay down so I improvised a slightly different support which seems to work better. The smallest heart is held up by a foam mounted decorated strip. The card folds flat for mailing but is bulky so requires a bit more postage for sure.

Mothers Day Love

I know it is early to be creating mother’s day cards but my two boarders asked me to do one each so they can mail them to Brazil. Lately the mail has been slow so I thought getting them done early would be better. Using a new die set from Spellbinders called Grand Cabinet 3D card, I cut the pieces in different card stocks. Then I set about decorating and assembling it.

MOM Vignette

This is my first attempt at this style of card and while it wasn’t difficult, it was very fiddly and took quite some time to do. I am thinking that the next one will be easier as I know what to expect. I used some pretty floral PP for the very back panel and then added a couple more layers. The card will normally hold 6 layers but I decided to only use 2 in the middle and the front and back as it allowed more space. I had the letters already cut from a Cheapo die I just bought. Added them to a plastic strip and glued it in front of the background panel. The next layer I added some stickers in a few places without obscuring the word and on the front mirror panel I added a 3D heart sticker in the bottom left corner. I also added some mirror card to the sides to cover up the tabs which I didn’t like sticking out. The whole thing folds flat and there is room to write a greeting on the back.