Birch Trees

PP564 Sketch Challenge
birch tree by Taylored Expressions

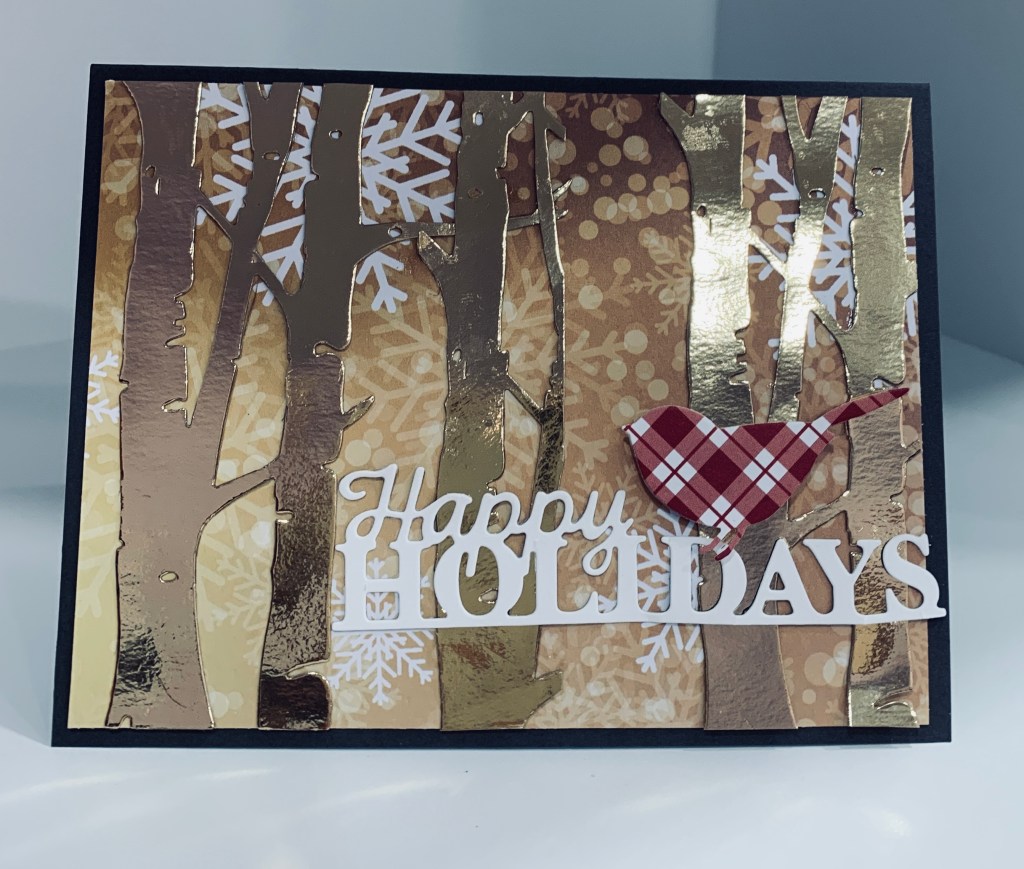
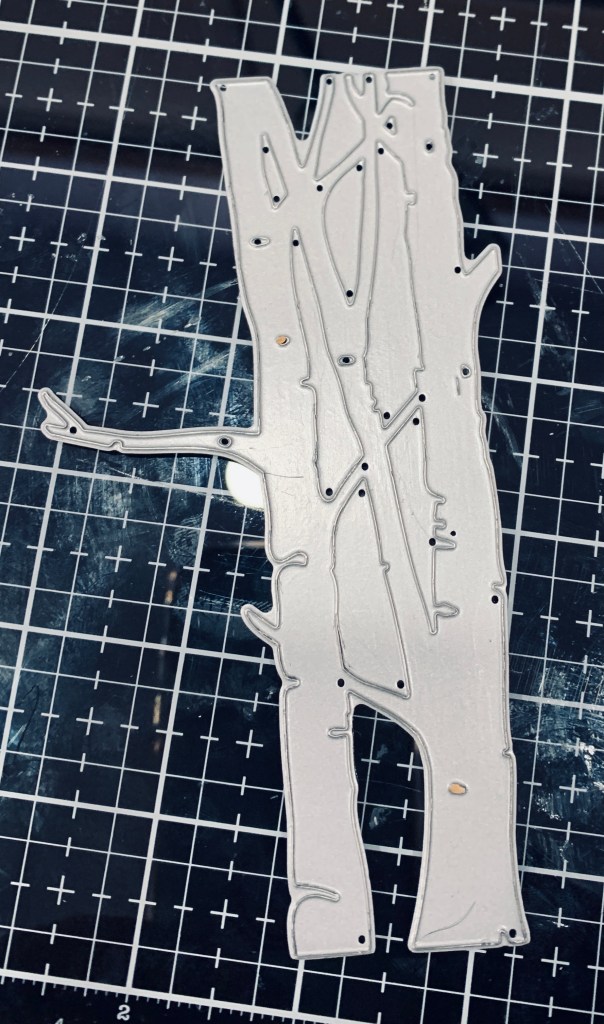
At the time I viewed the sketch, I also saw an image on Pinterest and thought it was a perfect idea to fit the challenge. Somehow what I wanted to try just didn’t work, although I’m not giving up, and will try again another time. In the meantime I really wanted to enter the challenge and I’m needing Xmas cards so this is what I came up with. Using the birch die I cut 3 of them using Metallic gold paper from Recollections. I also cut a small panel from Reminisce PP to go behind the trees. To get this looking how I thought it should I cut one of the tree pieces in half. Laying the pieces onto the pp I moved them around until sure they would fit then I glued them and cut off the excess. I added this layer to the card front and then using an Essentials die I cut the greeting from off white cs. I had the little plaid bird leftover from another project and he seemed to fit onto this card.

We had planned on going for a walk, but the heavens have opened up and the rain is pouring down, so the idea is scrapped until it eases. The rain suits my mood today. I’m feeling a bit down due to lack of sleep and the loss of a good friend earlier in the week. Her death wasn’t a surprise as she had been battling cancer for a number of years, but it is always hard to lose someone we care for. I am glad she isn’t suffering anymore as I know the last few months were not pleasant.

Colour Challenge – Green

Colour Challengehttps://makethecardschallenge.com/make-the-cards-challenge-38/

One colour in a challenge is actually quite a challenge but this colour is certainly perfect for a Christmas card. Mine was inspired by something seen on Pinterest, but unfortunately there wasn’t a link to follow so I cannot attribute it to anyone in particular. I used 2 types of green, the card front is from GKD and is called Fresh Asparagus, and another scrap piece that is darker in tone but one I don’t know where it came from. It looks a bit gray in the photo but it truly is a darker green and the paper is slightly textured. I also used some metallic paper from Recollections as a background for the darker green and for the tree shaped die cut words. The die is from Essentials and is in 2 parts with the outer frame looking a bit like a shadow for the rest. Once the pieces were cut it was an easy card to put together. I used another Essentials set called Mixed edge rectangle layering basics die for the panel which is a scrap piece left over from a paper pack by Reminisce. The sparkly washi tape was added underneath the main piece for some added green. The scrap pp was run through an EB folder called champagne and holly by Couture creations. Hope you like it.

Homey Christmas

Challenge #2

This card has been created using a combination of different stamps mainly from an MFT set called Fox and Friends, but the snowman and sentiment come from a limited edition set by GKD. I also used a piece of ribbon from my stash. Firstly I took a narrow piece of card stock and stamped the background all over it. I then coloured some of the background using InkTense pencils. I cut this down to size added the ribbon and attached to the card front. The snowman was stamped, die cut and coloured before popping him up on top of the ribbon. I have the second half of the stamped background to go onto another card front. Nice to get a two for one from one piece of CS.

I’ve added it to the Peace on Earth challenge as it fits the mood board theme quite well. I do like these mood boards as it gives one a lot of choice for creativity.

Frog Heaven

Just Us Girls #606 – Color Week

Even though this background ended up being a bit busier than I expected I still quite like it. I used a technique found here but I didn’t get quite the same effect. Once it was done I couldn’t think what to do with it although the colours fit the JUG’s challenge. Then I remembered a Memory Box die called Splashing puddles and had a go at cutting it through the watercolour paper. I had to run it through a few times but it did cut nicely in the end. Using my latest SSS kit with the frogs etc. I stamped the simplest frog and fussy cut him once he was coloured. To colour him I used InkTense pencils. I added glossy accents to the splashes, raindrops and the eyes of the frog. I also used some of the fall outs to add a puddle under the frog and some splashes to the inside. I used the sentiment only on the inside as the front is too busy to add anything else. The card stock is from GKD and I made it into a square card for a change. Initially I wasn’t sure if this was going to work, but I quite like the end result and I have another piece to use for a 2nd card.

Red and Kraft Joy

Color Hues #28

Since putting my stuff into my new craft room, still in progress actually, I’ve come across many items I had forgotten I had. The red corrugated paper is one such as is the kraft coloured handmade paper. I shall have to label my drawers and cupboards so I can find it all. Lately I pull open all the drawers looking for something that I know is there but can’t remember exactly where I put it.

I’m trying to get Christmas cards done and it is a slow process although I did manage to finish 7 this past week. Another 100 to go based on my recent count. I figured the Color Hue challenge was a perfect one for another Christmas card and this is what I came up with. The red and white letters are die cut from an Origami set of papers and I used some scrap bits for the punched foliage. Using a red glitter Sakura pen I added glitter to the foliage and to the stripes of red on the letters as well as a few tiny dots here and there. The die used is from Dee’s Distinctively.

We are experiencing what the weather people called an atmospheric river and the amount of rain coming down is immense. It is almost continuous so is very dreary outside. Our view is nothing but cloud and mist.

Repurposed Store Bought Card

Sometimes we receive a store bought card that is too pretty to throw away and a challenge to cut up and use in a different way. This card is made from one of those I received last year. Initially I couldn’t decide on how to use it but found a video by Lisa Curcio on YouTube: https://www.youtube.com/watch?v=68iuUR-TmtA and that made me wonder if doing a tunnel card would work out. I’ve never done one before although always like the way they look. After reviewing the video I took the plunge and die cut the center pieces from the card front. Then I reassembled them as shown by Lisa. I used infinity dies from HeroArts to get my circles. I added everything to a new card front and think it is a good way to reuse a store bought card. I may do more of them.

And just so everyone is aware, I don’t cheat and add my name to any repurposed cards. They aren’t my creations and I won’t claim them as such even though I change them a lot. It is just a great way to recycle something which is why I do it.

Light of Christmas

Peace On Earth Christmas Challenge #1

Products used come from Divinity Designs, SSS and GKD. Firstly I die cut the lamp and the small embellishments using scraps. Then I dry embossed the white panel and added it to the card front. I added the lamp chain next, then the candle before adding the lamp on top. After which I added the leaves, bow and berries. I couldn’t decide on a greeting initially but found the Ho Ho one in the stamp set I had been using on another project and thought it a good choice. After stamping it I added the piece to a bit of sparkly paper to give a border. Added a bit of Sakura glitter to the words but it doesn’t show on the photo. It reminds me of an old fashioned Christmas card – the kind we used to get years ago.

Grateful

#TCH #27 & https://doubletroublechallenge.blogspot.com/

The colour hues challenge requires orange and green and Double Trouble requires some kind of fall project so I combined the 2 and made this card. The card was inspired by one seen on Pinterest and this is my take on that card: http://iminhaven.blogspot.com/2016/03/mini-flowers-and-leaves.html. I don’t have nesting square dies so I used a diamond set from Spellbinders. PP is from MFT and I had to go through my box to find the pad which took forever as I kept missing it. After adding the PP to the card front I cut the white piece to the size I needed and played with die placement before cutting the openings. Stamps used were all from the Triple Play Holidays from GKD. After stamping I fussy cut the wreath and the tiny leaves. Inks used were Rusty Hinge and Peeled paint. Once dry I added some coppery glitter using a Sakura pen and I also added frames around the diamond shapes. I added foam tape to the back and popped this panel up on the PP. With a green Sakura pen I added a touch of green to the small orange leaves. I kept the card CAS and hubby said he liked it so I’m happy.

Peachy

Make the Cards Challenge #34

When I did a recent card as a guest designer for the Make the Card challenge site, I was left with a small piece to use on a different project. It was on my desk waiting for ideas. While playing yesterday I found these dragonflies that I’ve had forever and only used one or two in the past. Firstly, I decided to use the edge of some paper ribbon down the side of the stamped panel. Very hard to attach but I managed it and then added it all to the card front. I had the stamped sentiment already done so I added the tiny dragonfly to that and popped it on top. Then I added the larger dragonfly above. I wasn’t making it for any challenge at the time but this morning saw the latest one at Make the Cards and realized the colours worked. I finished the card by adding a few gems and am posting it for the challenge.

Autumn Leaves

LEAVES
http://daranddiane.blogspot.com/

My last card for today because it is almost time for me to begin meal preparation although I would prefer to stay in my craft room. Its my first entry for Double D since early this year and I was determined to participate this week. While on Pinterest I came across a very pretty leaf card and this is my take on the one I viewed – mystampspaperandink.blogspot.com. I used various Distress Oxides, squeezed lemonade, rusty hinge, scattered straw, dried marigold and finally a few dabs of frayed burlap. Initially I just the 2 lightest inks to get my panel covered. Then I randomly stamped leaves using VersaMark ink and a GKD set called Stitched Leaves which I clear embossed. I added more leaves and a florish from the same set along with a tiny leaf from SSS set. Once happy with the result I went over it all again with the darker shades of inks. Added some ink spatters and water drops then dried it. I also had some paper ribbon strips on my desk so I added them to the sides before adding the main panel on top. Using VersaMark and Cosmic shimmer powder I heat embossed the word on vellum. Original intention was to wrap this around the main piece but I forgot so it was added at the end. During my unpacking I came across the popped up leaves, purchased a long time ago, and these are the last two. Decided to use them as shown and am happy with the result. I think this is leafy enough for this challenge don’t you?