Night Sky – Aurora Borealis

Challenge #225 – Night

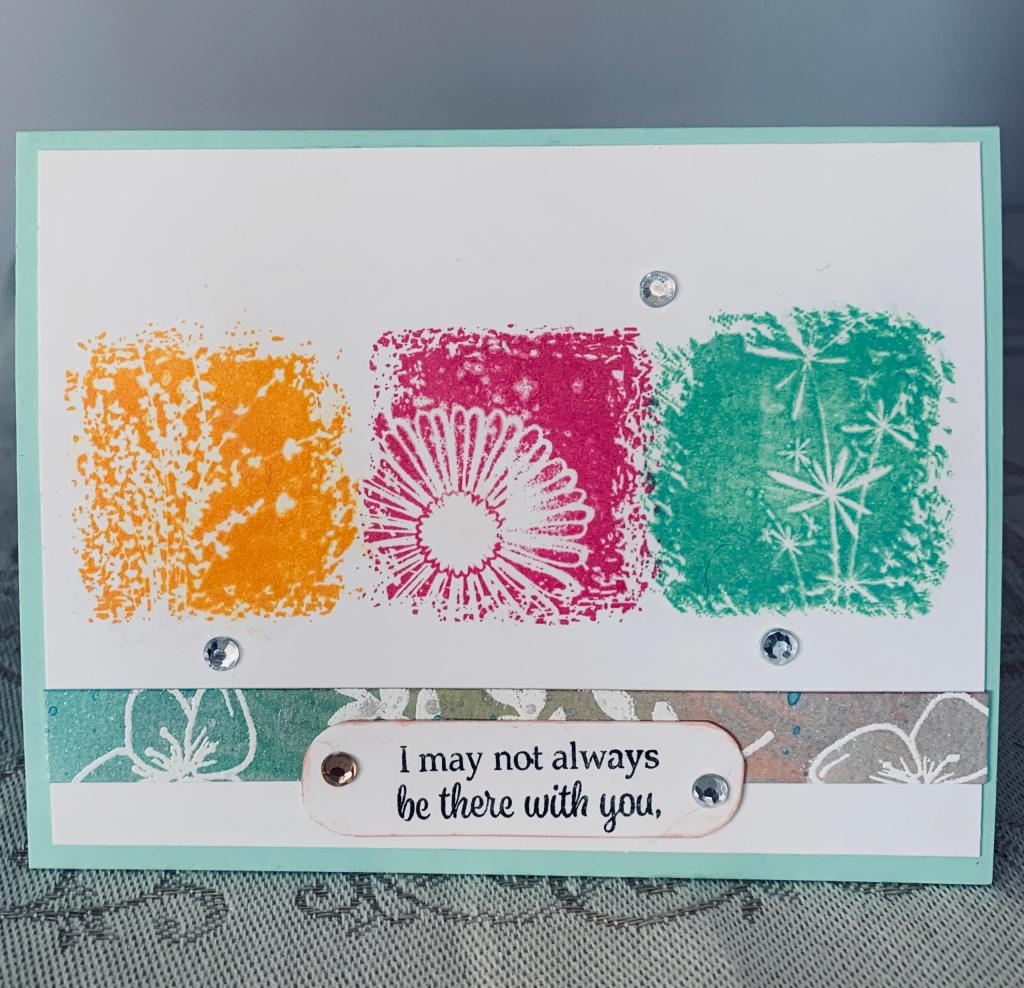
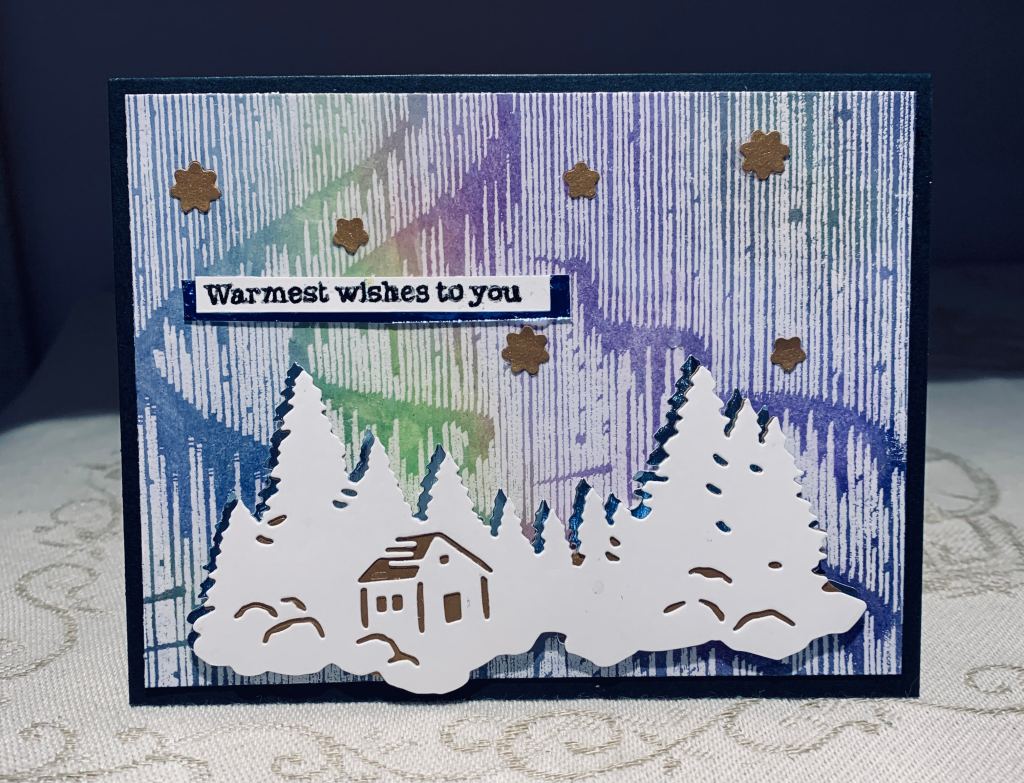
This background is from a Hero Arts background stamp that was part of a recent kit. It has been sitting on my desk for weeks waiting to be inked and the challenge at Inkspirational was why it was used now. I thought it was perfect for the challenge. Using versamark I stamped the image and then clear heat embossed it. After that I used various Distress Oxides to create the Aurora Borealis colours. In addition I used some glow in the dark paint on top which is very shiny but doesn’t glow on a photo. Using one of the dies from the kit I die cut the trees and cabin 3 times. Once in a mirror CS, then in a dark gold and then in white. The dark gold layer I deliberately didn’t cut through where the cabin sits as I wanted it to glow through the gaps of that die cut. By kind of embossing it I was able to use scissors to cut it down to fit behind properly. Then I offset those layers on top of the mirror piece. Using 2 star dies from the set I added a few extra stars into the sky. The sentiment came from a GKD set as I only wanted a very small strip on the card front. I also offset this piece on to another mirror strip in a darker blue. I used foam strips to pop up the die cut piece. I shall use that background stamp on more cards as it gives a very effective night sky.

A different kind of fold

Just Us Girls – Wild Card Challenge #560

I had seen a variation of this twisted easel card on Pinterest and eventually followed one of the links to find out how to it was done. This is my first attempt and because I used 2 word die cuts it actually fits the challenge at JUGs this week although initially it wasn’t made with any challenge in mind. It is a larger card so will cost a bit more to mail, but I like the end result and all the scraps leftover gave me a similar but smaller designed card. The inspiration came from here, but I found some instructions here. Basically you use a 12″ by 6″ piece of card stock and you score at 6″. The twisted part you score from corner to corner on the diagonal. PP is from designsbyreminisce.com For the snowflake panel I used some scrap cs and stamped it randomly with snowflakes and backed it with some gold paper. The Xmas tree is a die from Essentials and comes in 2 pieces and I used some scrap pp to cut the word tree part and added it to the darker gold base. To hold the easel up I used a button and some canvas with thread pulled through and tied into a bow. Then I cut the Happy Holidays using another die from Essentials. Of course any subsequent card looks better because once I’ve practiced the how, other cards are easier to make.

Golden Day

Golden Days of Fall

I’ve been playing around with a few cards with this design, same but different and have done about 10 so far. The idea and some instructions came from Here and they are a very easy card to make. The Sisterhood of Crafters is asking for something gold so this is one of my takes for the challenge.

Patterned Paper came from Designs by Reminisce with the darker gold die cut circle coming from my stash. The thread is also from my stash. Stamps are from Hero Arts and I coloured the tree with a combination Inktense pencils and Sakura Gelly roll pens.

Triple Step Fall Card

The Card Concept #142 {Autumn Bounty}

Yesterday was one of those days where I spent some time fooling around with one thing and another and not getting inspired by any of it. One of the things I did was to cut this card base with a die from Divinity Designs and then having no idea what to do with it. As well I cut another card base into a double gate fold and got stuck with that too. In the end I walked away from my craft room in disgust.

A reasonable nights sleep and a rainy morning sent me back into my craft room and here we are with a completed card and another one partially done too. I decorated the card front with some CS from a paper pad called textured card stock by Momenta. It isn’t actually textured but the patterns make it look that way. Once I had the pieces cut and adhered I took the less than perfect leftover background piece and cut some circles out of it. Did the same with some cream CS. I went over the background pieces with some gold ink and a pen around the edge so it has a bit of sparkle on both pieces. Then I stamped the focal piece with a fern leaf in different ink colours. No idea who made the leaf stamps but they are red rubber stamps and I think I got them in a sale somewhere. I used some other leaves from a StampinUp set and stamped the sentiment from that same set on the smaller circle which I heat embossed. Glued these pieces to the background circles and than added them to card. Went through my stash of bling and found the copper leaf and baubles for the bottom and an old jewelry piece I had broken up a while ago. Decided that this would work for this weeks The Card Concept challenge. To me this card seems to fit the Mixed media style best but it could also be FreeStyle collage.

Botanicals


PP514 – A Sketch Challenge from Jaydee & Global Design Project #264 | CASE the Designer

I managed to get this card to work for 2 challenges which is nice. Doesn’t always happen, but it was really easy this week. The stamp set is an incentive set from GKD called Botanical blocks and it was nice to use it as I haven’t done so often. I stamped the 3 blocks in different distress oxide colours and when dry used a little distress glaze on top. The small bottom strip is left over from a background piece I made earlier this year and the sentiment is from the same set but I cut it into 2 pieces. One on the front and one inside which says, ‘but I will always be there for you’. Added a few rhinestones and glued the panel to card front. I’m happy with this card.

Texture and Wood

Just Us Girls #559-Photo Week

Decided to have a go at making a wood look panel and I followed a link provided by Angie just to refresh my memory of what to do. I scored at 1/2″ increments and used weathered wood distress ink for mine. In retrospect perhaps it would have been better in a brown rather than the gray, but I used it anyway. I was intrigued by the clock on the photo, but don’t have any clock stamps (the ones I ordered are stuck in Blaine). I do have a Sissix folder called pocket clocks so I used this folder on a piece of the not so great background piece I tried to make. After cutting it down I glued it on top of the wood panel. Instead of doing flowers I thought one of the leaf stamps from a SSS set would look nice so I stamped it with versamark and heat set with Rose Gold powder and then die cut it. The sparkly bits are from some stuff I’ve had sitting around for a long time and forget to use. Sentiment is from the same set and on the inside it says Be Kind.

My Bias

Challenge #237 – On the Bias

This came about partly due to the challenge and partly due to what was left over on my desk. I had been fooling around with the leftover gold frame wondering how to use it, and a few days ago decided it would look okay if I angled it on a card front. Didn’t have time to continue and was also working on something else so it wasn’t until a few minutes ago that I looked at it again; after seeing the challenge. I had the tone on tone snowflake piece, the plaid paper, and the sparkly snowflake marquee pieces sitting around so instead of cutting the paper in two I decided to let the frame and tone on tone piece do the dividing. The frame is from Paper Roses, the snowflake Marquee is from Memory box and the Happy sentiment is from LawnFawn. Although the tone on tone snowflakes have sparkle, from a Stardust Sakura pen, it doesn’t show in photo, but it is very sparkly in R.L.

Ice Mice

CAS Mix Up October Stencil – Tone on Tone

One of the DT’s here did a design where she cut up the stenciled piece and I liked it so much I decided to do the same to my card. I took a gray piece of CS and sponged through a KaiserCraft snowflake stencil using Distress Oxide ink in Hickory Smoke. At first I thought it was too dark but once dry it was much more subtle. I cut it up and glued to white card front. Then I took my LawnFawn ice mice stamps and dies and did three of the mice. Added them and then stamped the sentiment and die cut it. It took a while for me to settle on best placement of this piece but in the end I thought at the top looked best.

Fall Fun

Just Us Girls #558 – Color Week & October … WHAT does it mean to you??

The colour challenge at JUGS and the October one at Double D gave me the chance to do another fall card today. Stamp set used for most of it came from Gina K Designs – Triple Play Holiday – that I purchased from stamp buddy Diana and first time inking since I got it. The raffia ribbon stamp was stamped first and I added the rest around it. This card kind of designed itself as I didn’t have a plan when I started. Added the sentiment above the ribbon. Then I stamped the pumpkins using some masking to get them to sit together and added the faces to them in black. Then I added the leaves at the top left corner and gave them a bit of sparkle using a copper pen. I was going to try spattering some black but knowing my technique isn’t very good decided against it and instead used some tiny stamps from a different set called Lettered and Lovely. I think I like the effect these small stamps give better than I would have the spattering. Mounted the panel onto some black and then onto the purple card front. Having just had tea (socially distant) with my neighbor who is still battling cancer and talking about my cards which she always enjoys, I’ve decided that this one is for her.

Thankful

Global Design Project #263 | Theme Challenge

As I haven’t entered a Global Design challenge for a while and because I had been playing around with making some backgrounds with my new colours from Colorburst I decided to create something that combined both. To be honest I didn’t like my background results very much as I managed to use too much of the dark brown and everything was quite dark. Those that know me are aware that I don’t throw much away so I decided to use part of one piece that wasn’t as dark or as bad as the other. I had used some Dusty Concord Distress oxide on a large background stamp first which was clear heat embossed. It is somewhat evident on this piece but a lot got covered up. The card is a leftover piece of kraft that gave me a 4 1/4 square card. Using the Stitched leaves stamp set and dies from Gina K I stamped and cut the leaves as well as the word and shadow pieces all from same set. I used 2 sakura gelly roll starburst pens in gold and copper to add sparkle and some subtle colour on the leaves. Once positioned I added the twine bow and a few metallic gold dots on the background. I really wish the shine would show up on a photo as it is quite pretty in R.L.