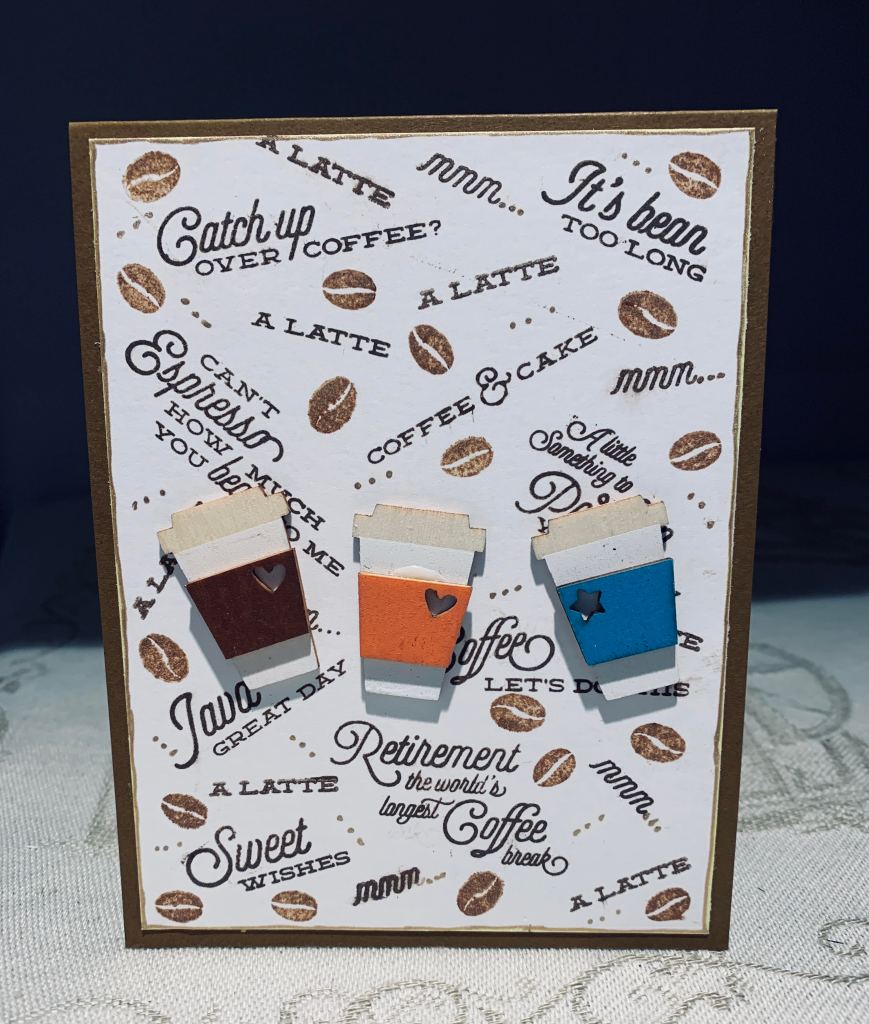
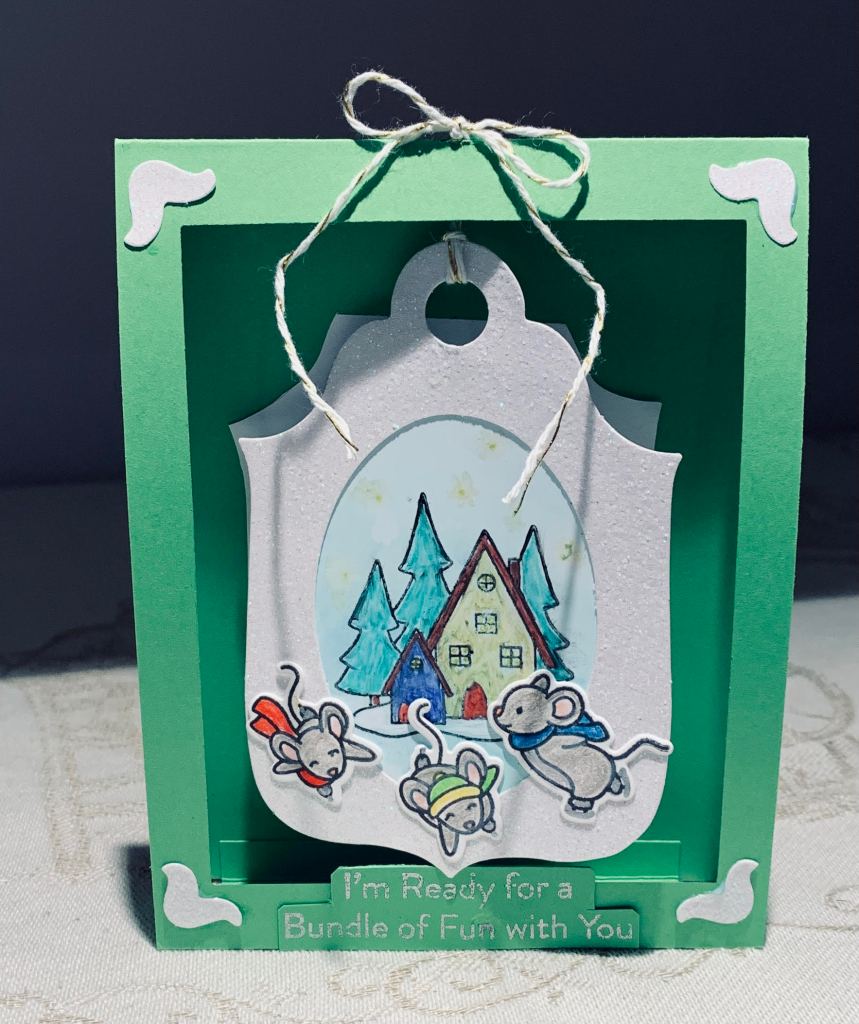
A Few CAS Designs

CAS Game #176 – One Corner + optional twist Cosy & Winners Post + DESIGN TEAM CALL

What can be cosier than a small dog curled up on a mat? Stamps are from Hero Arts and from Gina K Designs and the images were coloured using Inktense pencils. Added a bit of sparkle to baubles and edges of the tree, but doesn’t show on the photo. A simple and quick card to make. It was made for the AAA challenge but then I noticed that Perfectly CAS is asking for DT entries and although I don’t have a hope of being picked I thought it would be fun to enter. I’m adding a few other examples to this post.

paper pieced

For this one I used my new MFT kit along with a Sissix folder. Even though I did some paper piecing and the background piece is a layer this is still CAS to me as it has lots of negative space.

Snowflake die cut

Done on navy CS using left over pieces from another project. Heat embossed the sentiment in silver. The pieces are all sparkly white CS by LawnFawn. I think CAS can be done on coloured CS as well as white, although some may not agree with me.

Poinsettia Layers

Just Add Ink #527…Sketch! & Lots of Layers

A few days ago I pulled out my Sue Wilson Festive collection dies thinking I would want to use them soon. Didn’t really have an idea in my head at the time, but after seeing the sketch challenge at Just Add Ink I thought they would work for the challenge. In addition The Sisterhood is asking for lots of layers and this meets that challenge too. One of the DT examples is what inspired mine.

I added a silvery layer to the card front and then added the die cut oval which already had some texture and I added a bit more by dry embossing a few snowflakes. I popped this up on top of the silver panel. I spent some time die cutting all the elements for the poinsettias using a scrap piece of white sparkle, gold foil, silver foil and some green foil. After layering all the pieces I played around until I got them in position and then glued them on top. Added the leaves and smaller flowers around the sentiment. Die cut the sentiment from Essentials in the same sparkle cs. In retrospect I should have die cut one in a dark cs (maybe the green foil) to add behind the sparkle, but even so I’m happy with the end result. Not a card for mailing but I can hand deliver to my neighbor who I know will like it.

Feeling Wicked

Challenge #224 – Picture Inspiration & HALLOWEEN JUMP START

Halloween isn’t my thing and I only make one or two cards each year. This is my first one so far and is intended for our little neighbor down the street. As I don’t do the trick or treat part anymore, this goes to her with some money inside so she can buy whatever treats she wants. I like doing fun folds and this is a double Z fold. The ghosts were fussy cut and I went over them with a white gel pen, but they still look a bit grayer than I wanted. Card stock all from Gina K but the pp is from other sources. Stamp set is from GKD called Feeling Wicked, and I randomly stamped some of the images and the word onto scrap CS and cut it to the size I needed.

From me to You

KRAFTY CHICKS CHALLENGE #529 – CAS – (CLEAN AND SIMPLE)

I had seen a lovely CAS card on a blog (I think Ellen Hutson) and I liked it so decided to create a version of my own. Using a shooting star stencil from Hero Arts, I picked out a few of the stars using a Sakura glitter pen. With some scrap strips of CS I added them as shown and stamped the greeting (Kaiser Mix & Match set) underneath. On a separate piece of CS I stamped the village image from Great Impressions using archival ink. I then coloured this using InkTense pencils and a bit of water. The image was a bit too big for my strips so I cut it into a curved shape and removed one of the houses. Second version shown below. I then popped this up onto the strips. I did add a bit of glitter to the village houses and falling snow.

Second version

Did this one much the same as the first but used different glitter pens for the stars and did a much better job of adding the strips. I like both cards.

Challenge the World

#141 {Around the World} Challenge

After concentrating on Christmas for most of this week, I needed a change in pace. The reminder to play in the Card Concept challenge was in my mailbox and that inspired me to do this card. Several things in the photo inspired my ideas, the books, flowers and the globe and I ended up with this layered card. I’ve had the world die by Sissix for a long time and don’t use it much, so decided that should be part of my design. As I don’t have any book stamps I went to the internet and found some free stock photography which I printed and then cut out the elements I required. I cut the stack down to 3 books as the original was a bit too big. Card front is Peach Bellini from GKD and the vase and flowers are from one of her stamp sets called Vogue Vases. I fussy cut these images out after colouring them with pencils. PP is a scrap piece left over and used to ground the books and vase. I cut part of the world off as it was also too big for this design. Added all of this to the black background and then added the sentiment strips from an Tim Holtz Idea-ology pad. I wanted something to reflect knowledge and the world and these worked the best. Finished it off with some iridescent bubbles from Studio Katia. A nice bonus is I actually like the finished card.

Welcome

card front

Using my Hero Arts Christmas kit from last year, and an idea from a card I made at that time, I created several of these for family and a couple of special friends we don’t see often due to distance. After die cutting the house panel and folding back the door so it is easier to see behind, I hand coloured everything. Using one of the set stamps I added the welcome mat at the bottom. With other dies from the set I cut the door wreath and the side plants. I added some Stickles sparkle to all the die cuts, and I also added a bead for the door handle.

After getting my hubby to resize and print the selfie photo we did for a particular project gift for my sister earlier this year, I added some gold metallic paper to show through the windows and lanterns and then adhered it to the back of the die cut.

Inside the door

I adhered this panel on to a tent fold card and added a Christmas sentiment inside along with some poinsettia stamped images. These have basically taken me all week to complete so it isn’t a card I will mass produce for everyone. Had fun with it though and am pleased with end results.

Circle Peek-a-Boo

DRU Challenge #154 – Anything Goes

My new Peek-a-Boo set from Hero Arts arrived the other day and I was dying to try them out. Figured the challenge at DRU was a good choice for incentive to play. I did check out a few ideas on Pinterest and with Jen McGuire before starting. I decided to create a small scene under my flap and have the sentiment on the front section.

under flap scene

First I stamped the leaves, using a rubber cube stamp by Stampendous in versamark, heat setting it in gold onto the sandy beach CS. Then I die cut the peek-a-boo portion and using some pencil marks and the opening as a guide I figured out where to stamp the scene onto the white card front. After lightly sponging some tumbled glass ink to create the background I then took some tiny stamps from a GKD set called Holiday Frame and stamped the snowflakes at the top in white then heat embossed in white too. I stamped the snowman with amalgam ink and coloured with Inktense pencils and stamped the tree with evergreen bough. Added a tiny hand drawn gold star to top of tree and added some glitter to the snowflakes to make them more visible. Can’t make them show up properly on the photo unfortunately. I also added sparkle to the snowman and the tree. Using a tip from JM I added a tiny circle with the word lift hand written on it.

The front flap was a bit bland looking so after I heat embossed the sentiment I added some extra snowflakes in gold at the bottom and some bling around the rest. I’m not totally happy with the result, but it isn’t bad enough to have to do again. For a first try it isn’t terrible and we learn from our mistakes right.

Ombre Snowflakes

Just Us Girls #557 – Trend Week

Before it was trendy I did a few slimline cards because they fit into a regular business envelope. This, however, is my first since they became the latest trend. Starting with a piece of LawnFawn Pixie dust cs, I die cut the snowflake using the die twice. On another scrap piece of cs, I ink sponged with distress oxides in Milled Lavender, Seedless Preserves and Dusty Concord blending each of the colours from light to dark. I adhered the 2 together and then added a black piece underneath to get the border. Mounted this onto the white card front. Using a sentiment stamp from a GKD set called Holiday Frame I stamped it with both the seedless preserves and dusty concord and then mounted this piece onto another scrap of black. After adding this to the bottom of the card I added gems in similar colours to the inks. This turned out much better than I thought and I’m quite pleased.

Star Wreath

Wreaths Challenge

This star wreath – unbranded die cut – was left over from another project so I decided to make an additional wreath card for the Double D challenge. PP from a Recollections pad and before I glued it to card front I added the ribbon. Then after adding the wreath I used some glitter on the bigger stars and a Sakura glitter pen on the smaller ones. As well I used the pen on the tiny stars in the middle of the background panel. The sentiment came from a GKD set called Deck the Halls and I stamped it onto a tiny die cut tag. I also added a couple of gold stars then I tied it to the ribbon using some embroidery thread. Kept this very simple and wish the glitter showed up on photo.

Winter Wishes Wreath

Wreaths Challenge

Using a Penny Black wreath stamp I first stamped the image in versamark and then heat embossed in silver. using a berry sprigs die set from Dee’s Distinctively I cut the red sprigs and played with placement until I like the look. Glued them in place but left parts loose for dimension. Didn’t like the square orientation so I cut the wreath using a Sissix set and added some foam to the back. Searched through my pp and found the black plaid piece for background. Popped the wreath on top and added the bow, but it needed some bling so I added the small gems here and there in different colours. The sentiment is from a CTMH set that I’ve used almost every year since I purchased it as I like the font. Heat embossed in white on a black scrap piece that I rounded the corners of. Popped up along the bottom. My hubby loved this effort and my photo doesn’t really do it justice as it looks nicer in reality than here.