Mardi Gras Mask

Challenge #3 2022: MARDI GRAS

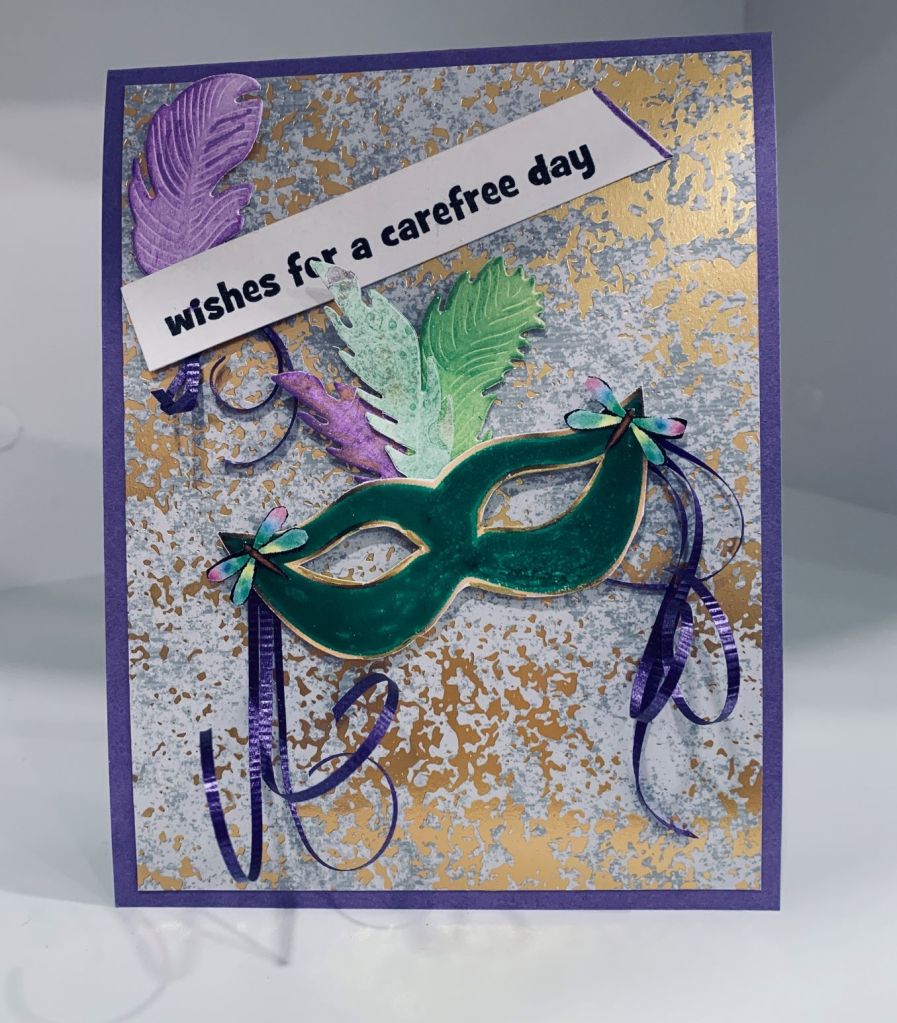
These past couple of days I was so busy creating something ready for next month as a guest designer, that I almost forgot about the current challenge. Then when I remembered it I couldn’t at first think of anything that would fit the theme. A bit of research gave me the idea for the mask with feathers and I was off. As I don’t have any stamps that work for a mask I eventually used one I found on the Internet and coloured it with Sakura Glaze to get a deep green. I used a gold pen around the edges of both eyes and the entire mask shape. Another internet search netted me the tiny dragonflies which I managed to fussy cut using tweezers and scissors. These I glued to the upper corner edges of the mask. I spent some time with my Inka Gold pots and added the colours to a piece of mineral paper which I intended to die cut. Unfortunately although the colours are wonderful I didn’t realize that mineral paper doesn’t like being die cut so I got embossed impressions of feathers rather than the feathers I needed. I set it aside figuring I can use it later as a background and die cut more feathers using regular white card stock. My feather dies are from both SSS and Spellbinders and I cut more than I needed. After sponging them with various Mardi Gras colours I picked the best ones to add to the center of the mask. Using some purple Christmas ribbon I fringed and curled it a bit and then added some to each corner to hang down. The sentiment came from a new StampinUp set and after stamping I added a bit more ribbon and one feather to this before gluing it to the card front. Initially I made a harlequin background with a stencil, but hated the result so I did some more research trying to find one I liked which was unsuccessful. After thinking a bit, I remembered I had some lovely paper that had some golds in it so this became my background layer. I even added some feathers to the inside of the card. I know I shouldn’t say this, but I love the result for this card and my hubby was impressed.

Happy Spring

Challenge #270 – Spring is in the Air

One of my previous posts used the floating technique and I was left with the negative part. After adding some foam strips to the back of this piece (more floating) I adhered it to the black background. In my recent sort out of older items I came across the daffodil. In Canada the Cancer society does a fund raiser using these daffodil pins, similar to the poppy campaign, and I guess I put this one away and then forgot about it. I decided to use it here and added some other scrap die cuts to denote leaves. I played around with the piece on the card front and liked it best as you see it even though it wasn’t a perfect square shape. I trimmed off the over hanging edges. The sentiment comes from an old GKD set and I stamped it on a smaller star so it could be placed in the corner. Taking some dark green gems I added a few scattered about and this is the result. I quite like it, always a bonus when that happens.

Green and Gold Floating Star

Color Hues-Special Double Challenge

Having already entered a card for the other part of the challenge I decided to have a go at the green and gold part. I used up some scraps of PP and added them to some acetate (found it finally). Then I cut it using an infinity Star die set from Hero Arts. The stitched panel was a piece leftover from another project and the star seemed to look nice on it so I added it after stamping the sentiment. I then added the panel to the Green Card front. Taking one of the leftover strips I added it across the bottom of the card front. It still needed something so I took a small die from Crafters Companion and die cut the circle. Using another scrap piece of gold and a teal piece I die cut the leaf and paper pieced the teal into the gold, then I added it to the star. I really like the floating element and shall be doing more with this technique.

Otterly Awesome

Challenge #460 – Sketch

This stamp set and PP were reward gifts for my recent order at StampinUP. I thought the otters were so cute and I really like the marble paper too. After I stamped the otter I coloured him using Inktense pencils and Sakura Glaze pens then I fussy cut him out. I think my card front is from SSS. Using an edge shape die from Avery Elle I die cut the two panels and glued them to the PP so it showed through the gap. I stamped the sentiment and then added the otter using some foam tape to give some dimension. Its a simple card but looks good and after adding a few Studio Katia bubbles I was happy with it.

Spring Pocket

Something With POCKETS Challenge & ANYTHING GOES  SPRING

Having found a pocket template online I proceeded to size, print and cut out before I stamped any design to it. My stamps and die came from a new StampinUp set I’ve just acquired called Daffodil Daydream and also another one that was a gift called Friendly Hello. I stamped the design across the pocket so it would look like decorative stitching and added a flower underneath. Using a pen and ruler I added the faux stitching to the edges. Using the Easter sentiment from the set I stamped and fussy cut it and added it above the fancy stitching. Then I added foam tape to the back for dimension. After stamping the daffodil using the kissing technique and Tombow markers I added a bit of water to move the colour around a bit. I also added a small amount of Sakura Glaze here and there. Once it was dry I die cut it. Using an Essentials mixed edge layering basics set I cut a frame from DSP and added it to card front and then I added the daffodil. The pocket was added last, after which I added a few Studio Katja gems in various sizes. As it seems to fit both challenges I am entering it to them.

3D Christmas Tree


Peace On Earth Challenge #11

This card was inspired by the wreath, and the gold puppies. The products used are a mix from StampinUp (glitter background and sentiment) a Martha Stewart punch, ribbon from GKD and embellishments from my stash. I had seen something like this on Pinterest and liked the idea so this is my version. I used the punch to cut many sprigs in both white and gold and I glued them into a tree shape. Added a white curved piece to look like snow and to ground the tree. Not sure how this will mail so most likely I will hand deliver it to someone close by when the time comes. It was a bit time consuming to make, but very easy and the result is worth the effort.

Funky Design

Global Design Project #332 | Case the Designer & Color Hues-Special Double Challenge

This card almost got tossed as I was so unhappy with it. I don’t know why I found the CASE so challenging but I did. After I had gotten so far with it I decided to finish it and post, even though it isn’t one of my best cards. Hubby said he thought it looked funky, and while he agreed I’ve done better, he still thought it was okay. Products used are a cover plate die that I’ve had forever but have no idea the brand, some new scripty dies from Amazon that are unbranded, embossing folder from Darice called Swirly vines and a little bow from my stash. As the colours seem to work for the new Color Hues challenge as well as Global am adding it to both. I didn’t want the full die cut so I cut it in half but it does leave some jagged edges. I thought using a small strip of blue along the worst edges would help and then I added the yellow die cuts on top and beside it. As I said it isn’t a terrible effort, but it certainly isn’t the best card I’ve made.

G’Day Mate

Game #209: 1/9th + Favourite Animal

Due to construction going on in the house right now, I didn’t think I would be able to do much creating this week. However when the old countertops were removed yesterday we found some hidden issues and before we can continue they have to be dealt with. What was supposed to be 3-4 days without a kitchen will now, likely be at least 3-4 weeks. What a pain, and we have to figure out how we shall manage that long without a functioning kitchen. Such is life and the trials and tribulations of doing any kind of renovation.

So here we are – I managed to play a bit this morning and have made a card for the AAA challenge. Using only 1/9th of the card isn’t easy, but I managed it. My favorite animal is actually an elephant, but I don’t have any stamps small enough that I could use. My hubby is an Aussie and I nicknamed him Kangaroo, but again those stamps are a bit big so I chose a Koala bear instead. And anyway, my true favorite animal is my hubby, so representing him with any Aussie image works. haha. Initially I tried to stencil the background over the masked stamped image but I didn’t like it so instead just sponged some colour for the sky using speckled egg and scattered straw inks. I still didn’t really like it as I couldn’t get close enough to the stamped image to prevent ugly edges, then I had the bright idea to die cut the image out of a subtle patterned scrap of CS. This worked and I liked it much better. I added the sentiment at close to the same angle as the image. Stamp set is from a Hero Arts kit.

Feathers are Reminders …

PP580 – A Sketch Challenge from Anne Marie

The stamp set used here is one I’ve had for a while but only used one image from. The DSP is from StampinUp and reminded me of feathers and this stamp set from GKD, so here is my entry for the sketch challenge at Paper Players. There are times when covering up something as pretty as this paper seems like a crime so the sketch allowed me to use it and let it shine at the same time. The additional pp is from my stash and is a piece of mulberry paper. After stamping the Titmouse I looked it up on Google as I couldn’t remember what colours it should be. Some showed a beige brown and some showed a blue gray so I went with the blue gray. I Used a combination of pencils from both Inktense and Prisma to get the tone of how I wanted it to look. As well, I used some Sakura Glaze to highlight the blacks in the feathers. I cut several layers of the bird and glued them together for dimension and stability. Then using an MFT die that came with a stamp set I cut the sentiment and added a small navy bow to one end. The card base is a gray from GKD and I’m happy with the result.

More Daffodils

Just Us Girls Challenge #621 – Photo Week

This DSP from StampinUp reminds me of a painting my sister did when in Art College and I just had to use it. Pussy willow is such a lovely sign of spring too. Anyway I die cut the small frame in silver using a new unbranded set I’ve just received. I didn’t want to cover up the DSP although in retrospect I probably should have added a white panel underneath the frame. Using an Easter stamp set by Claire Brennan/GKD I stamped the daffodils and fussy cut them. I used Sakura glaze pens exclusively to colour in the image. Once it was added to the card front I added a few bees and one butterfly all from the same set and coloured them too. The sentiment was added to the circle along with the bees and I added some sparkle to it using a glitter pen. I went round the edge of the circle with a yellow Spectrum Noir pen before adding to card. This is a 2nd entry into the JUGs challenge. I’m not sure if some embellishments should be added so for now am leaving as is.