Pear Tree

For the Double D challenge I created this card …

Twelve Days of Christmas Part 1 Days 1-6


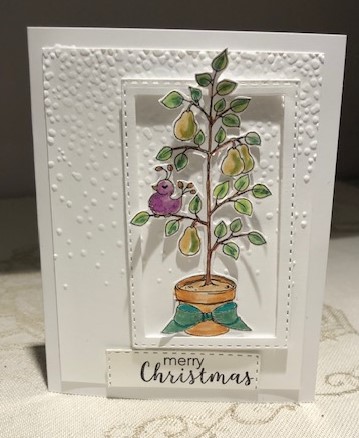
I found a free digi stamp here – https://beccysplace.blogspot.com/2010/11/partridge-in-pear-tree.html . Printed and fussy cut it out before I painted it. Using mostly my shimmery water colours I coloured in the image. I did use a few copics here and there to get more definition. Using a Sissix EB folder I made a panel with snow falling and added to front. I then cut out the frame with an unbranded rectangle set and popped it up with foam tape. Added the sentiment at the bottom. Added the fussy cut image inside the frame with some of it popping out at the top. Hubby brought me a glass of sherry with the consequence that the frame is slightly crooked. Remind me not to drink when crafting – lol.

Musical

CAS Colours and Sketches has a new challenge and although I thought I was done with making Christmas cards I realized that I could make a few as a gift set for a friend so this is part of what I did.

Challenge #350

I started with the corrugated card front in one of the stated colours or as close to it as I can get. I then took a cherry red cs and tore the edges over which I adhered the stamped music piece. Stamp is a very old wooden block and I have no idea of the brand. Using some foam metallic gold glitter I die cut the snowflake and adhered to the front. Die is from Gina K. I quite like how it turned out.

Heart Happiness

This weeks Global Design challenge is a sketch and the following is what I came up with …

Project 218 | Sketch Challenge

One of my stamping buddies gifted me with a lovely scrapbooking package earlier this year and the pp in the card came from that package. I just love this type of pp, but hate covering it up so in an effort to keep as much visible as possible I used vellum for the center pieces. I also used a left over strip of cream to go behind the heart die cuts. Using a stitched heart die set I cut the two bigger hearts and attached them as shown. I then cut 4 of the small ones in a gold cs to pop up on top. The gold cs matches the gold in the pp. The sentiment strip is from the same gifted package. I am so blessed in my on line friendships.

Winter White

I really didn’t intend to make another Christmas card but I came across this particular challenge and simply had to enter it.

Challenge #134

Funnily enough I actually had the snowglobe die on my desk because I thought I might use it these past few weeks and then didn’t. It is called Winter Fun and is by Precious Marieke. I decided to make it into a shaped card and played around until I got a good cut with top fold. Using the inner circle die that comes with it I also cut another piece which I had dry embossed with a Sissix Snowfall Speckles folder. Then I die cut the houses using a Cottage Cutz die. It was a little too long so I snipped off the last house and snowman. I added tiny pieces of foam to the back of the houses and adhered them to the card front. I also added the tiny snowman to the middle of the circle as he was too cute to waste. Using a sentiment die for which I cannot find the name but think is from Sissix, I die cut the words twice. Once in plain white and then again in a Lawn Fawn cs called Pixie Dust. I added the two together to the card front. It still needed something so I used a small amount of a HeroArts glitter lacquer on the roofs of the houses. The glitter doesn’t photograph but it sure adds something special to the look. My hubby was impressed – lol.

Snowman

I made a series of this card for a special group of people in my life. Hadn’t yet uploaded any so here is one of them …

PP470 – A Theme Challenge

After choosing the image I wished to use and also the card stock I proceeded to make the background paper. This is my version of a card I saw on Pinterest – and from this person – https://lisasstampstudio.com/2019/10/handmade-christmas-card-with-some-delightful-techniques.html . I decided it would be fun to try her idea and technique. In her technique, for the cream coloured background I am using, she used a mix of glue and water to create spatters to which she added EB powder and heat set. I tried it but wasn’t happy – I even hand drew a few lines and swirls with the glue but for me the effect wasn’t enough. In the end I looked in my stash to find an old bottle of embossing fluid that I’ve had forever. I dipped a brush into this and spattered it all over the cs. Then I added my favourite EB powder Cosmic Shimmer and heat set the lot. Now I was happy. I actually did this on a full 81/2″ by 11″ sheet so I could cut it up and make multiple cards. Worked perfectly. I had strips of glitter cs left over so I decided to use them as shown and I also cut up some strips of the green to make things match. In later versions I used washi tape for the strips as it was faster and easier. I added the strips as per instructions on video and also added the sentiment panel I had pre-cut and heat embossed. After die cutting the snowman – a GKD stamp – which I had coloured using some Pigma markers I added him on the side. You can’t see the shimmer in the background but in reality the entire cream panel glows.

Colour and a Sketch

Last card for today and done in a hurry too. Probably not the best way to work but I managed to get something I like. Done for the Global Design and Paper Players challenge so I did a twofer.

Color Challenge
PP469 – A Sketch Challenge

I used a border punch in the pink and laid another border in green over the top. I then stamped the chair image on a separate piece and using Prisma Colour Pencils gave it some colour. Stamp set from Hero Arts and used matching die to cut out image. Used as close as possible to the colour challenge I could get. Added a small bow and some bling for added definition. Stamped sentiment and went over it with some silver. This should be my final Christmas card for the year. I hope so anyway.

Packages

For the challenge at CAS Colours & Sketches I made this card. Didn’t think I would have time to enter but managed to get this one done late this afternoon.

Challenge #349 – Sketch

Using a small stamp from my new Hero Arts kit I stamped the packages randomly on the card front. I then coloured them with a combination of Prisma Pencils and Pigma brush pens. For a bit of sparkle I added some Sakura gelly roll to one or two and also some wink of stella. Sparkle doesn’t show in the photo. Sentiment is from a 12 X 12 paper that coordinated with some cards I made at a local class a few weeks ago. Had to use this last piece so here it is. Card front is a texture card stock.weight.

Cozy

The colours chosen for this weeks As you see it challenge were so pretty I couldn’t resist trying to make a card using them.

Challenge #214
Challenge #3 – Christmas

As well I decided to try to make the card fit the Perfectly CAS use one third site. These days I am trying more CAS cards so I get better at making them. Using my new Hero Arts stamp kit received during the week, I chose the stocking stamp and stamped it in a line down the side of the card. I also used the sentiment from the same set as it seemed to fit using a stocking.

Matching the colours wasn’t so easy, and initially I tried with distress oxides but couldn’t get the depth of colour I wanted. Then I decided to go over them with my shimmer water colours and that worked perfectly. The colours now pop beautifully and I was happy. I felt the card still needed something and I had the rickrack braid on my desk so decided to use it. It is a slightly darker green but has a glitter to it and to me it was the perfect addition.

Time

This card is for the Global Design Project for this week. I CASED the sketch as suggested and came up with this …

CASE the Designer


In one way it is a CASE of another card as well because I had an image saved on my computer from a long time ago. Starting with the pp I dry embossed it using a Tim Holtz texture fades folder. It was then die cut using a SpellBinder A2 Bracket die. I rounded the corners with a punch. I did the same thing on some black paper so I could create a small border. In the past I have done some Iris folding and had some special papers left over in my stash. One of these strips was perfect for this card so it was glued on to the black background piece and the other bits were popped up on top. Not having any clock faces I went on line and found a free one I could play with. Made it the right size and added the sentiment to the face using CorelDraw. Printed it and used a circle die to cut it out. I went around the edge of the clock face with a gold pen and added a tiny gem to the center. I also added, using my finger a small amount of black soot ink over sections of the dry embossing. Not sure if this was a mistake but too late to fix now. I think this card looks better in RL than on the photo.

Thanks Friend

Had a few minutes to spare so made this card quickly even though I had to fussy cut everything out except for the wreath which was die cut.

Challenge #348 – Colors

Started with the die cut wreath done with a pear coloured vellum. I then stamped all the flowers and leaves from a Lisa Hetrick set in Oxide inks and once cut out placed them where I wanted them. Added the sentiment which is a combination of two different stamps sets. Cut out the little bird and popped him on top.